What is CUDA?
Well, CUDA is both a framework and an architecture for parallel GPU programming. CUDA C++ is an extension of C/C++ for the programming of CUDA-architecture GPUs.
What is CUDA used for? It is applied in many fields and industries. These are some examples from Nvidia.
- Healthcare
- Financial Services
- Aerospace
In particular, we use it in Stwo’s GPU implementation, a Circle STARKs prover for program traces claiming to be the fastest one at the time of writing.
Threads, blocks, and warps
CUDA will act as an interface between the computer’s CPU and the GPU, which it will call host and device, respectively.
To parallelize code, cuda provides the developer with the ability to launch threads. These can initially be thought of as similar to CPU threads.
They will be launched in blocks, groups of a chosen number of threads. Just like we can choose how many threads make a block, we can also set the block to have one, two or three dimensions. Threads in the same block share:
- A memory space apart from the global GPU memory.
- Time of execution.
- Cache (sometimes).

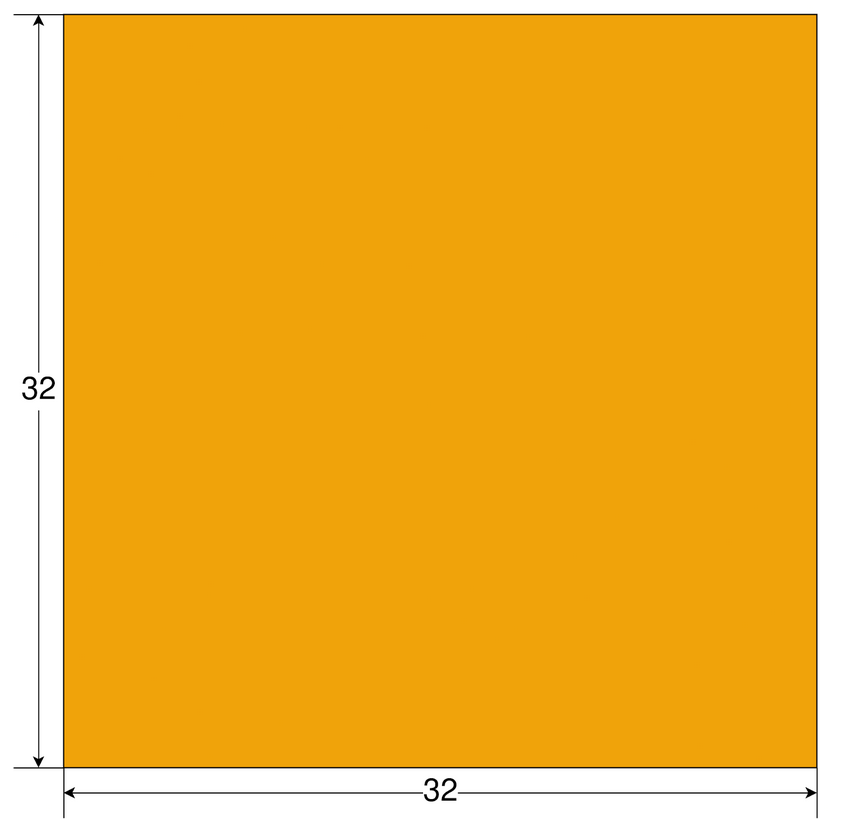
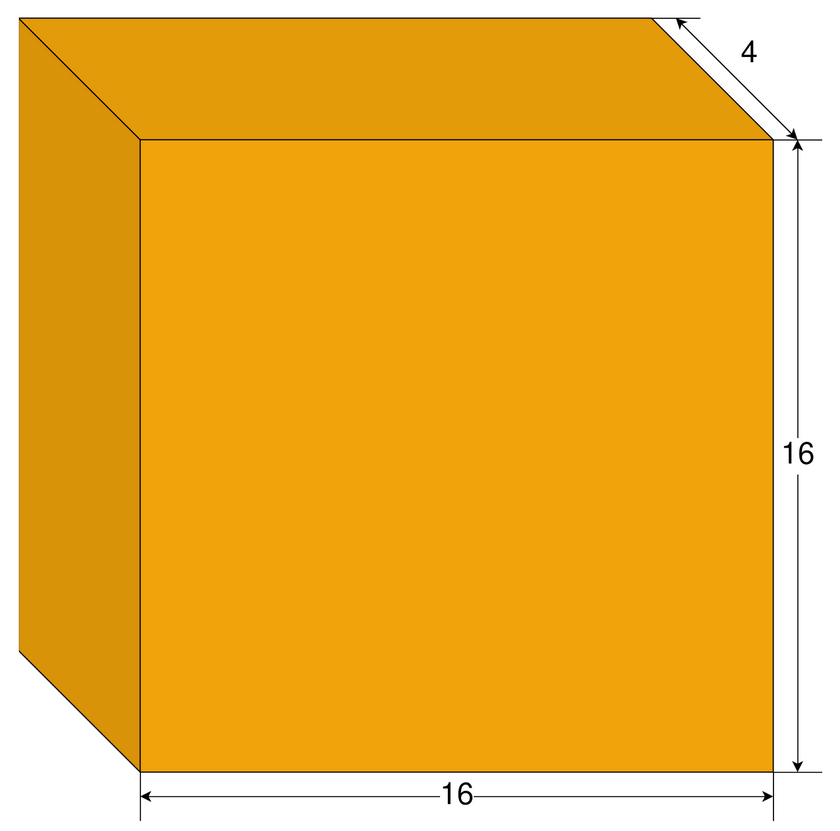
Threads are also grouped in warps. They are smaller than blocks, usually consisting of 32 threads. All threads in a warp share:
- Program counter.
- Register space.
- Time of execution.
- Cache (sometimes).
We can launch a ridiculous number of blocks to run concurrently, forming what we call a grid. However, the GPU will only run a certain number in parallel.

More CUDA parallelization basics
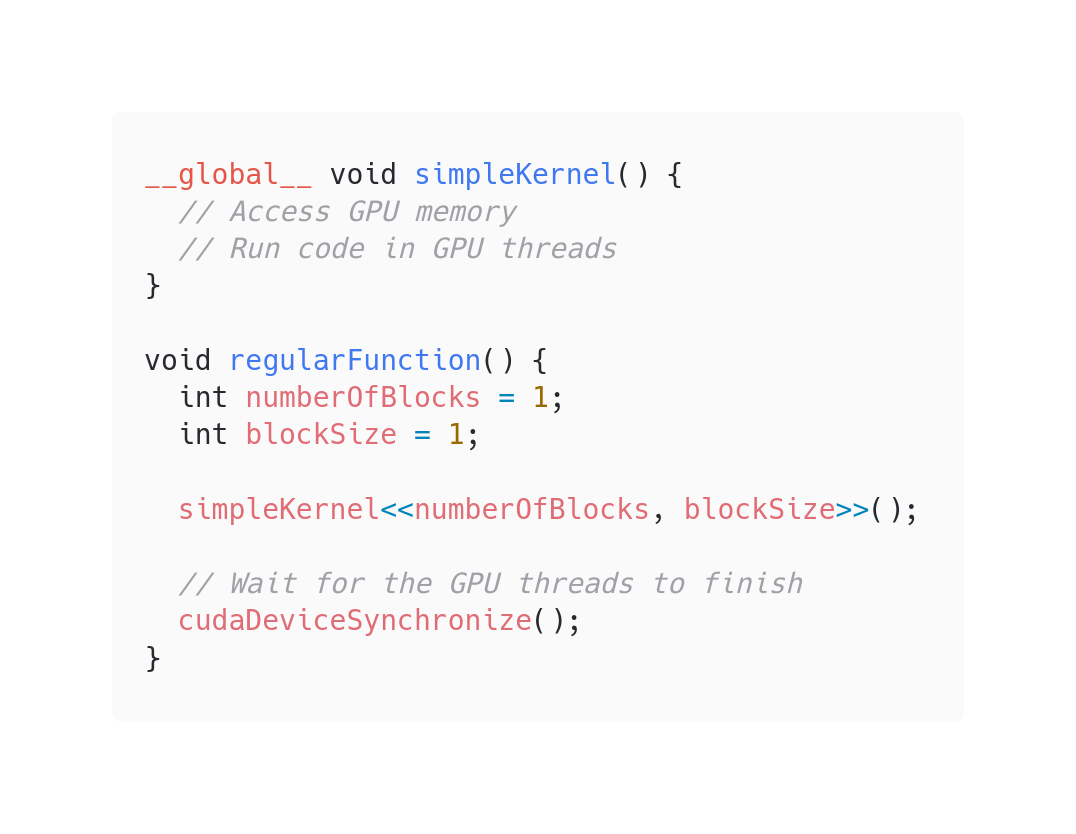
The way to run our code in the GPU is with kernel functions. They are functions that are called from the CPU but run in the GPU. They are asynchronous since we do not want the CPU to wait for the GPU to finish running.
The following is a way of running a simple kernel.
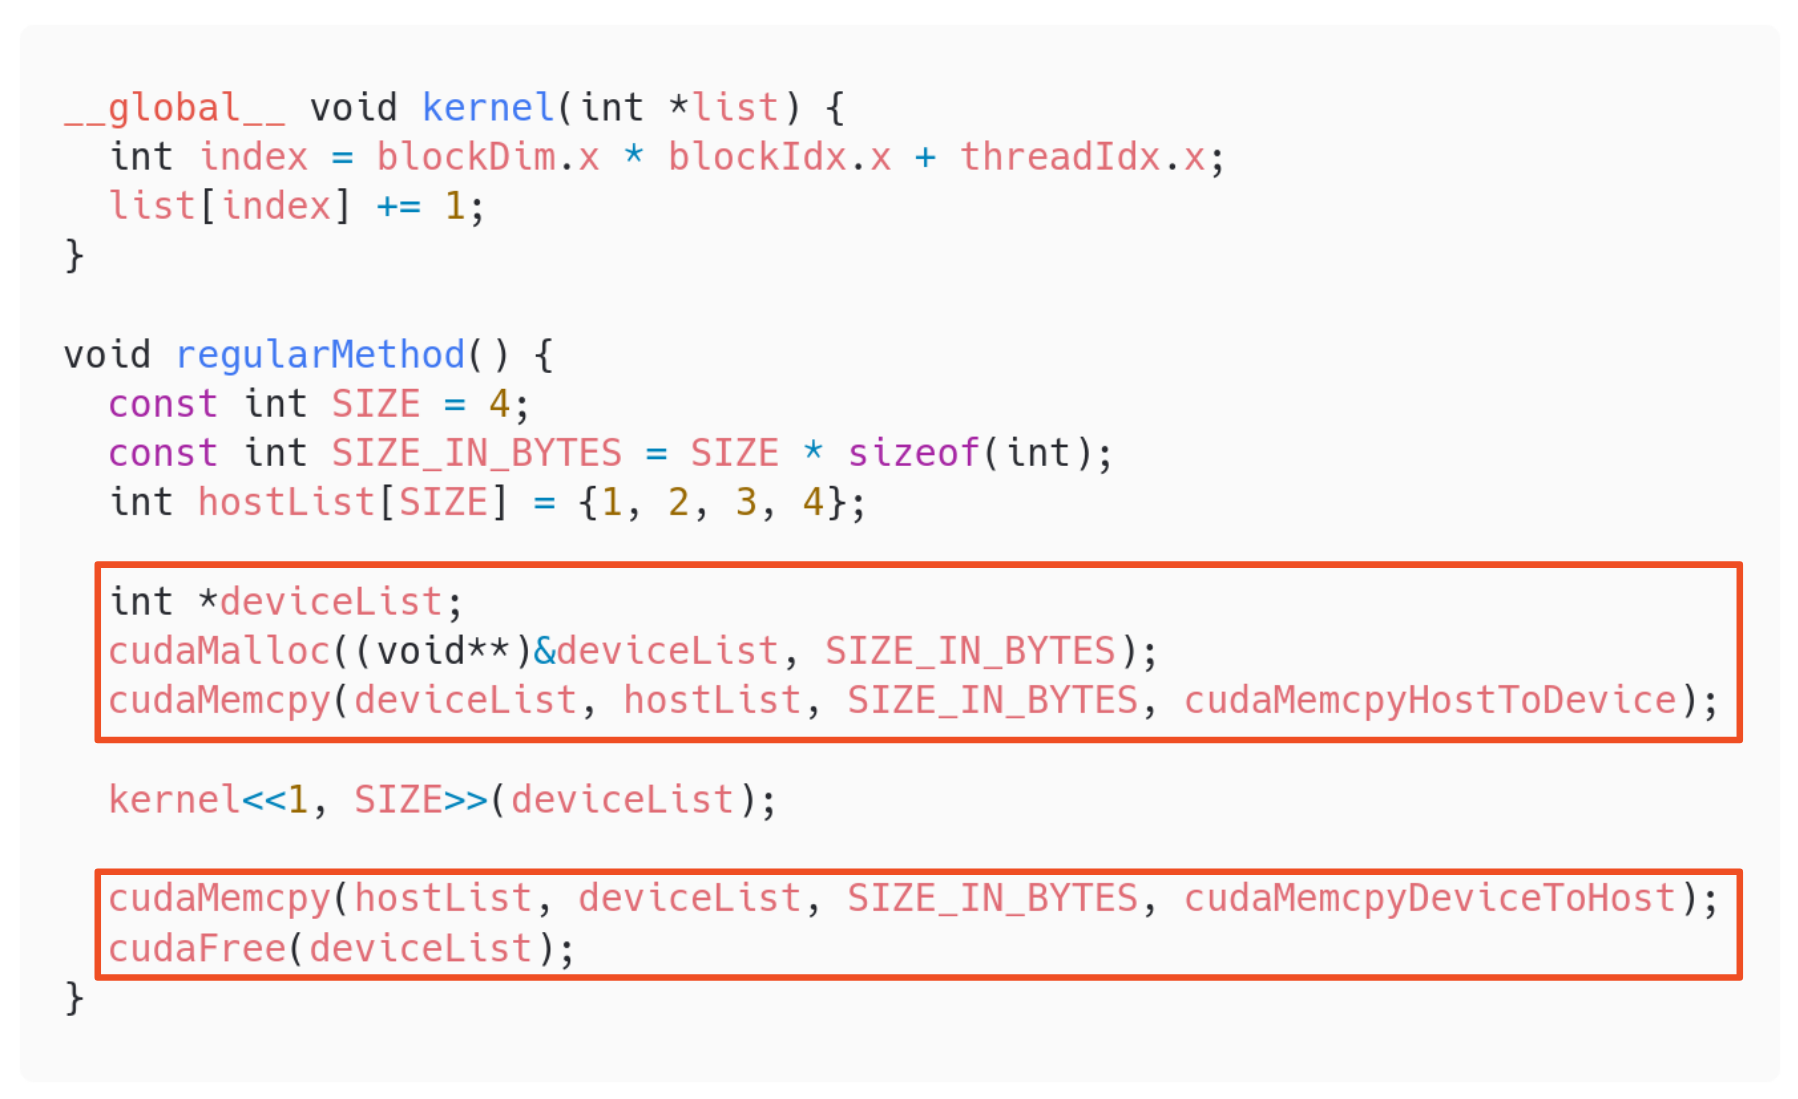
There are several types of memory in the GPU.
- Global memory.
- It is the common memory available in the GPU.
- It must be allocated.
- It is commonly known as VRAM.
- It can only be accessed from methods running in the GPU.
- Its addresses are only valid for the GPU.
- Shared memory.
- It is also available in the GPU.
- It also must be reserved, but only when launching the kernel, and without allocating a specific size.
- It is faster than Global memory, but more limited.
- It is shared between threads in the same block.
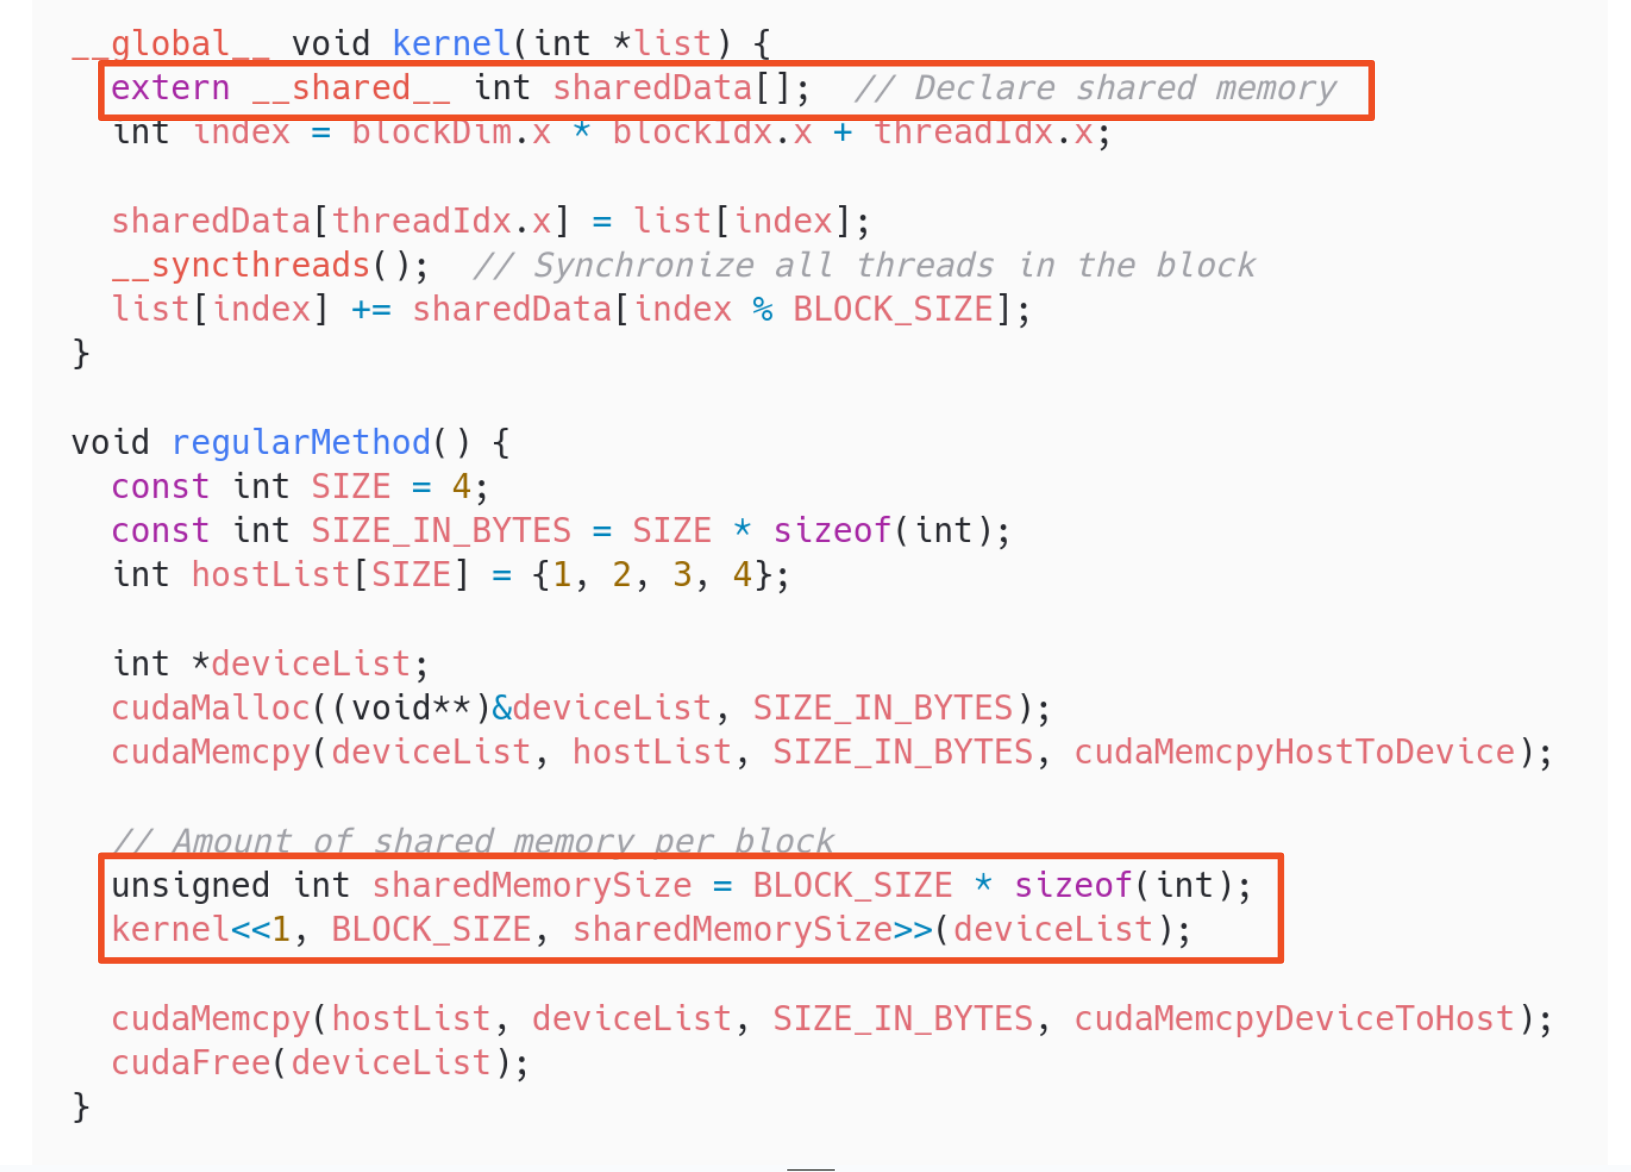
Algorithm to Implement: Array Sum
Introduction
We will use an array sum as the driving example. The idea is to sum all elements in an array and get the result, a single number, as fast as possible. This becomes increasingly interesting as we scale the array to bigger sizes.
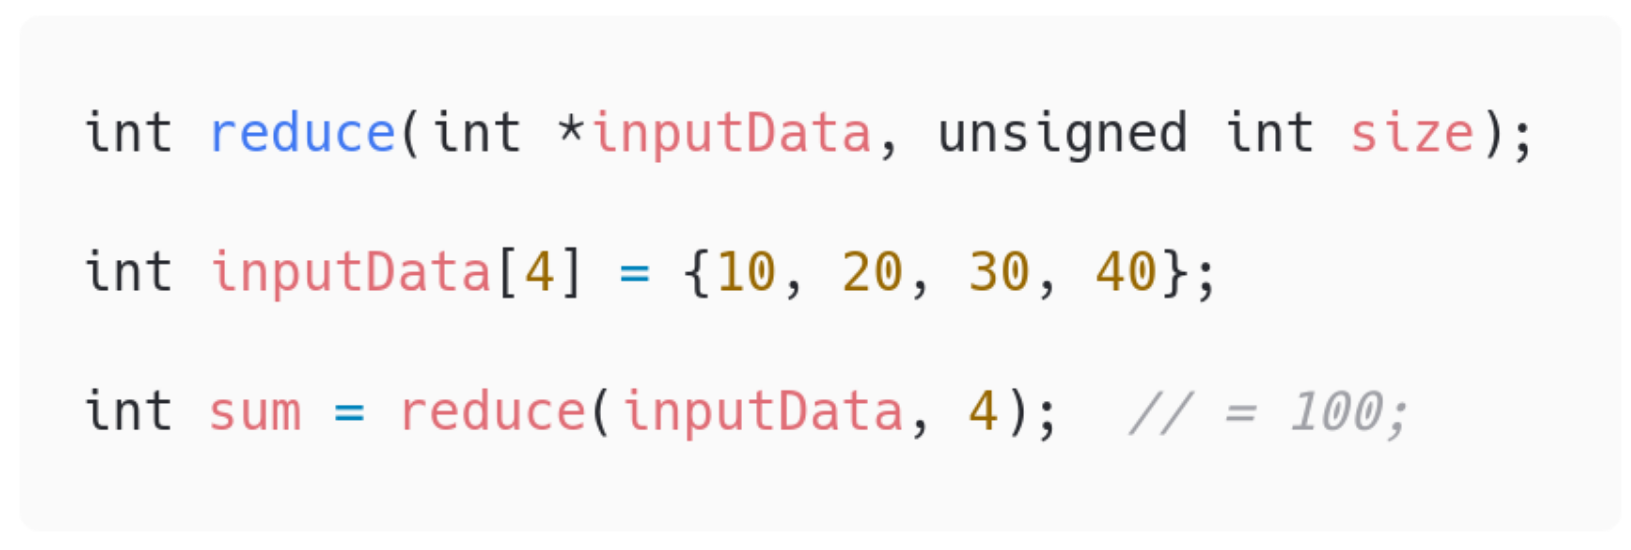
In this repository you can find all the code and benchmarks we talk about here.
Sequential implementation
To start with, this is a sequential version one might choose to implement for the CPU.
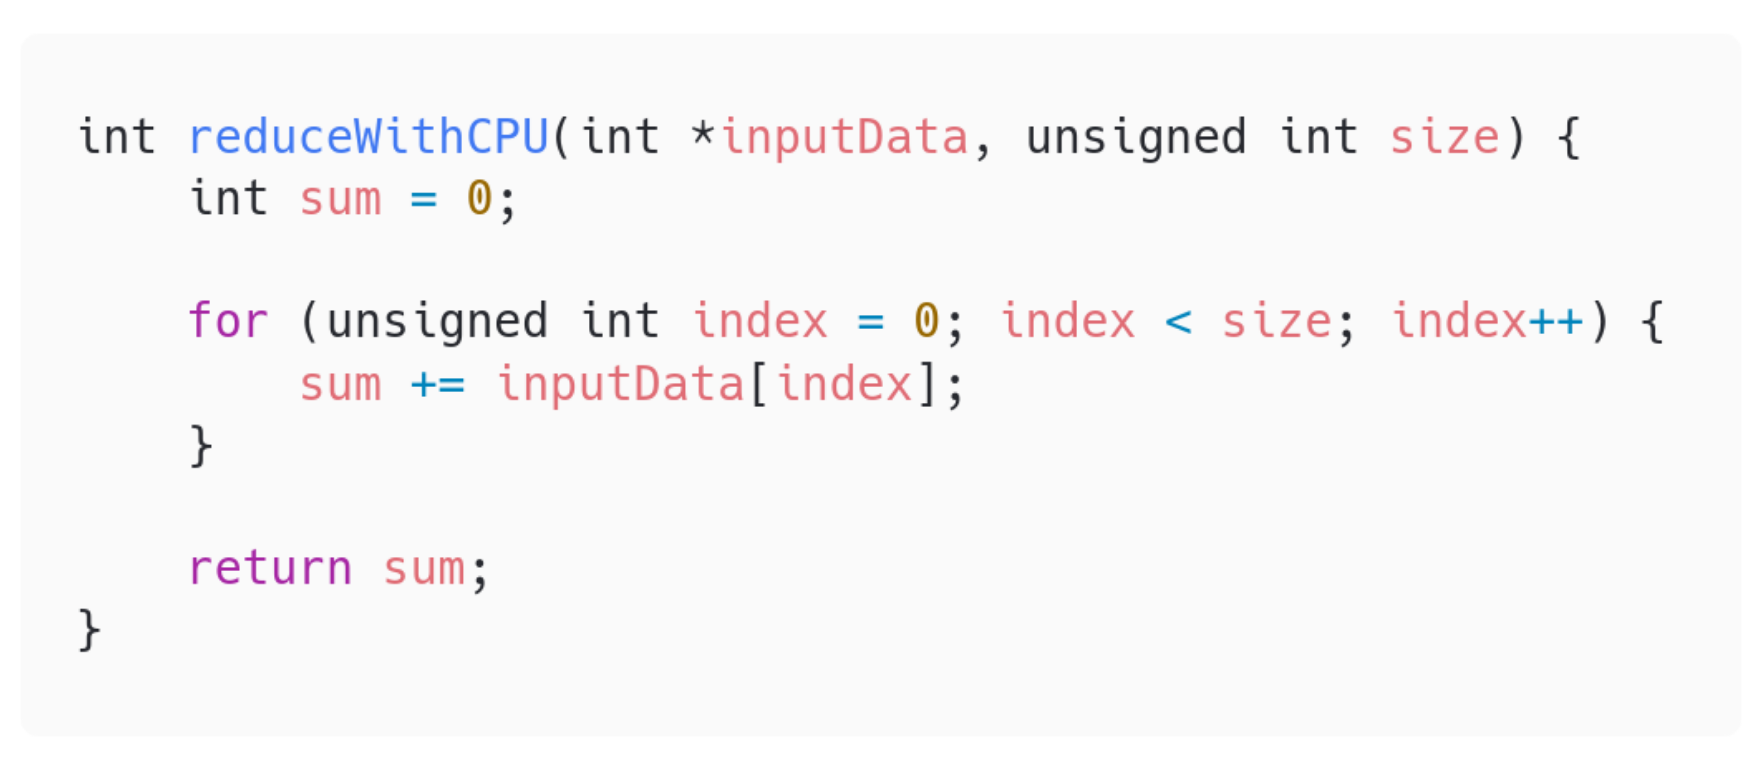
It just goes through the whole array, one by one, in order. As each element is reached, it is summed to the total.
Implementations with CUDA Parallelization
The general idea behind a parallel reduction
How would one parallelize the sum algorithm? Well, there is an idea, a pattern that will be repeated in, at least, most of the implementations we may think of. The idea is named parallel reduction.
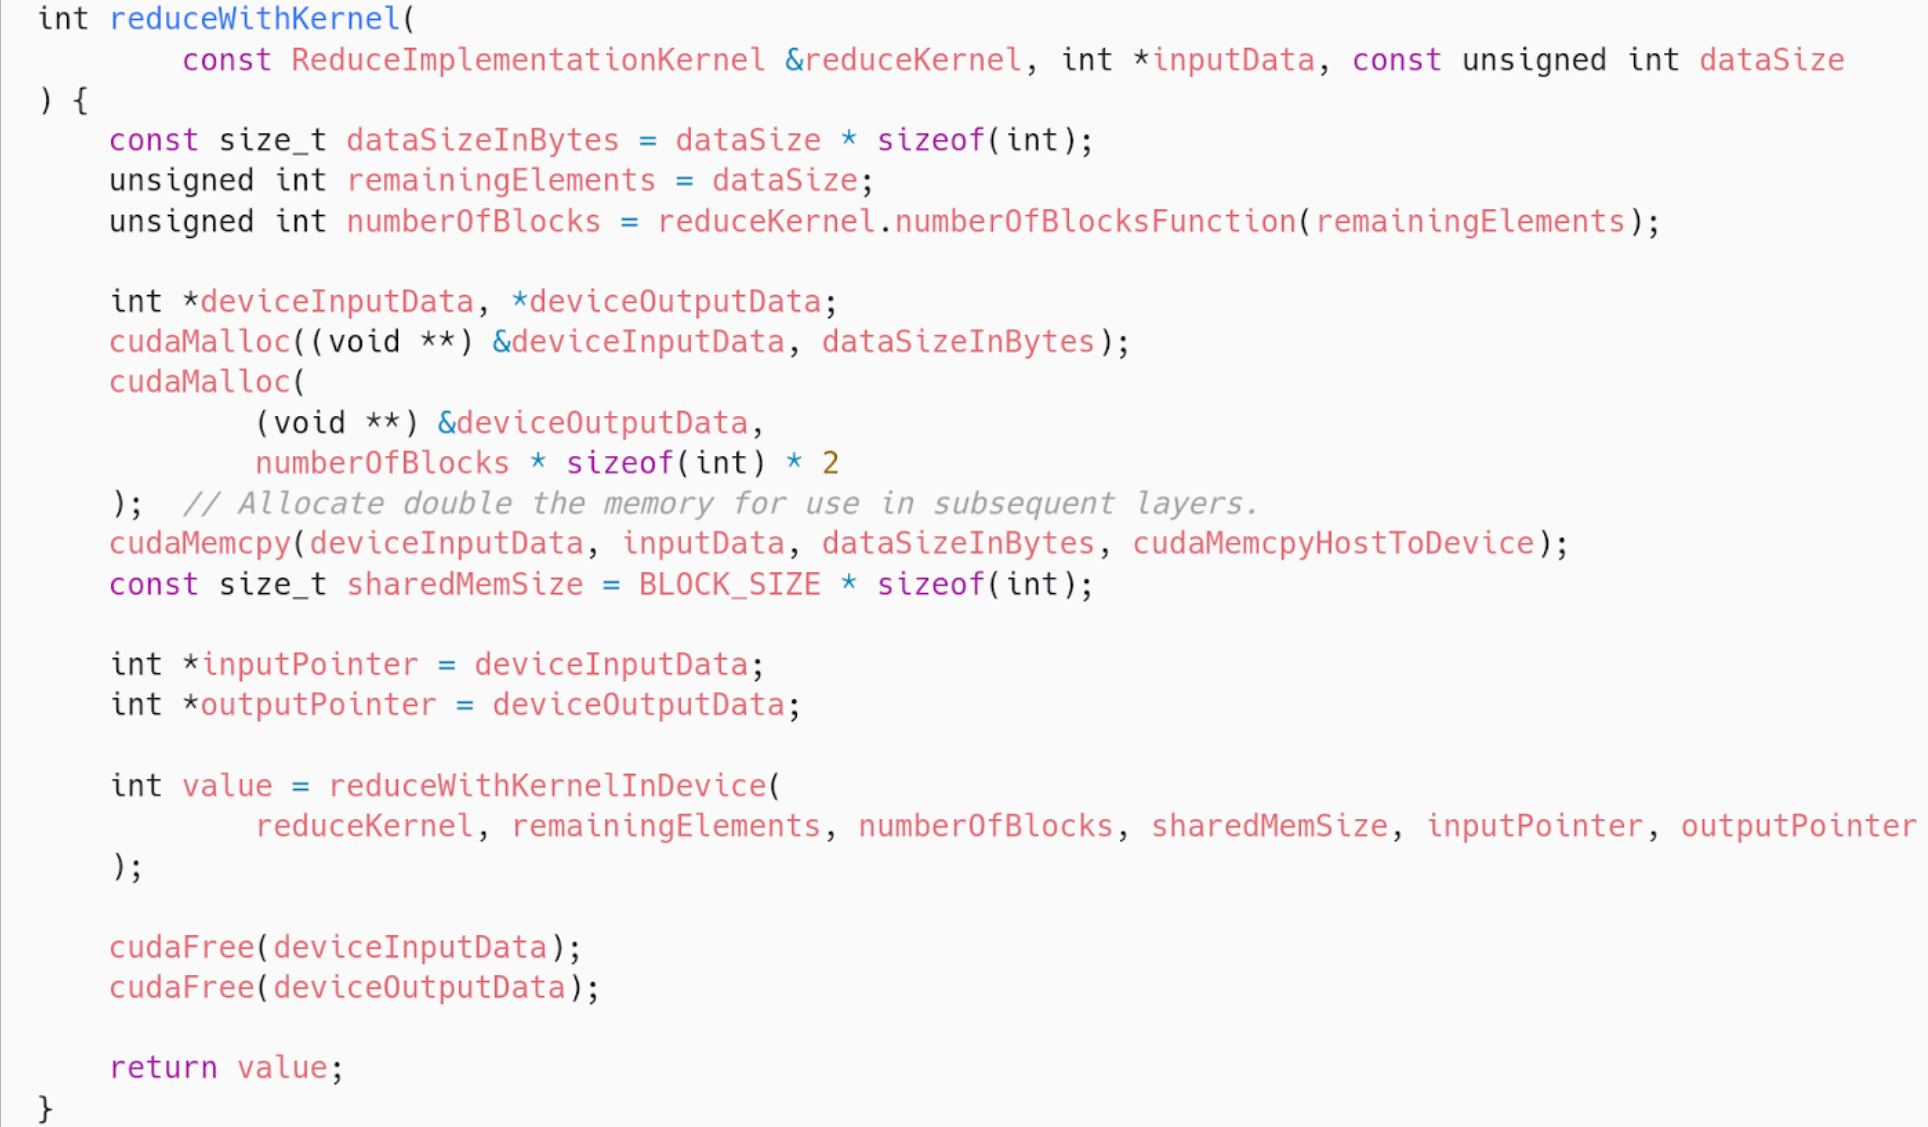
In the following part of the code, we launch a kernel inside a loop. That is the main idea behind parallel reductions. Here is the code without any intention of you understanding it fully yet.
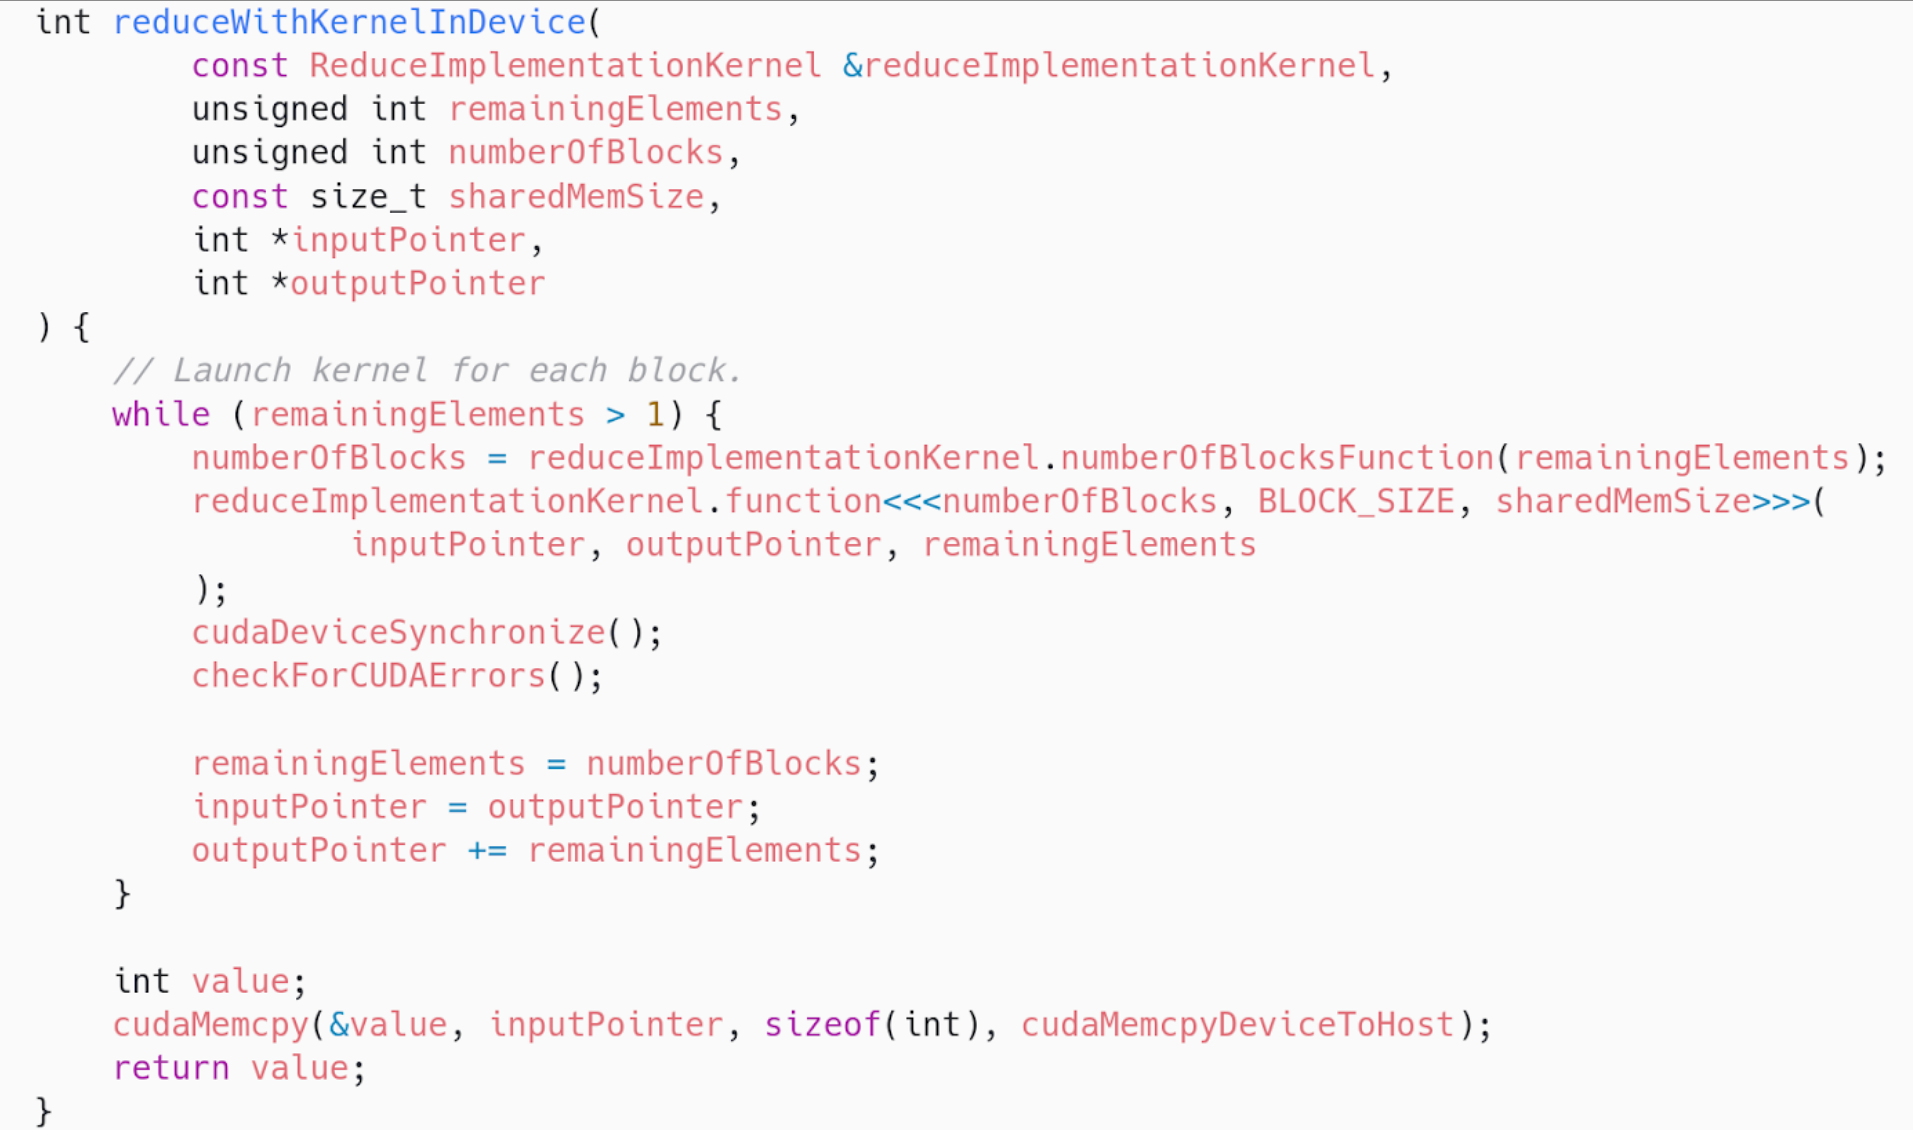
The general idea is to launch as many blocks as we need to cover the array with the number of threads the block has.

Then, each block will somehow reduce the whole chunk that corresponds to it into one single element.
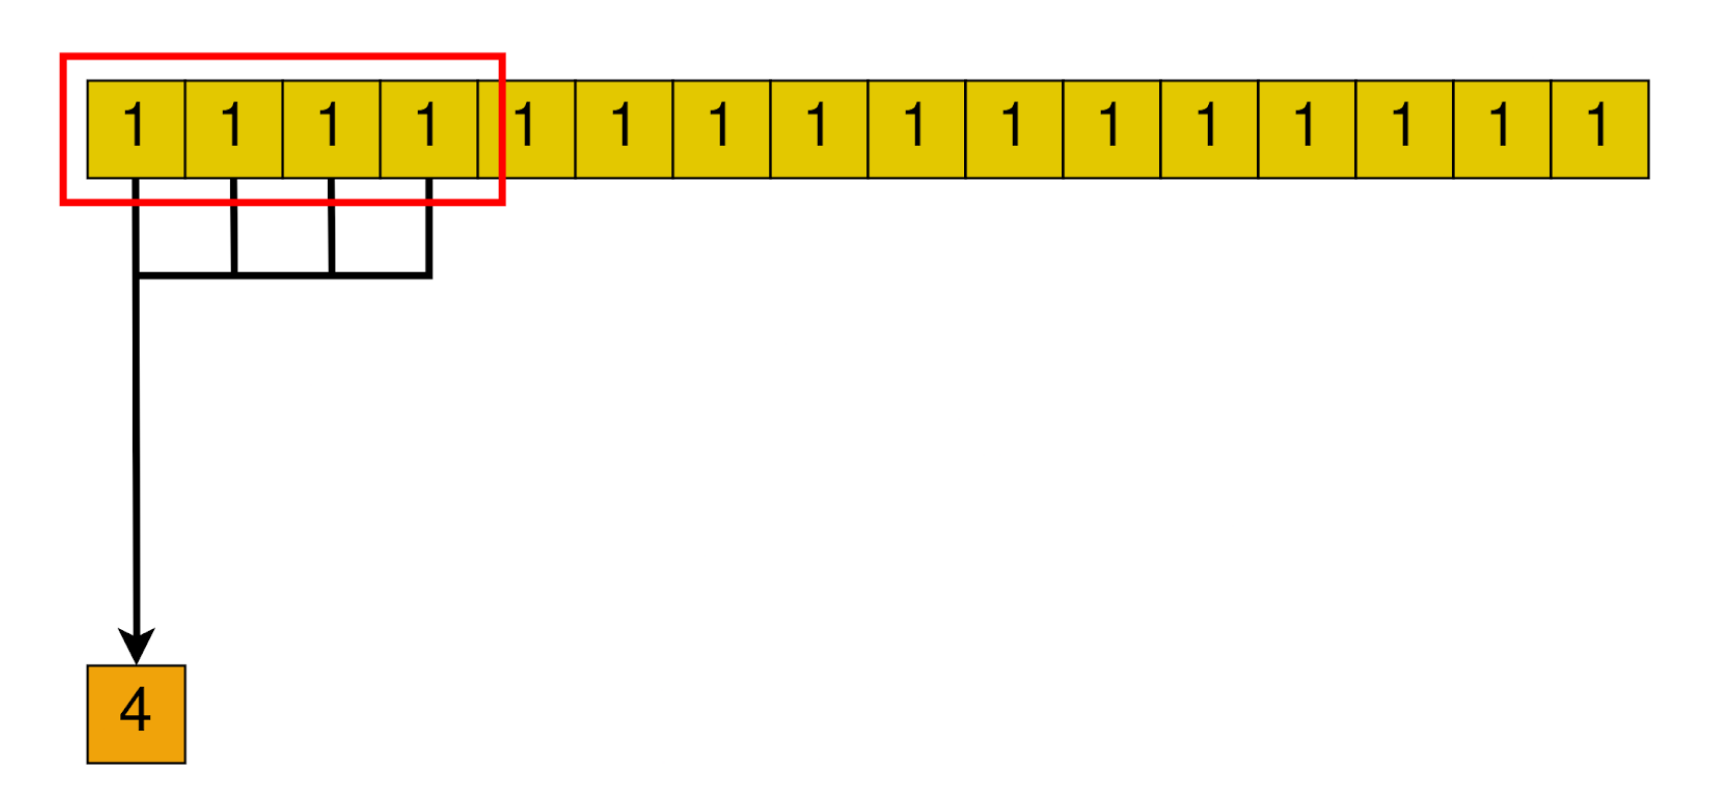
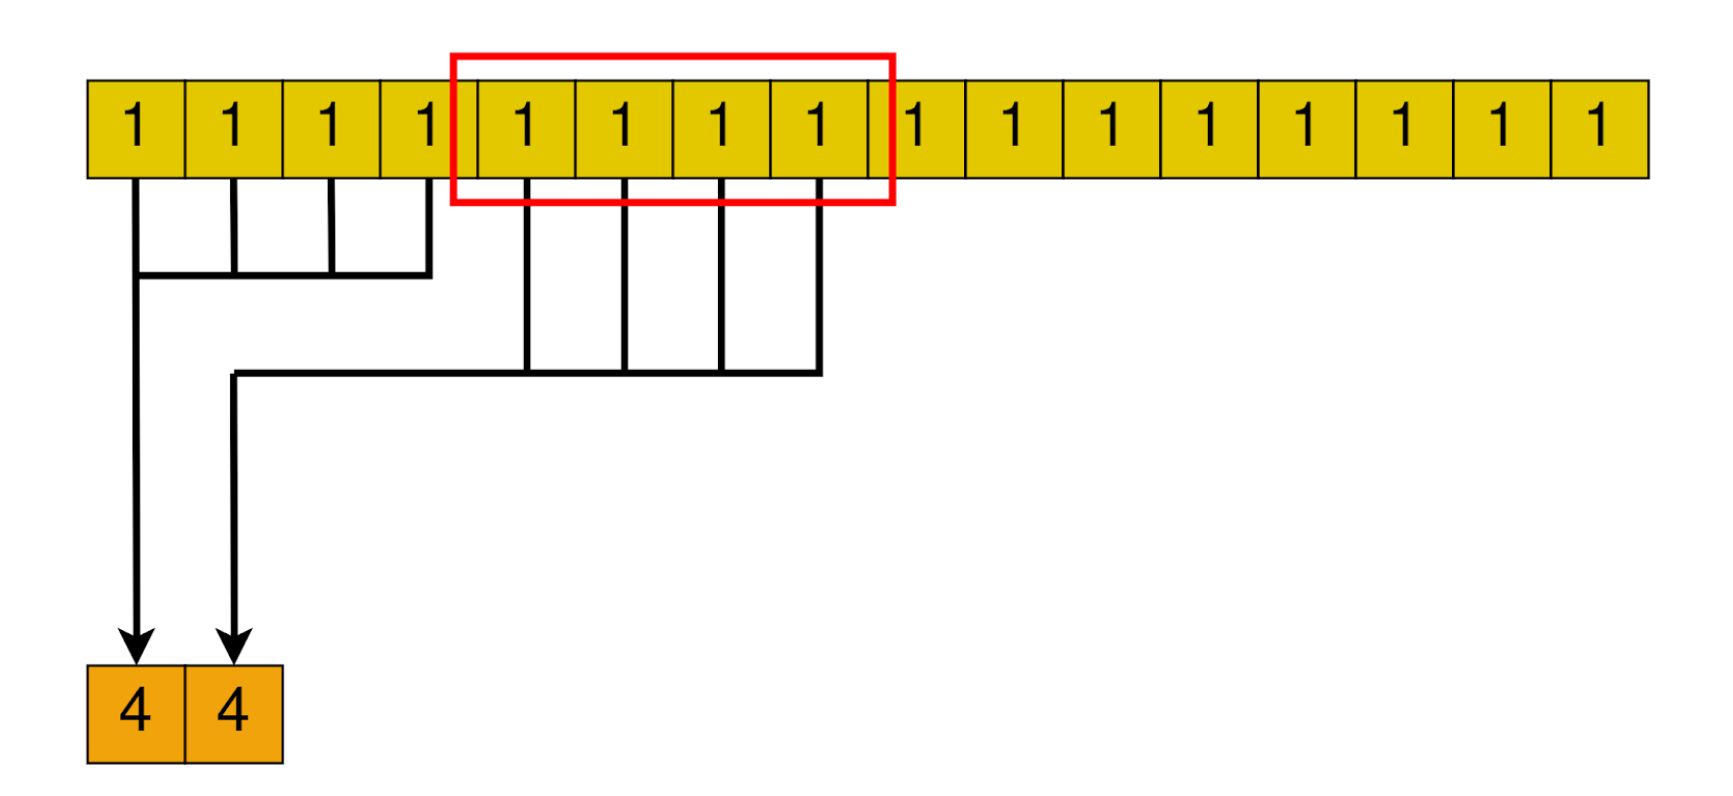
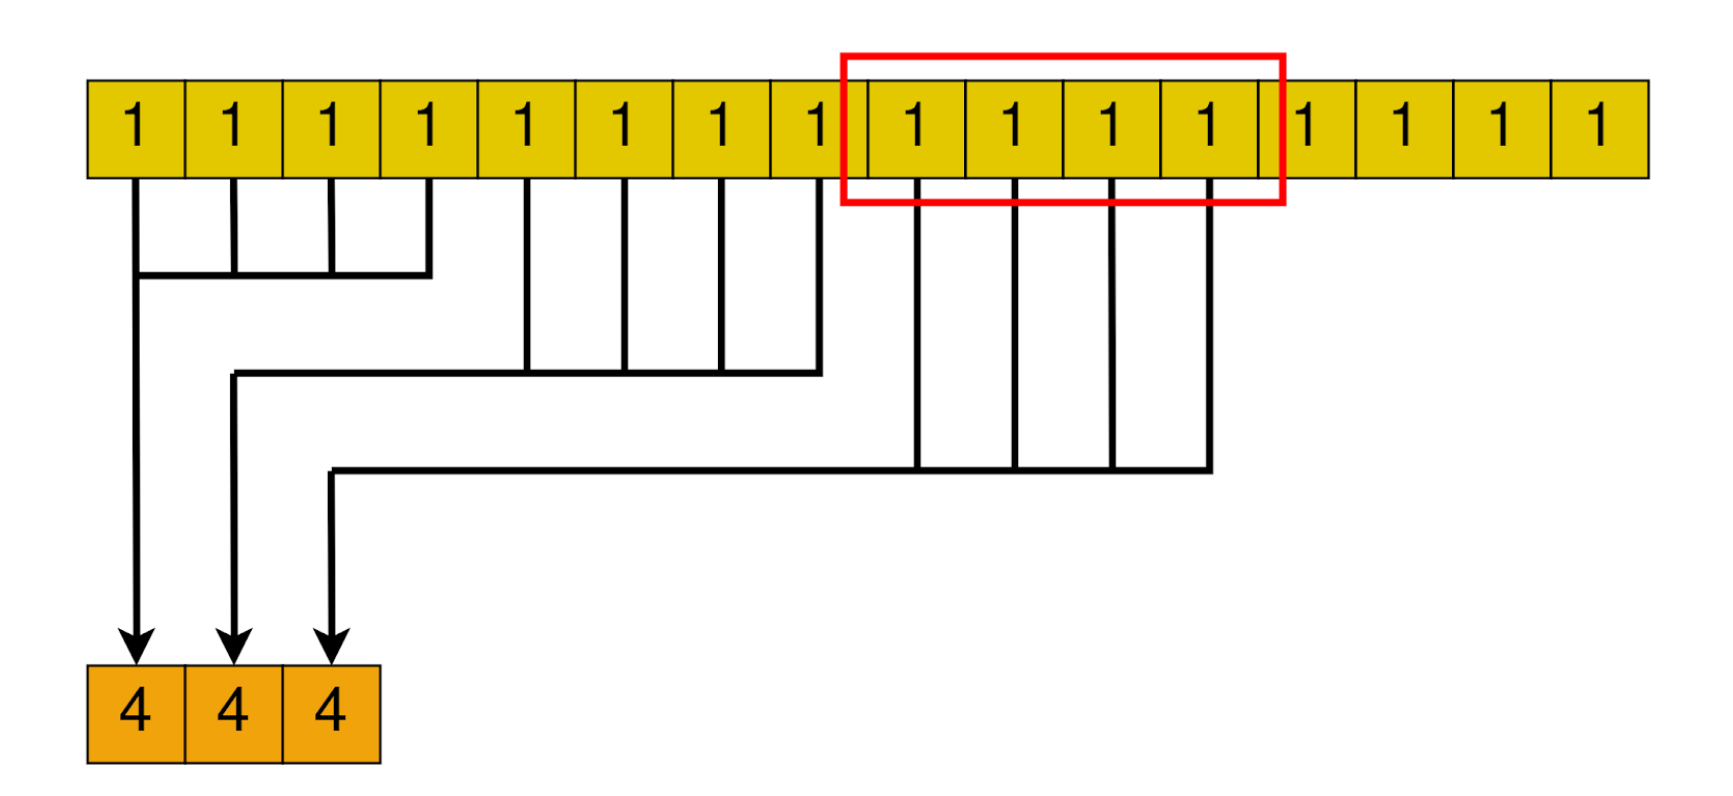
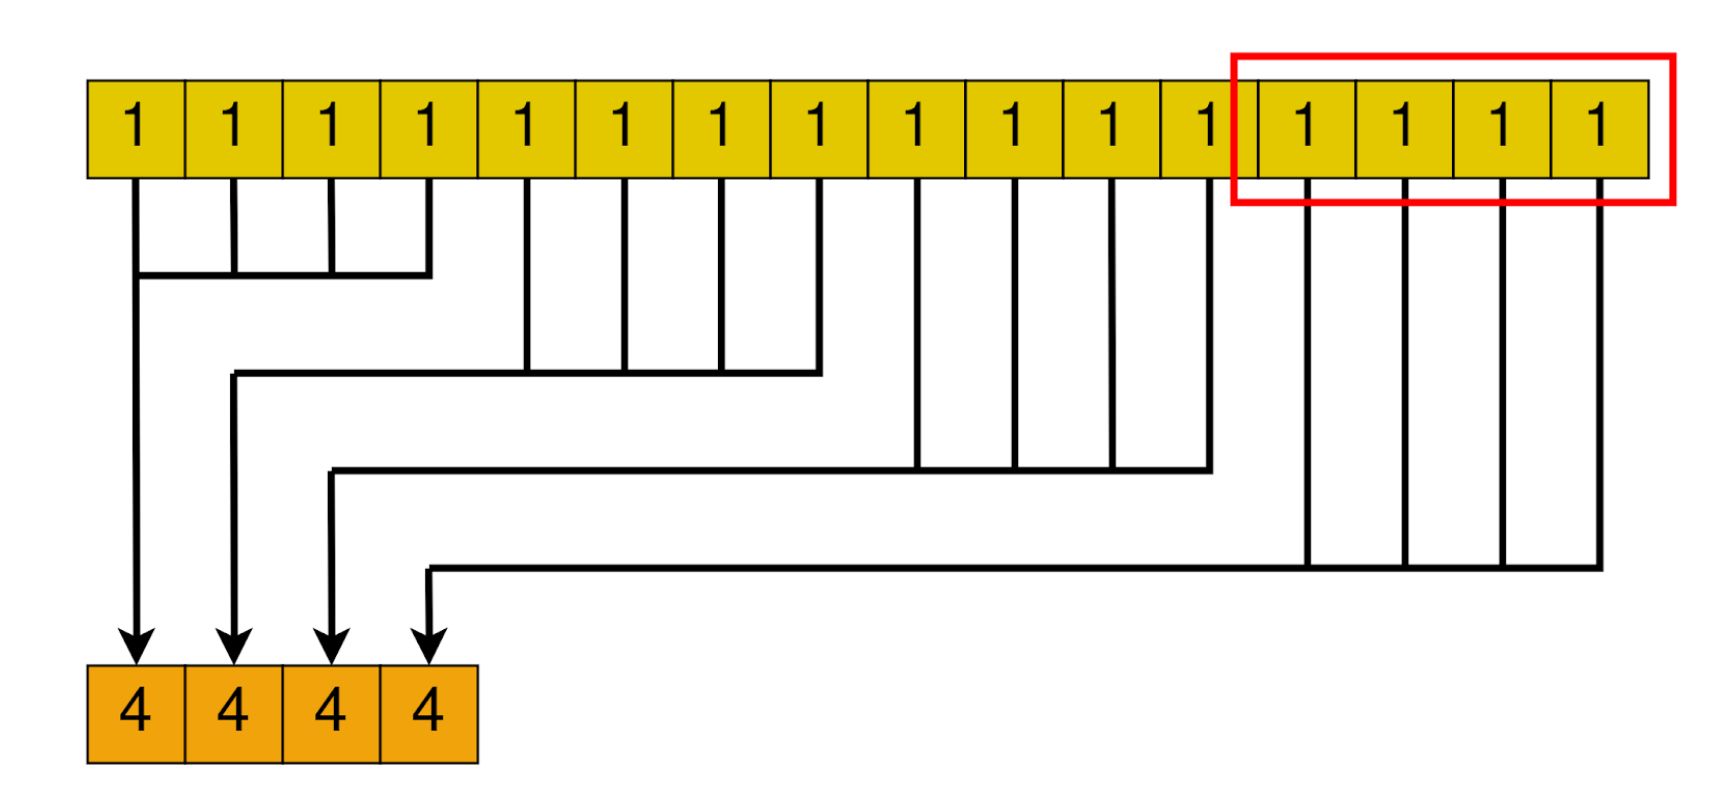
After all blocks are done, we are left with a smaller array, with its size equal to the number of blocks we launched. In the next loop iteration, this smaller array will be handled by a smaller amount of blocks. Until only one block is needed. In that case, that block’s result will be the final result of the algorithm.
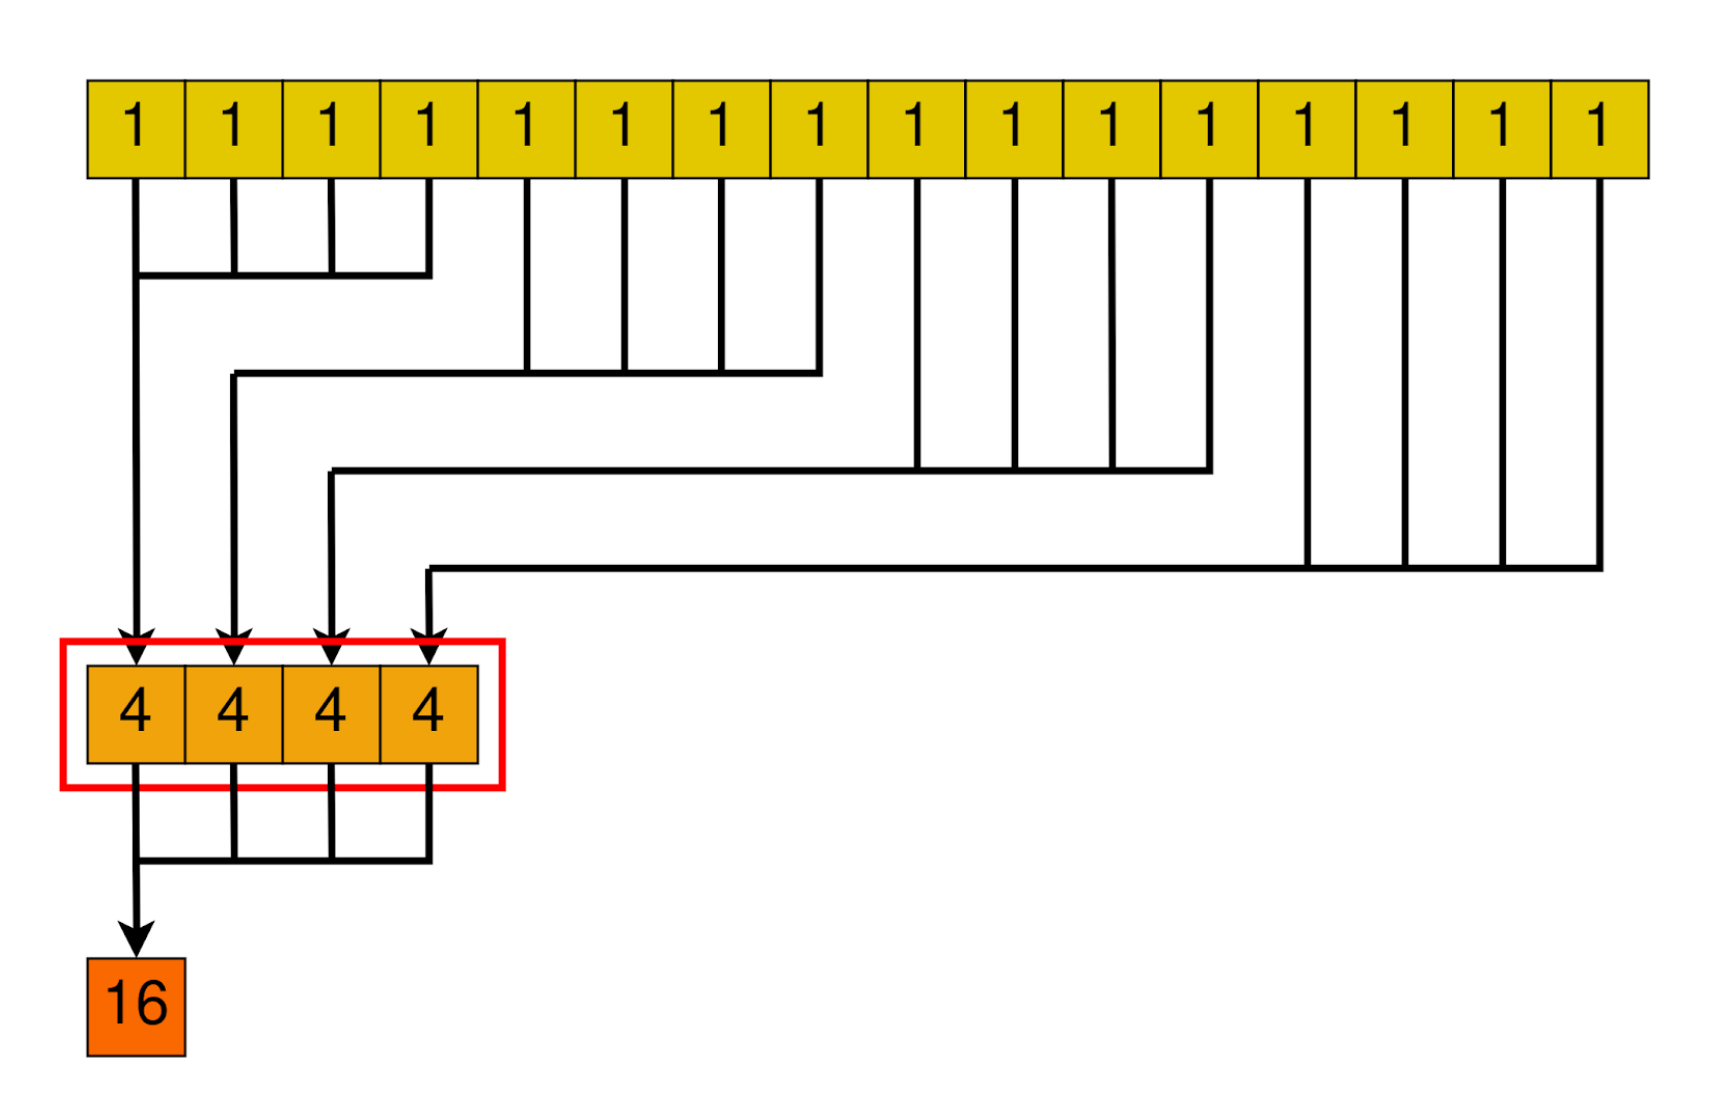
We will show different implementations with this pattern. Each is unique in some way.
- The kernel’s implementation.
- The number of blocks launched (changing because the number of elements covered by a block changes).
- The amount of shared memory reserved.
Implementation 1 - Interleaved addressing
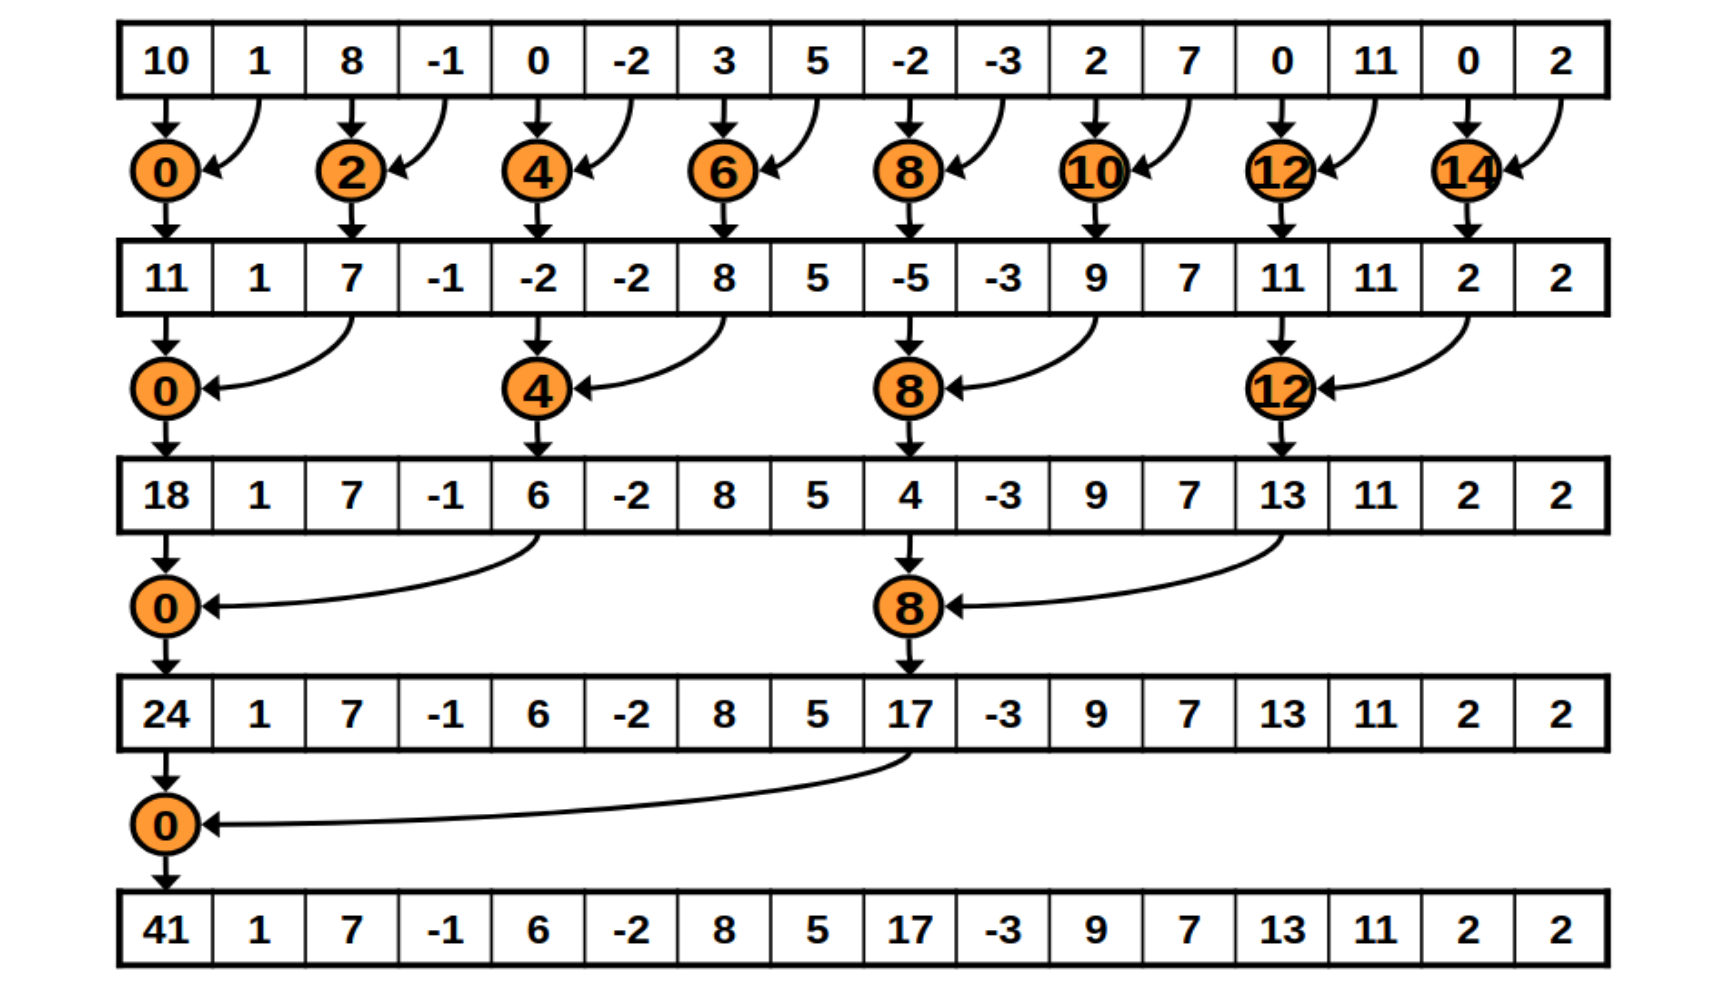
We will launch as many threads as there are elements in the array. So, if our block size is 1024 and the array is 32768 elements long, then we need to launch 32 blocks of threads to cover it.
The following is a diagram of how each block will reduce its chunk.
And the following is how the kernel implements it.
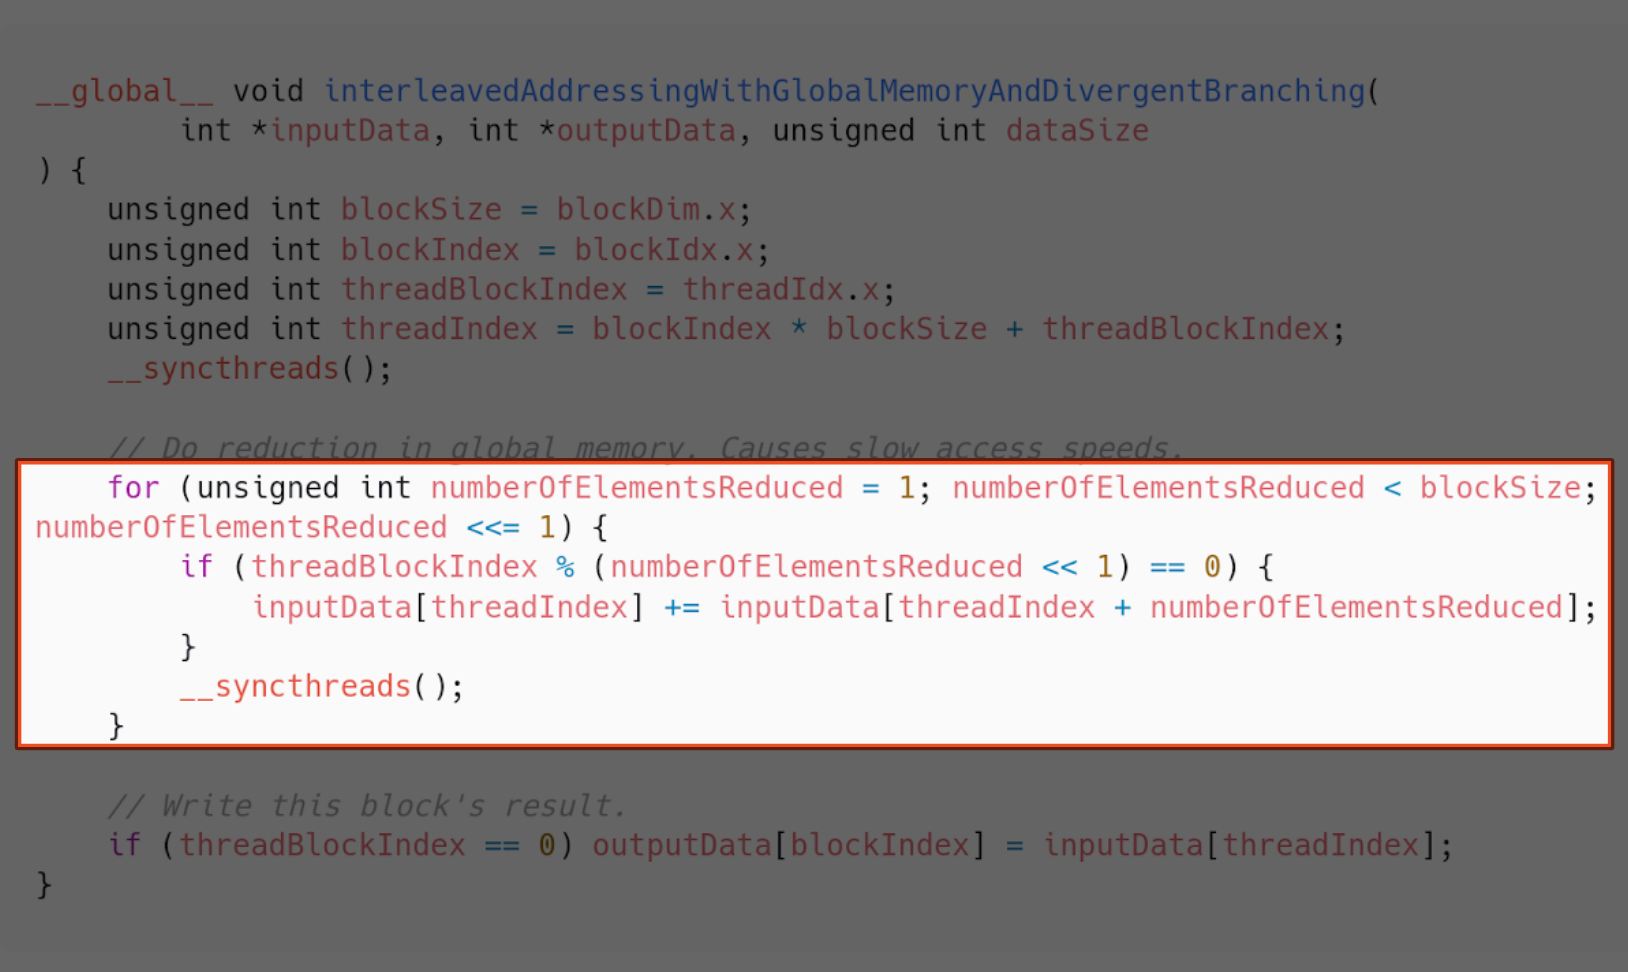
This is already a significant improvement in time taken against the sequential implementation. Even when we count the time taken to copy data from CPU to GPU memory and vice versa.
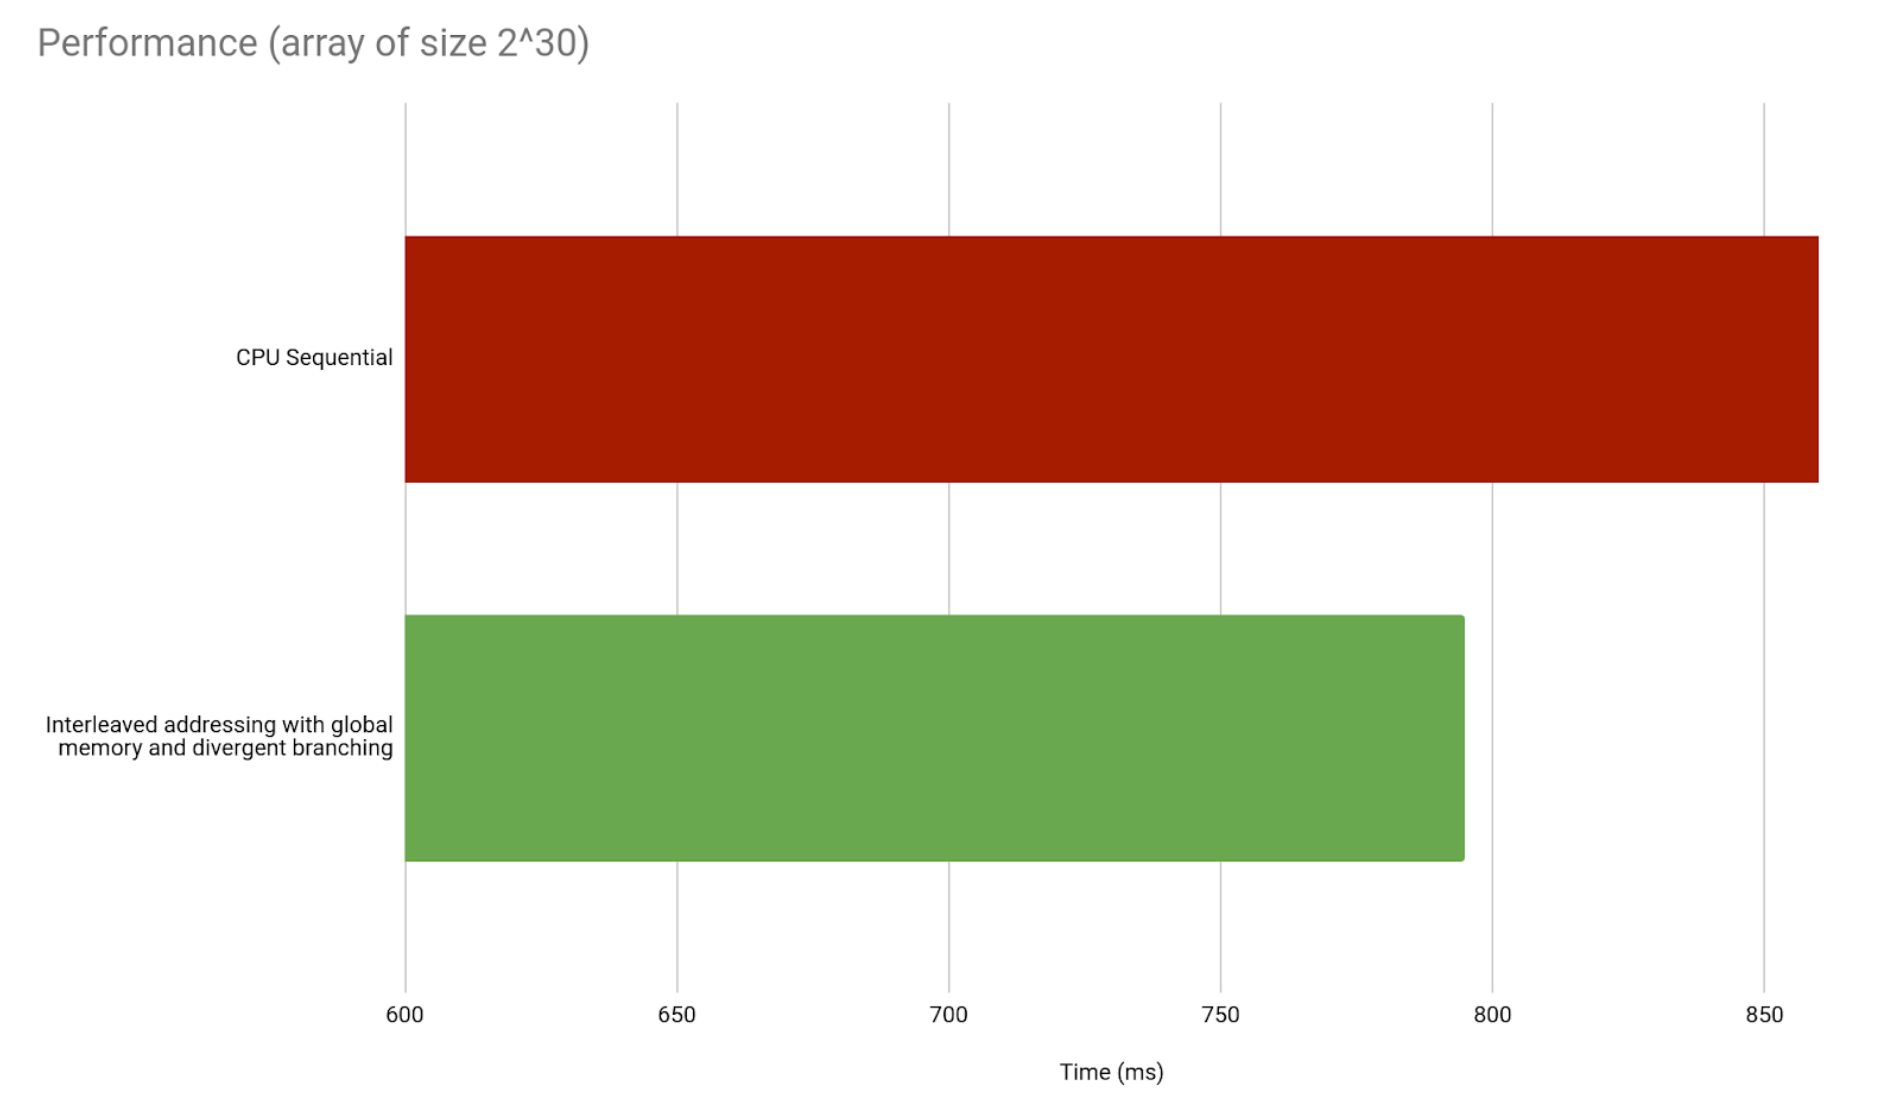
But we are far from the best GPU implementation. We have a lot of room for improvement. For starters, we are only using half the threads. We also said shared memory is faster than global memory, so we will start using it.
Implementation 2 - Interleaved addressing with shared memory
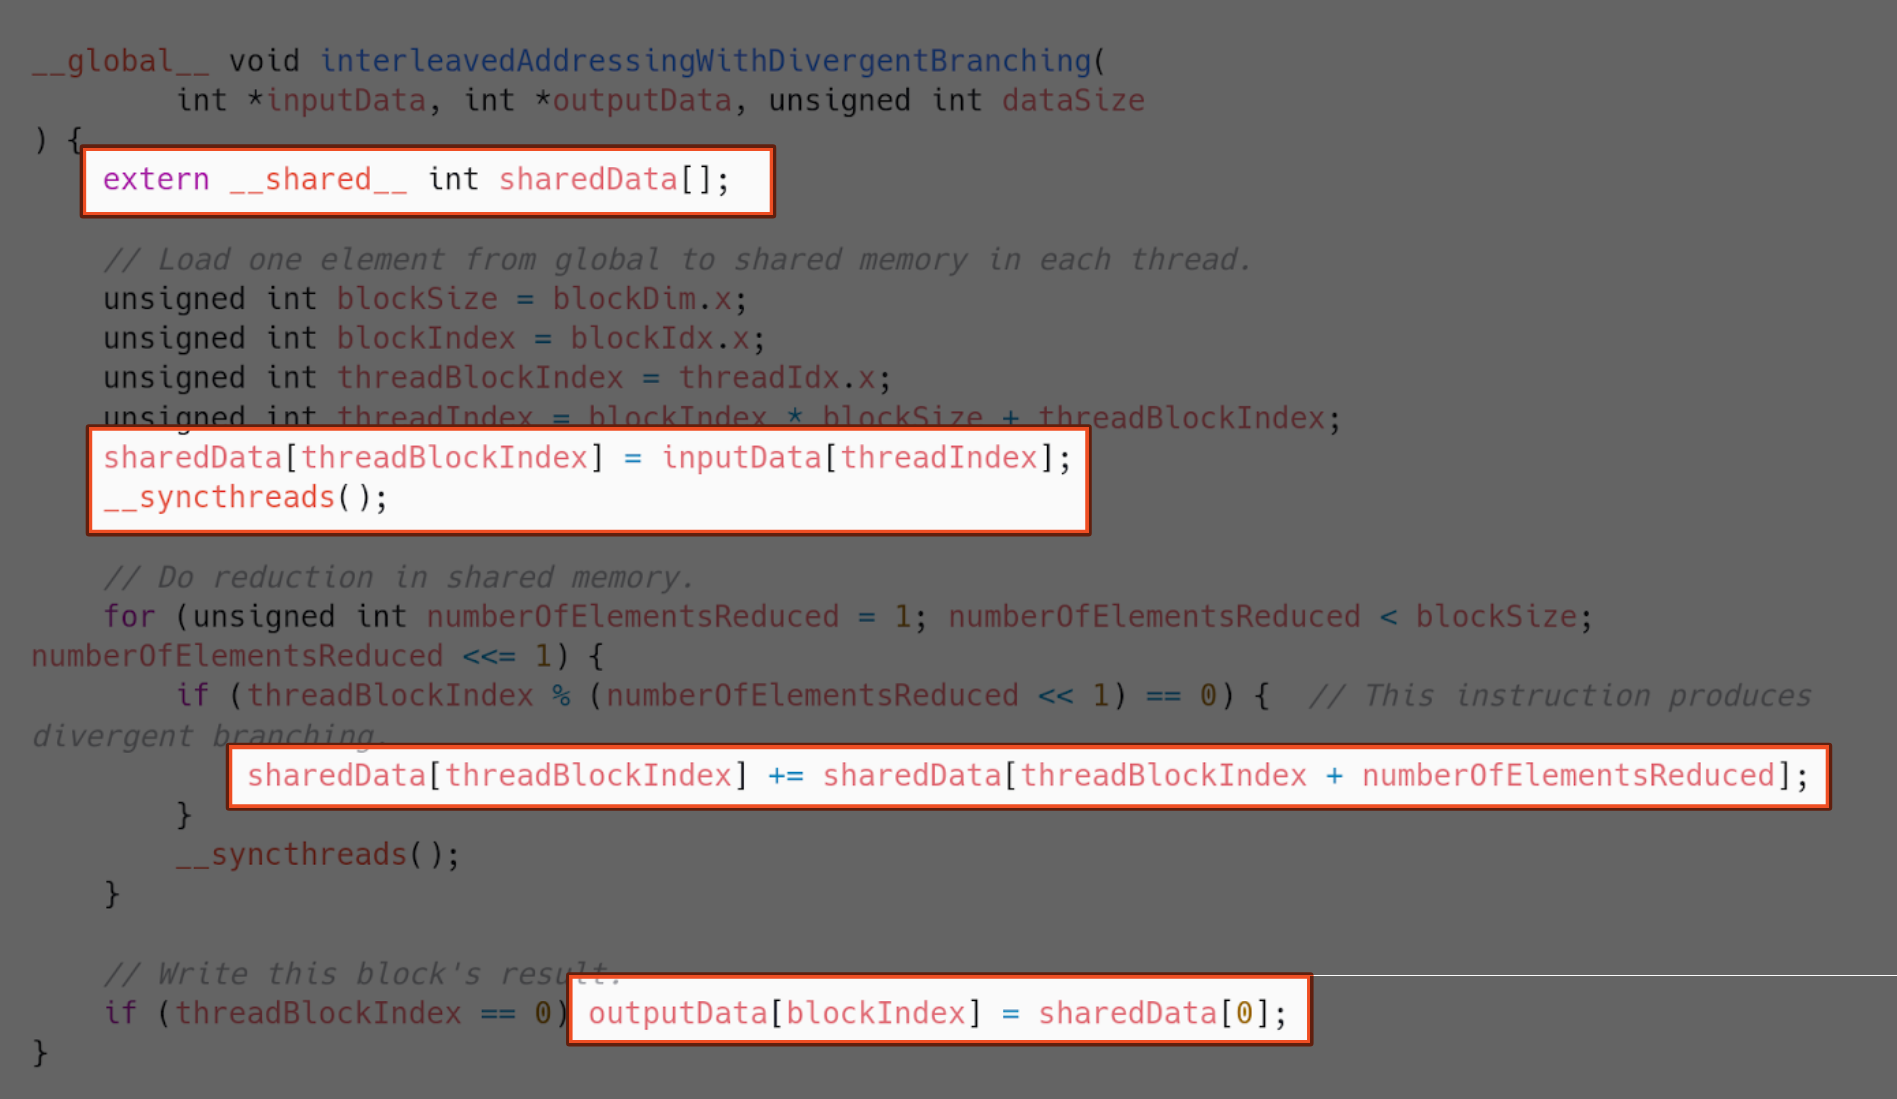
We must reserve the amount of shared memory we need when launching the kernel. After that, we can declare a variable inside shared memory in the kernel.
We will use all our threads to first copy the block’s chunk of elements to shared memory. Then, all the block’s reduction will happen using shared memory. In the end, the block will just copy its final result from shared memory to global memory.
Now, how does this compare to the previous implementation? Well, as it turns out, not too well.
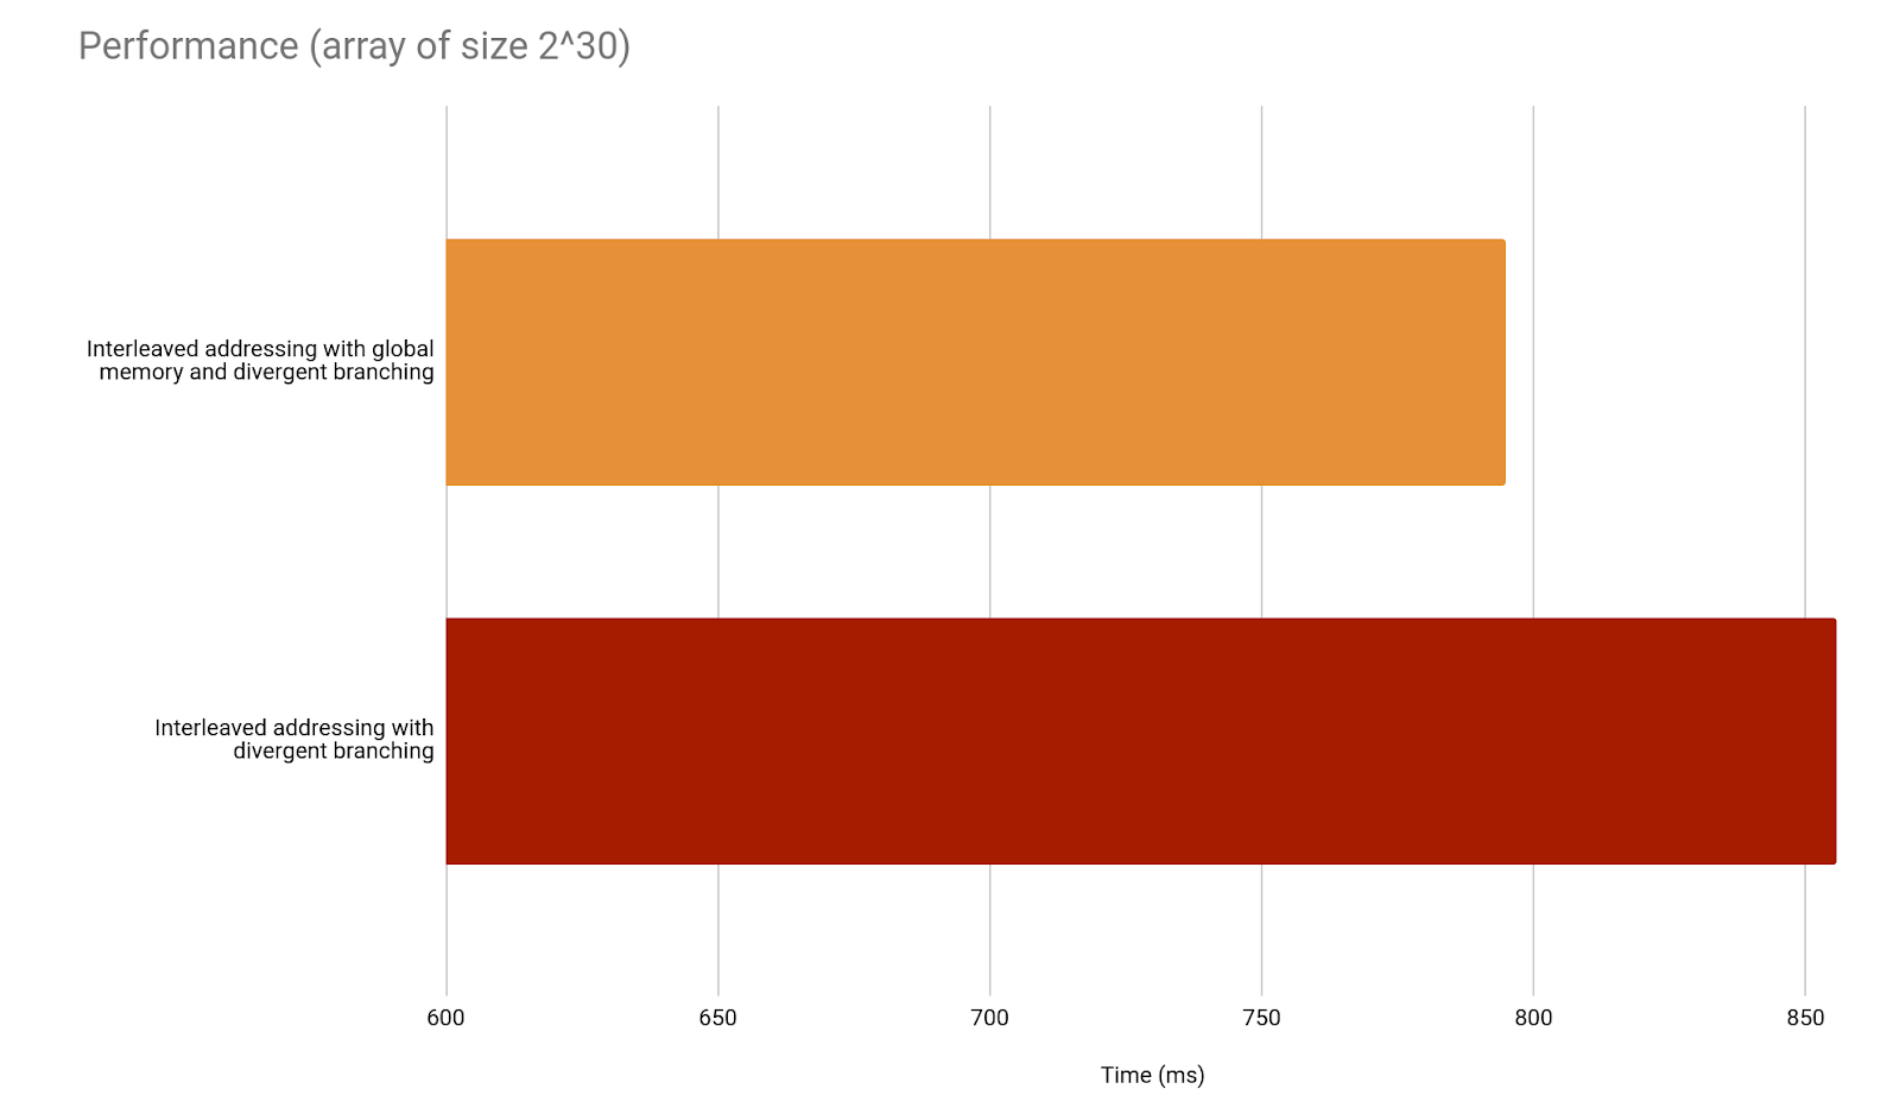
What is the reason for the shared memory version being slower in this case? We will come back to that in the following implementations.
Implementation 3 - Better branching
We are using the modulus operator, which CUDA insists on being slow and inefficient. We want to go from this:

To this:
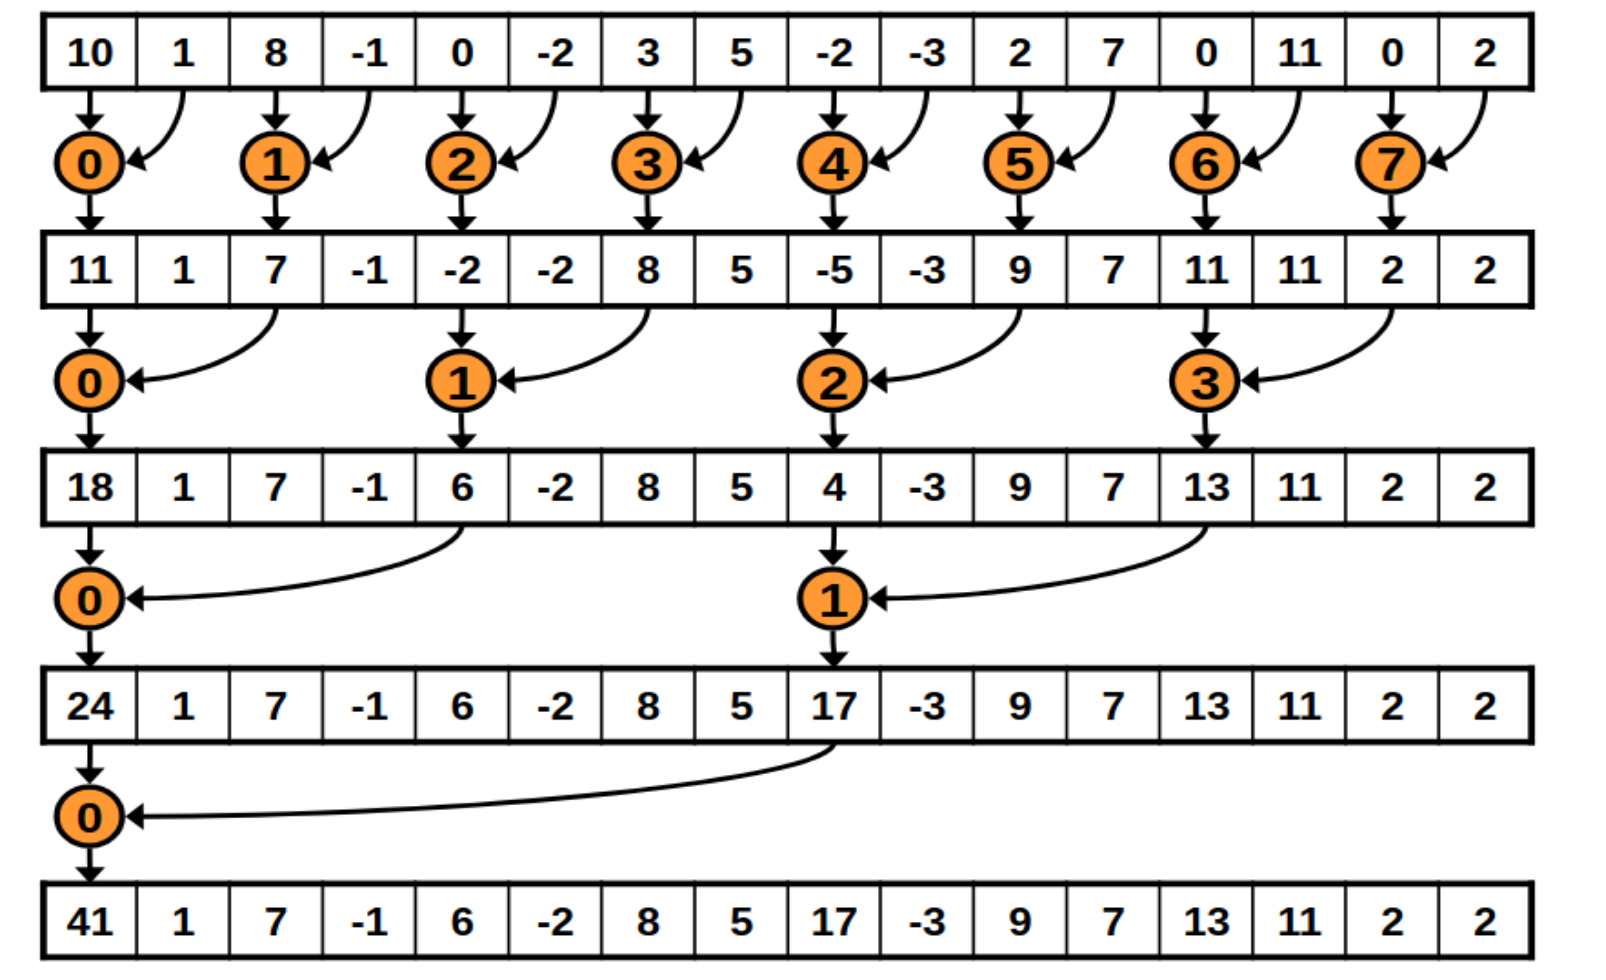
This is how the kernel would do that.
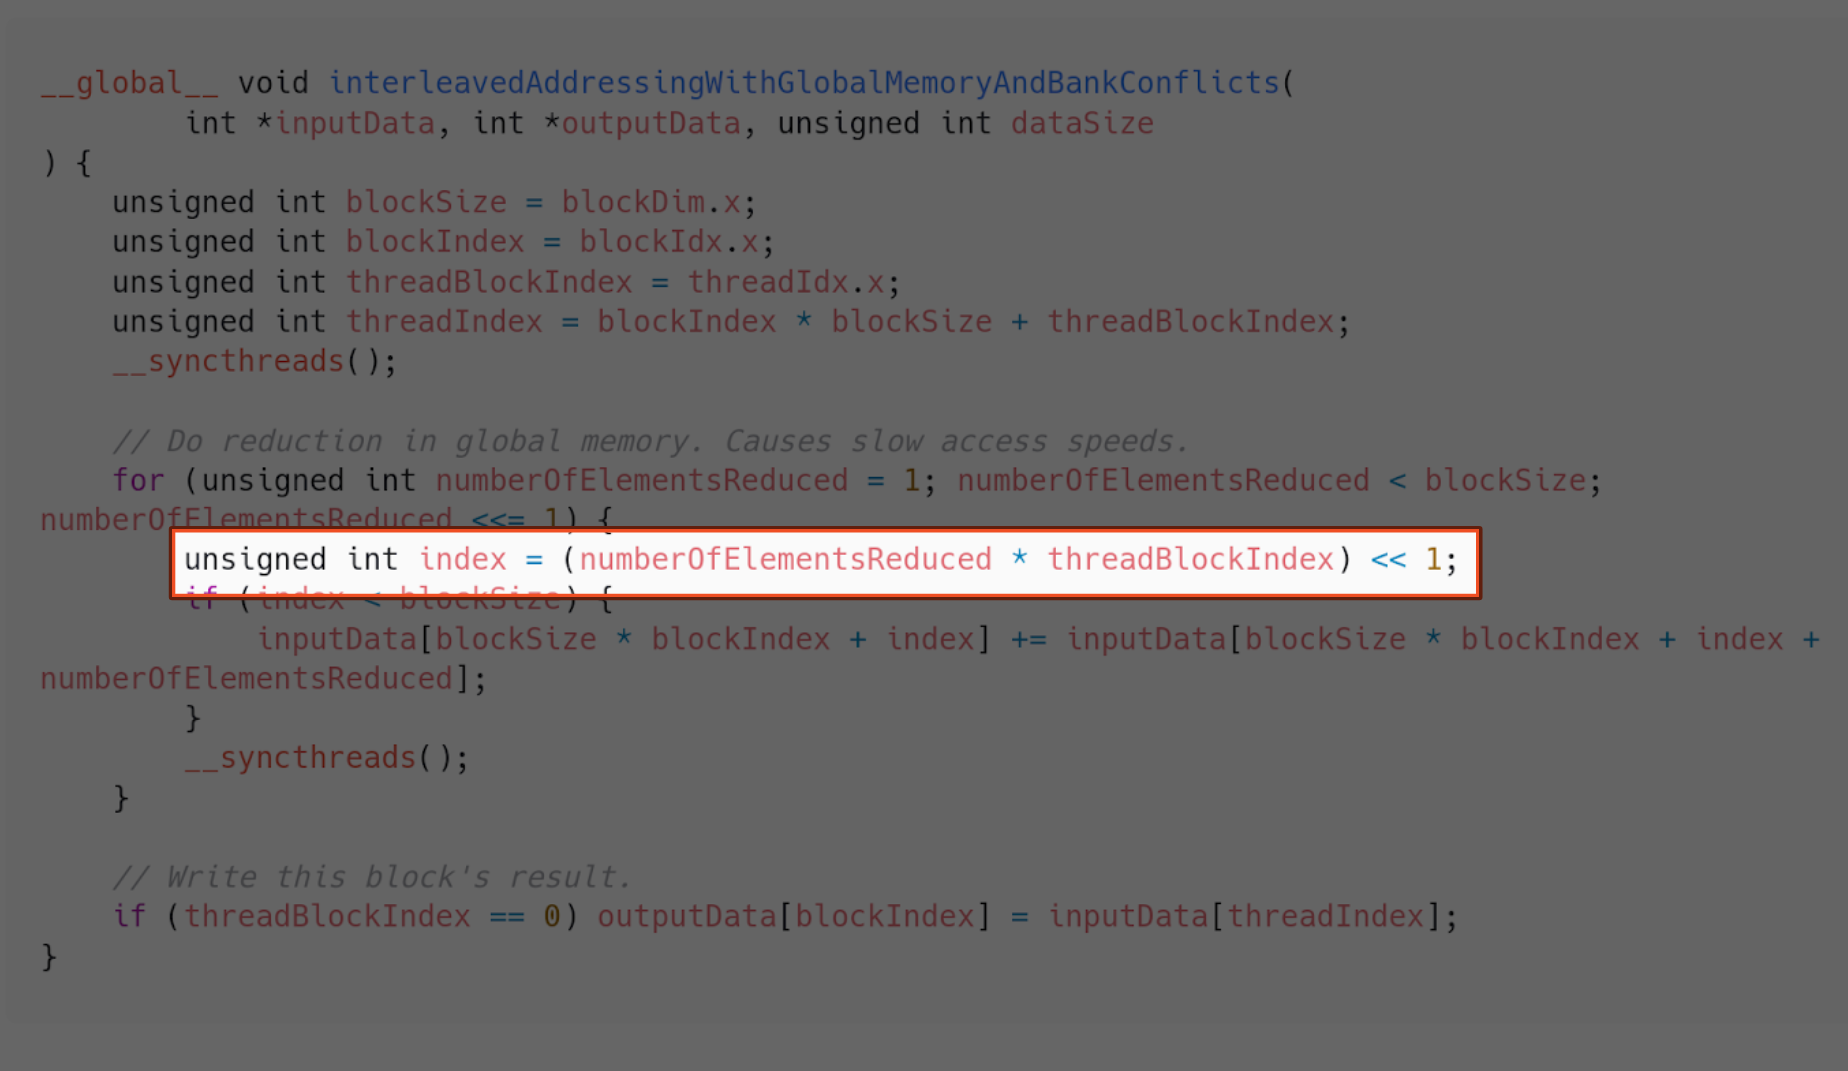
But we said shared memory is better, and we are not using it.
Implementation 4 - Better branching with shared memory
So, once again, we implement the use of shared memory.
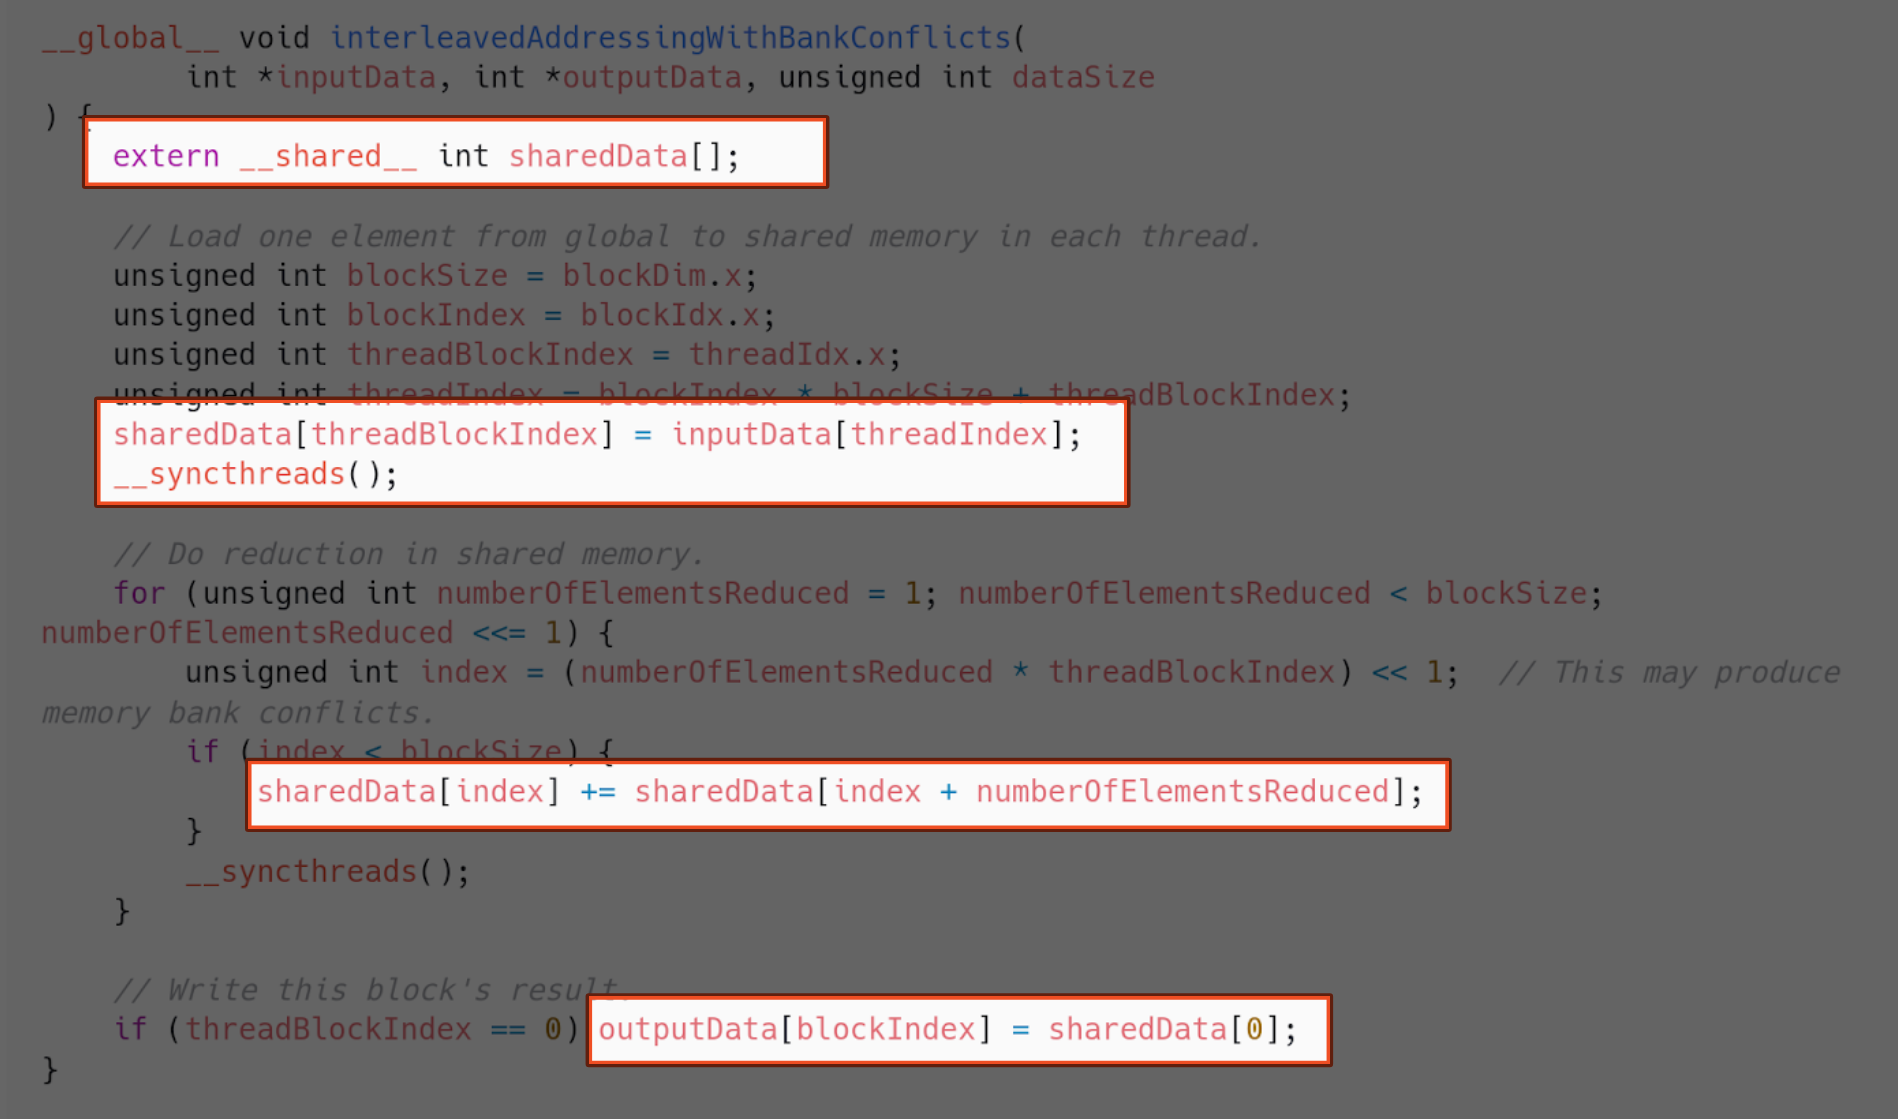
And how does this compare with the version with no shared memory?
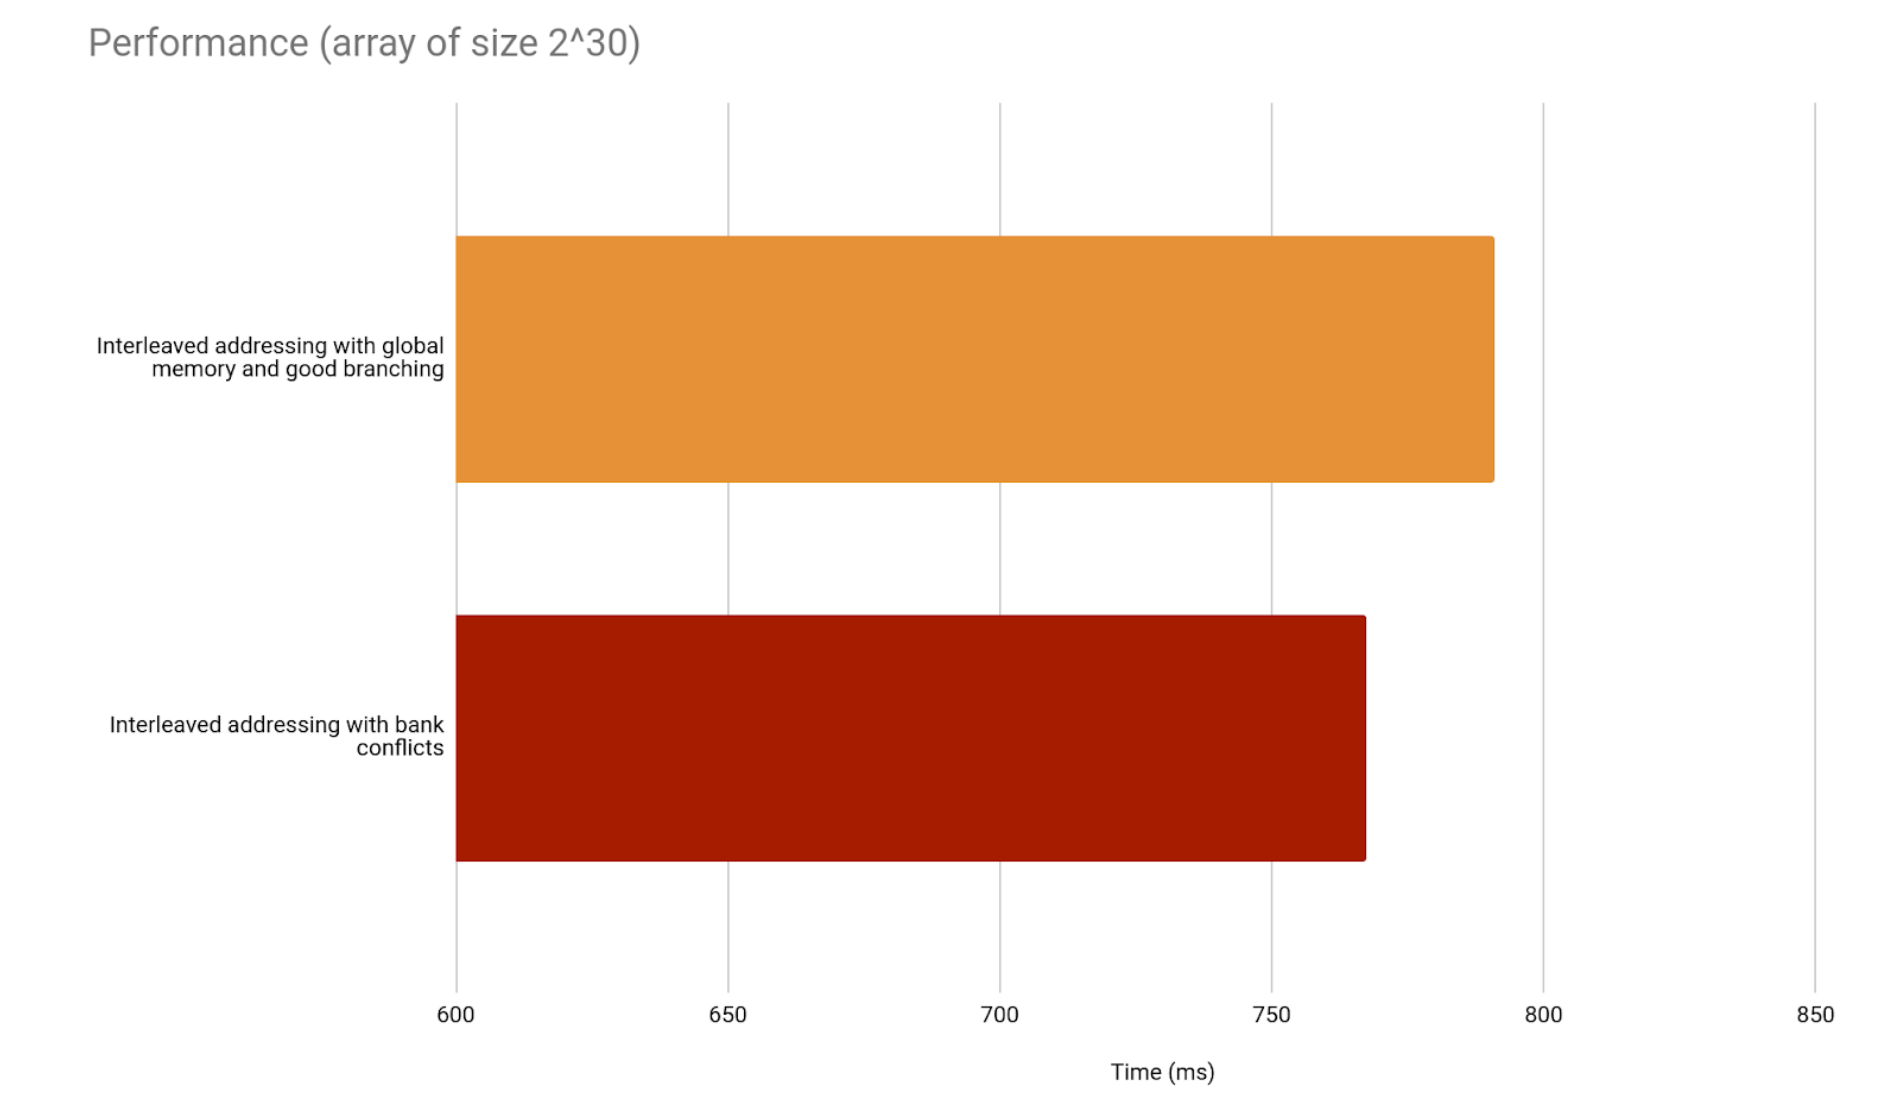
We are already seeing results. Still, shared memory should have more of an impact. In previous versions of the architecture, this implementation would even be worse than its global memory alternative.
What happens is we have bank conflicts in shared memory, because of the way we are indexing the array. This is where they happen.
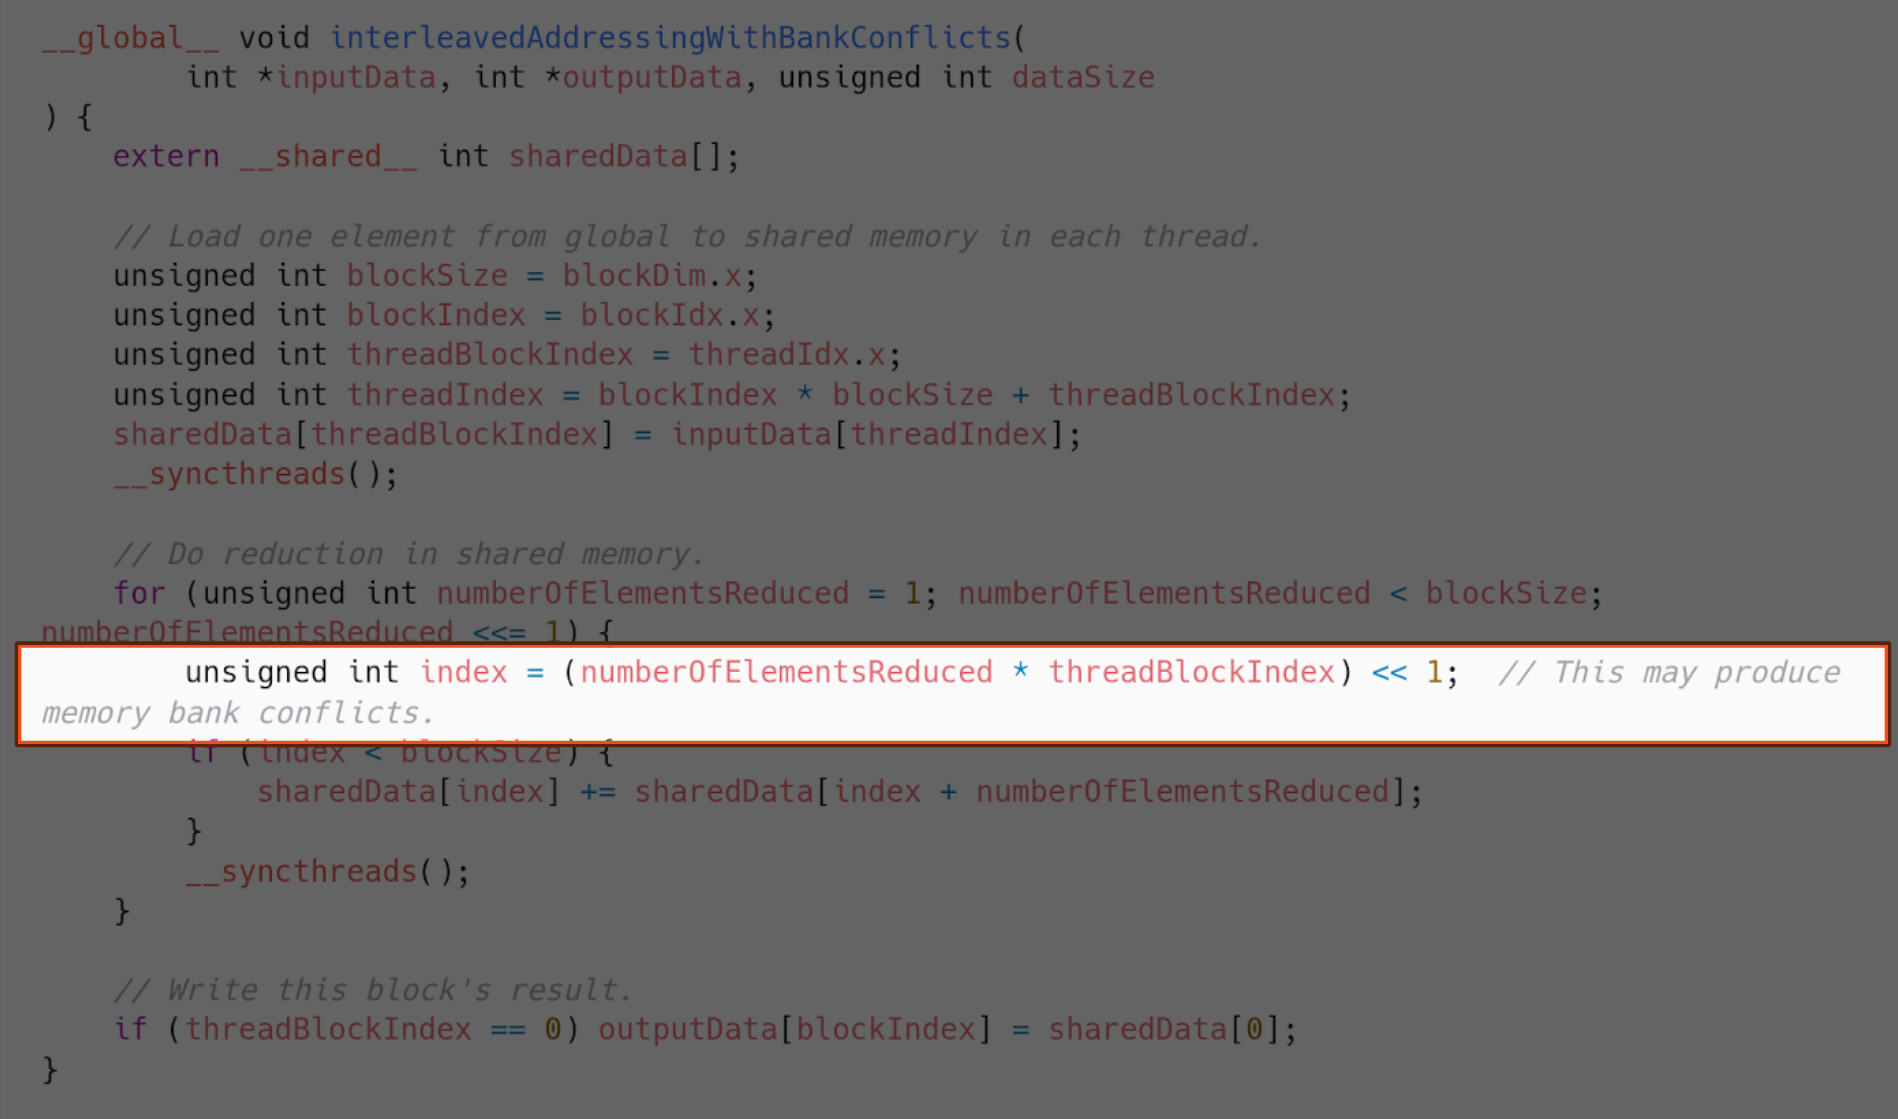
There are usually 32 or more memory banks. Requests to read or write memory addresses in the same bank cannot be fulfilled in parallel. Only one memory access will happen in the same bank at the same time.
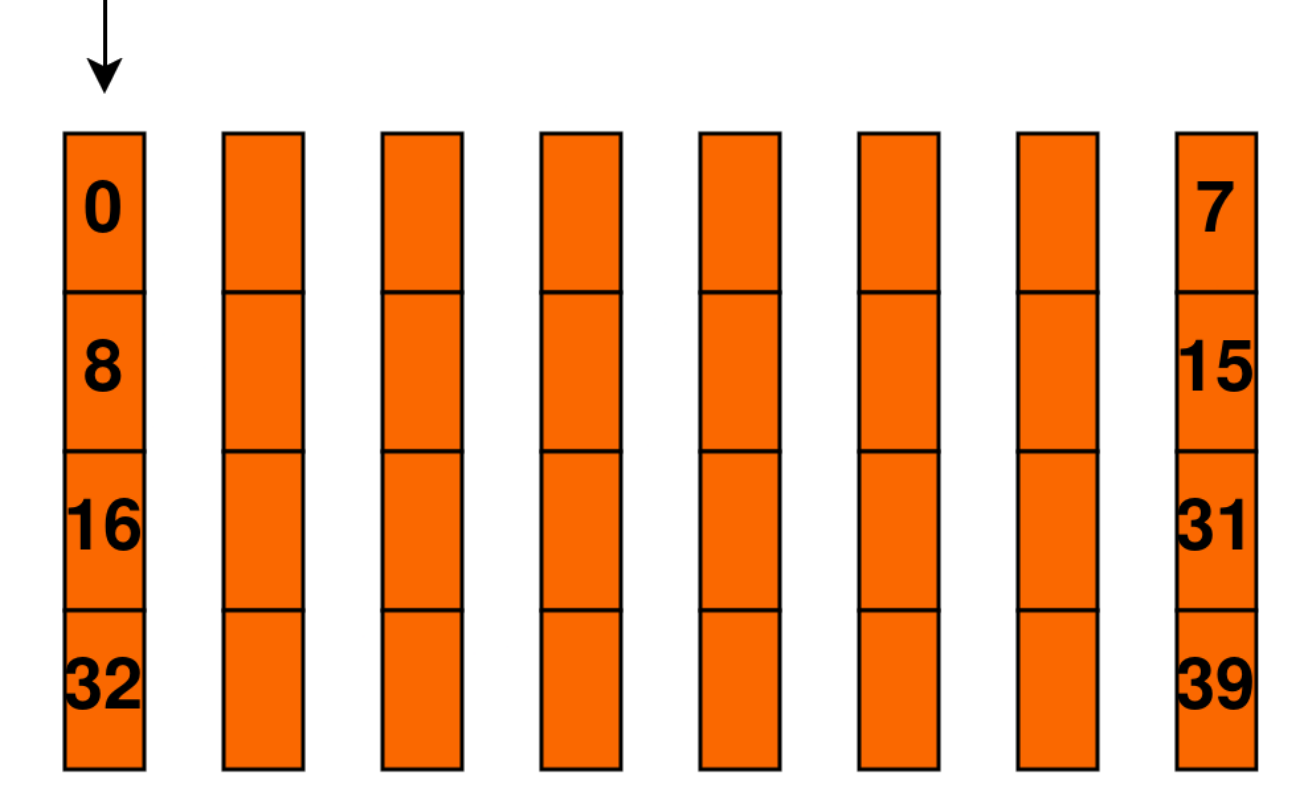
What is causing so many bank conflicts in our case is the fact that threads in the same warp are trying to access elements in the same memory bank. Our indexing is the cause of that. It is far from optimal since threads in the same warp have the same program counter. Therefore, threads in the warp need to wait for all memory accesses of other threads in the warp. If the addresses two threads in a warp want to access are in the same bank, these memory accesses become sequential and consequently way slower.
Implementation 5 - Sequential addressing
We need to fix our indexing to prevent bank conflicts, then. Our kernel will go from doing this:

To this:
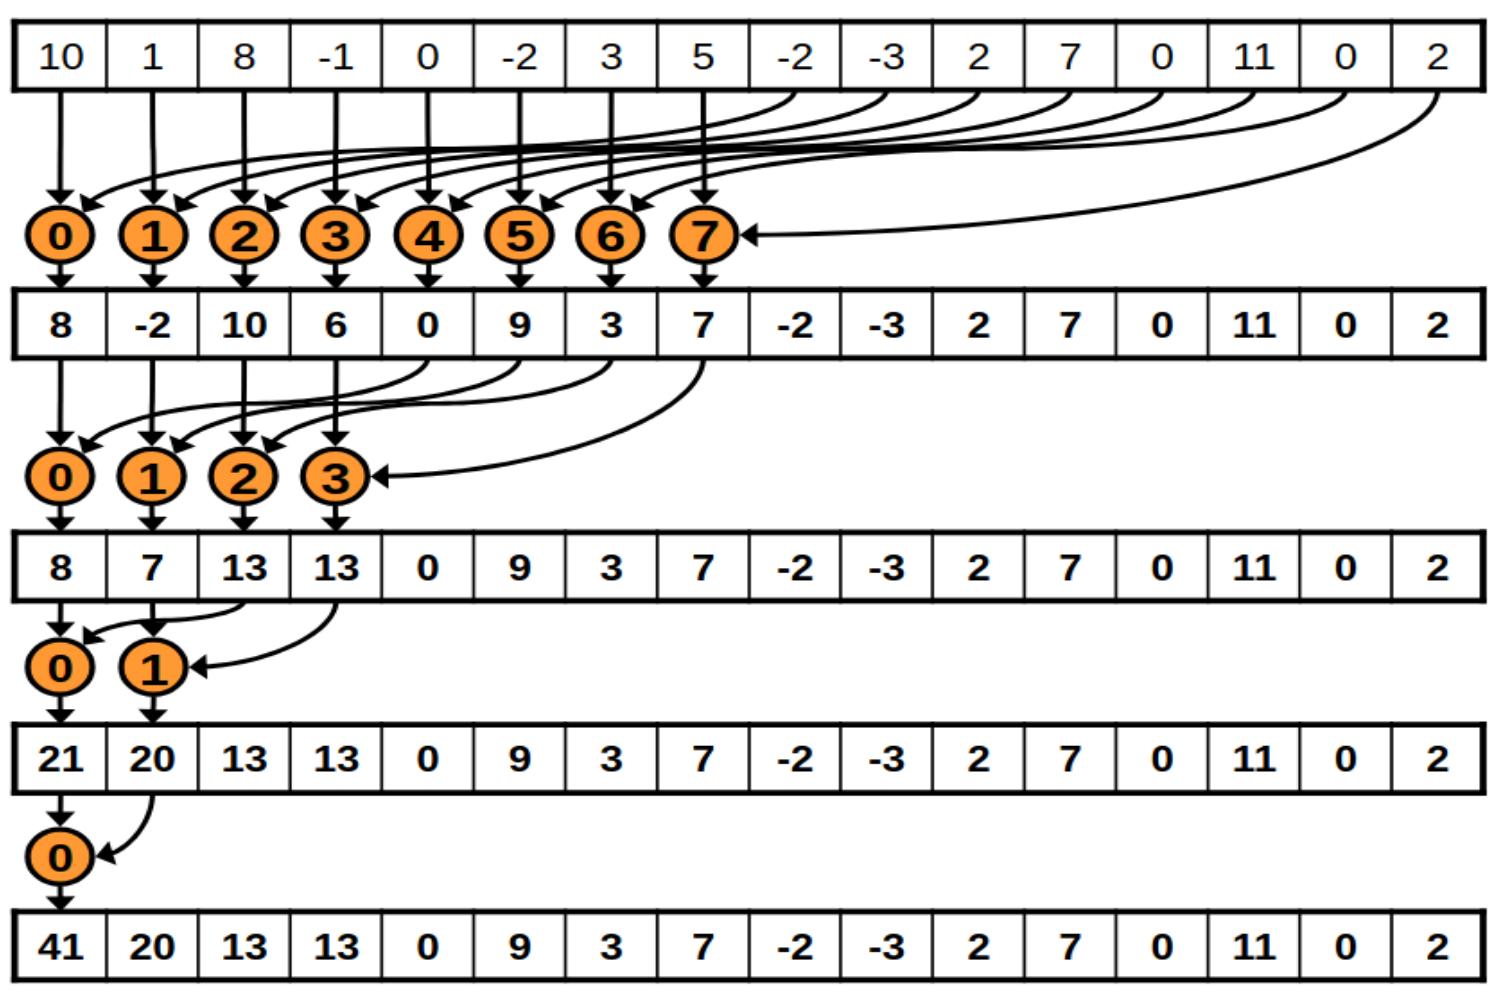
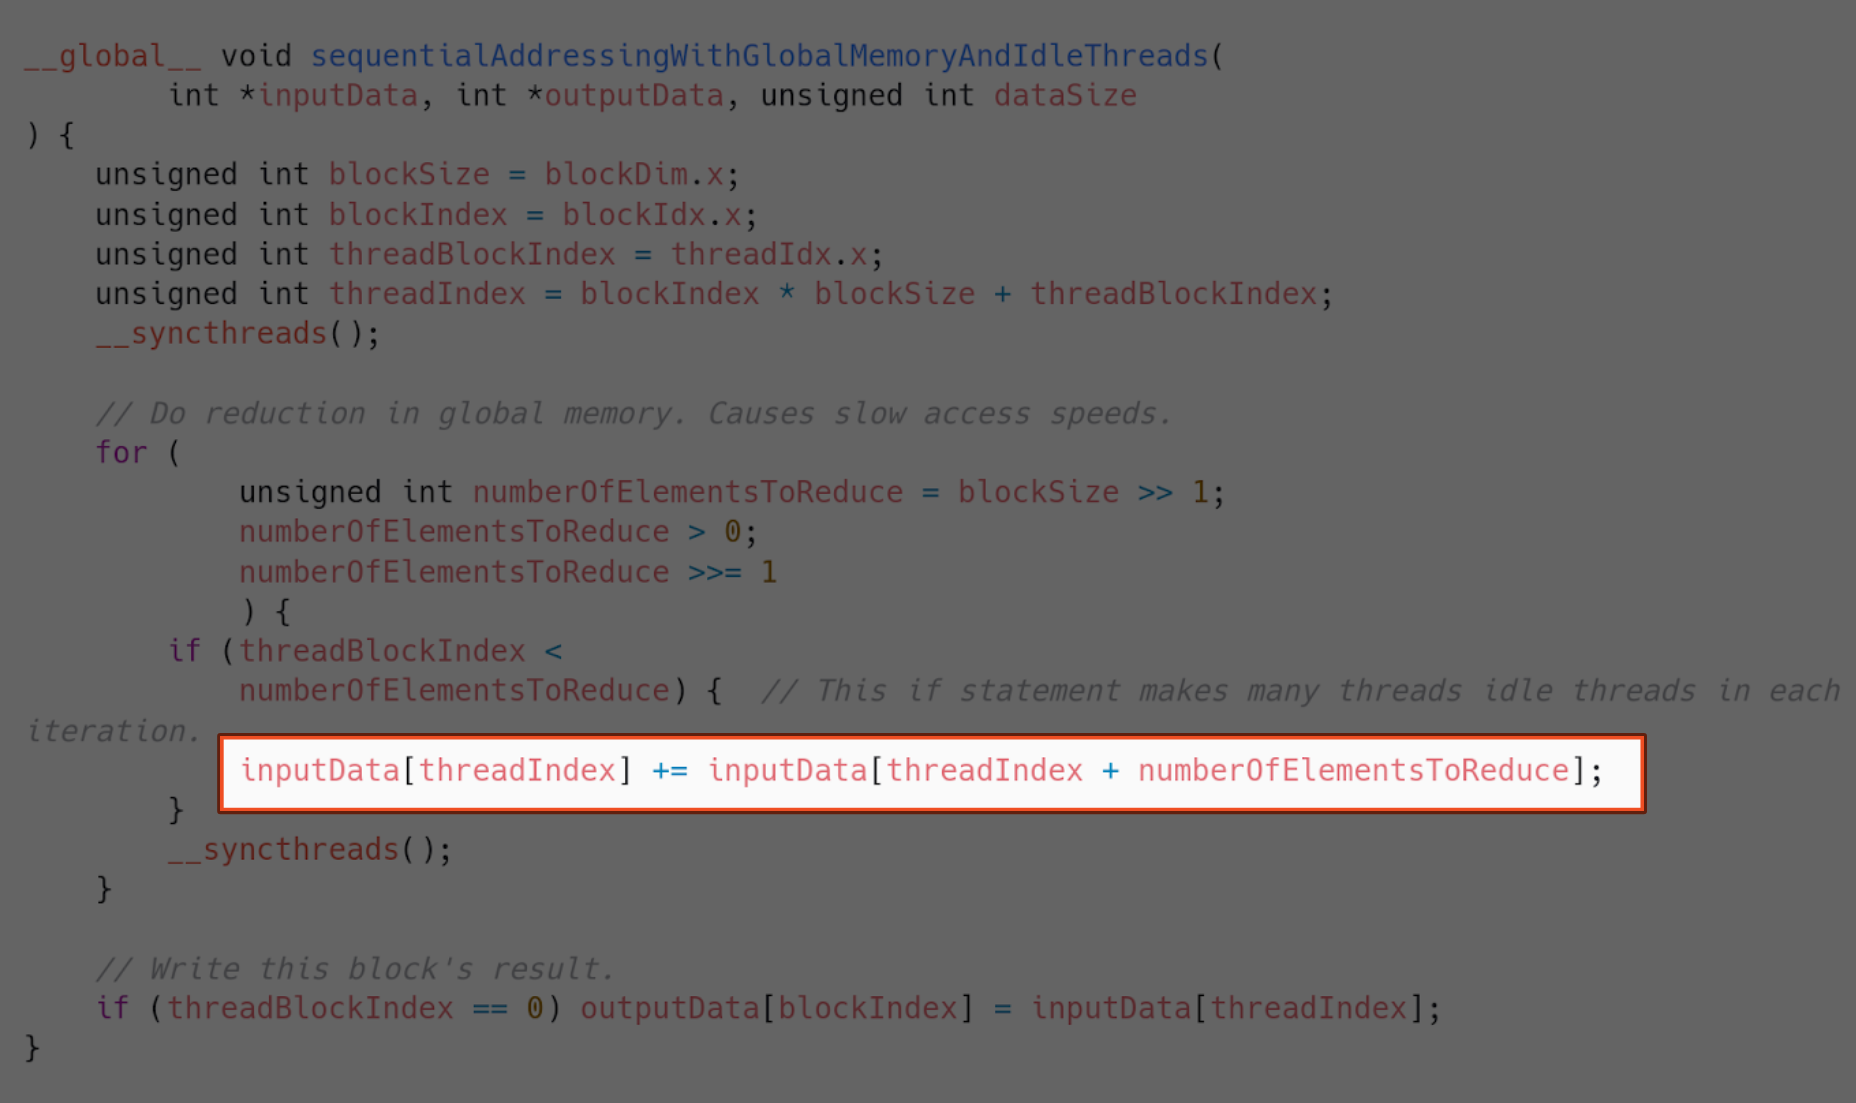
And this is how we do that (without shared memory yet).
Implementation 6 - Sequential addressing with shared memory
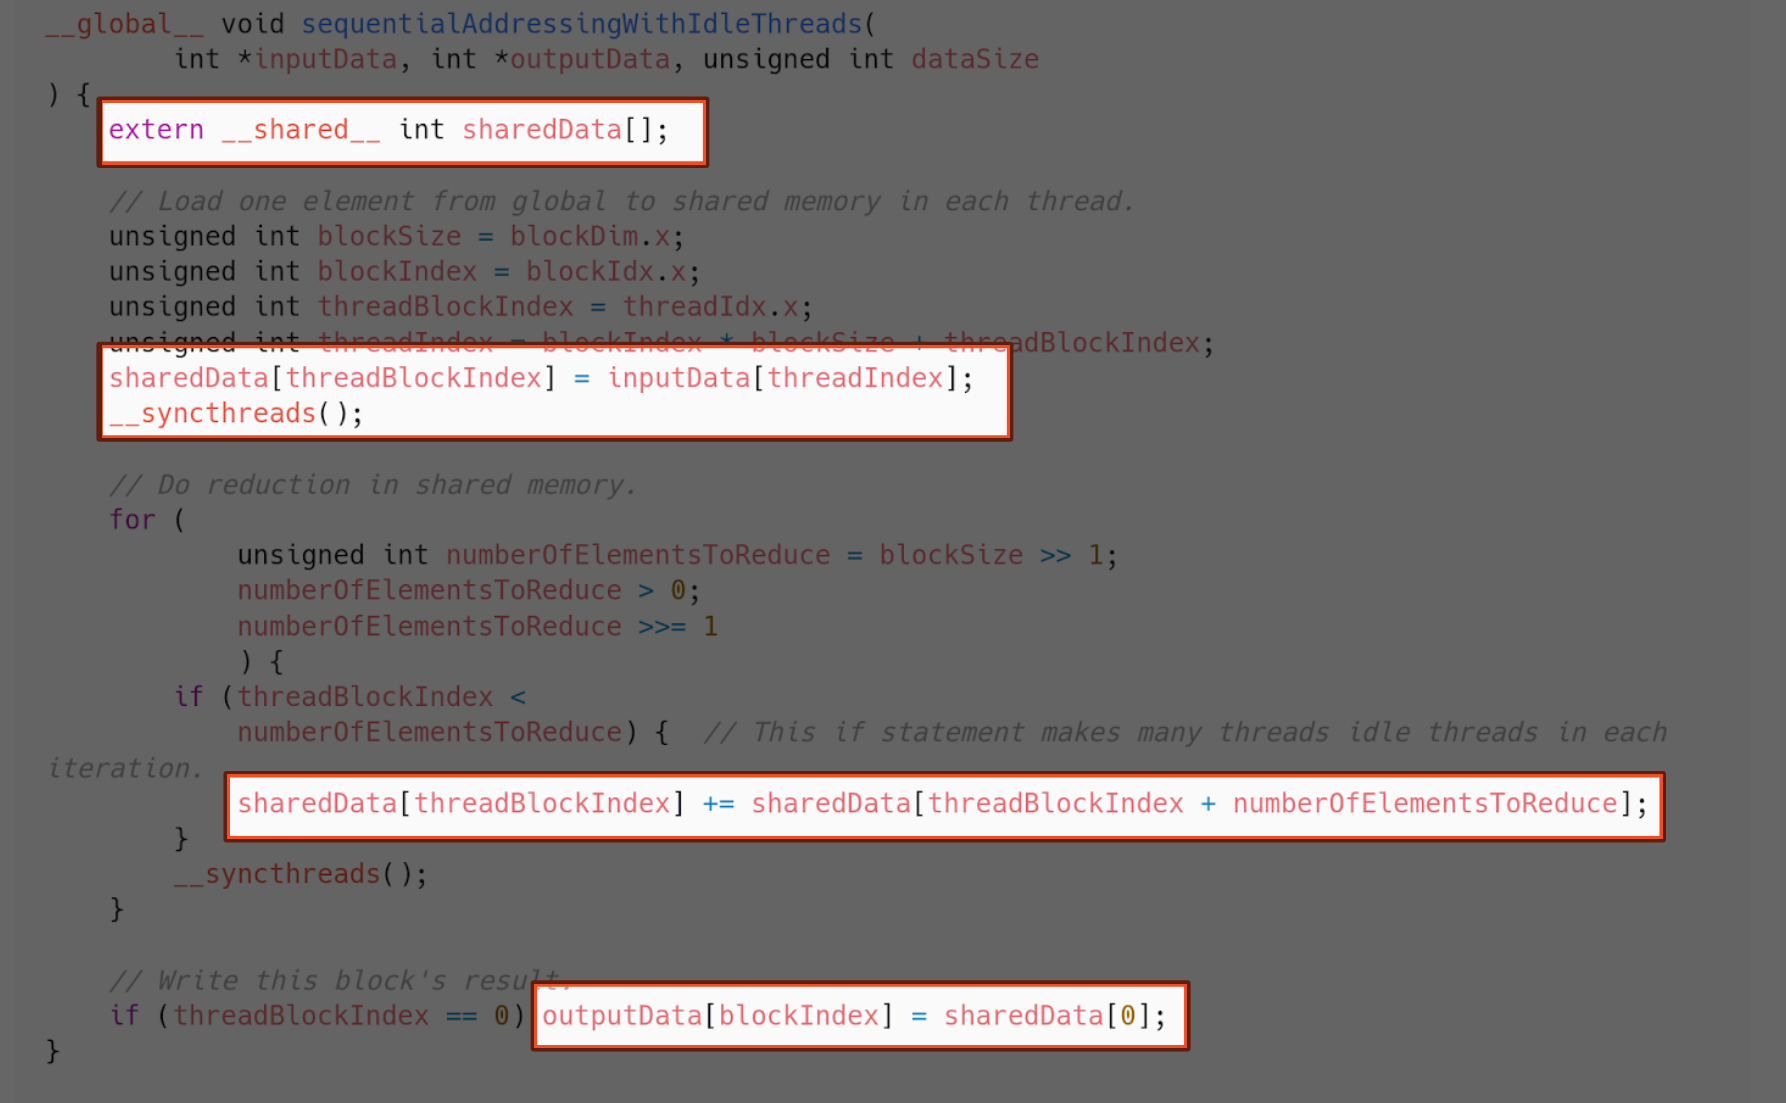
Now using shared memory.
And this is how they compare.
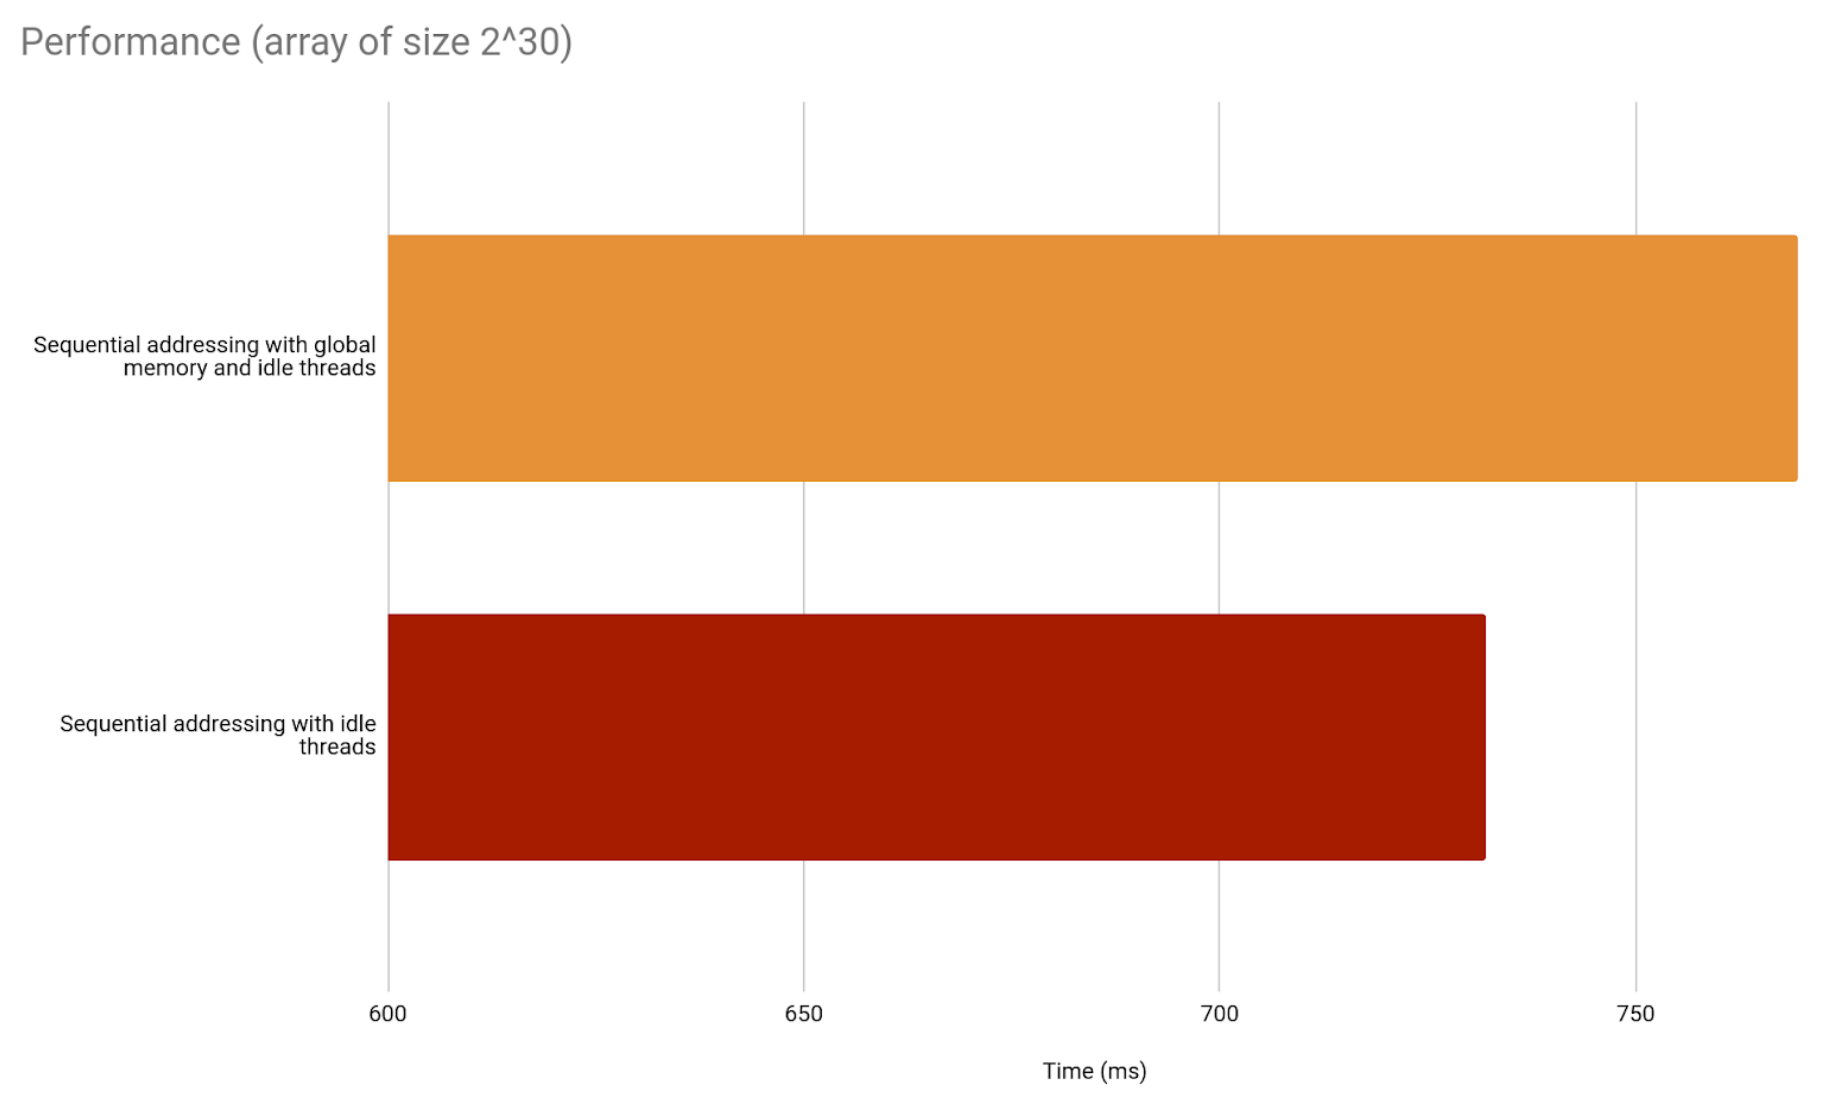
In fact, the fifth implementation (sequential addressing with global memory) is as fast as the fourth, which uses shared memory. So the difference is even greater.
From now on, we will use shared memory.
Implementation 7 - Taking advantage of copying data to shared memory
Since our threads are already spending time copying data to shared memory at the start of the block’s processing, we can take advantage of that. We can use that time to also sum two elements in each thread, effectively cutting the block’s chunk of elements in half when it reaches shared memory. This is how we do that.
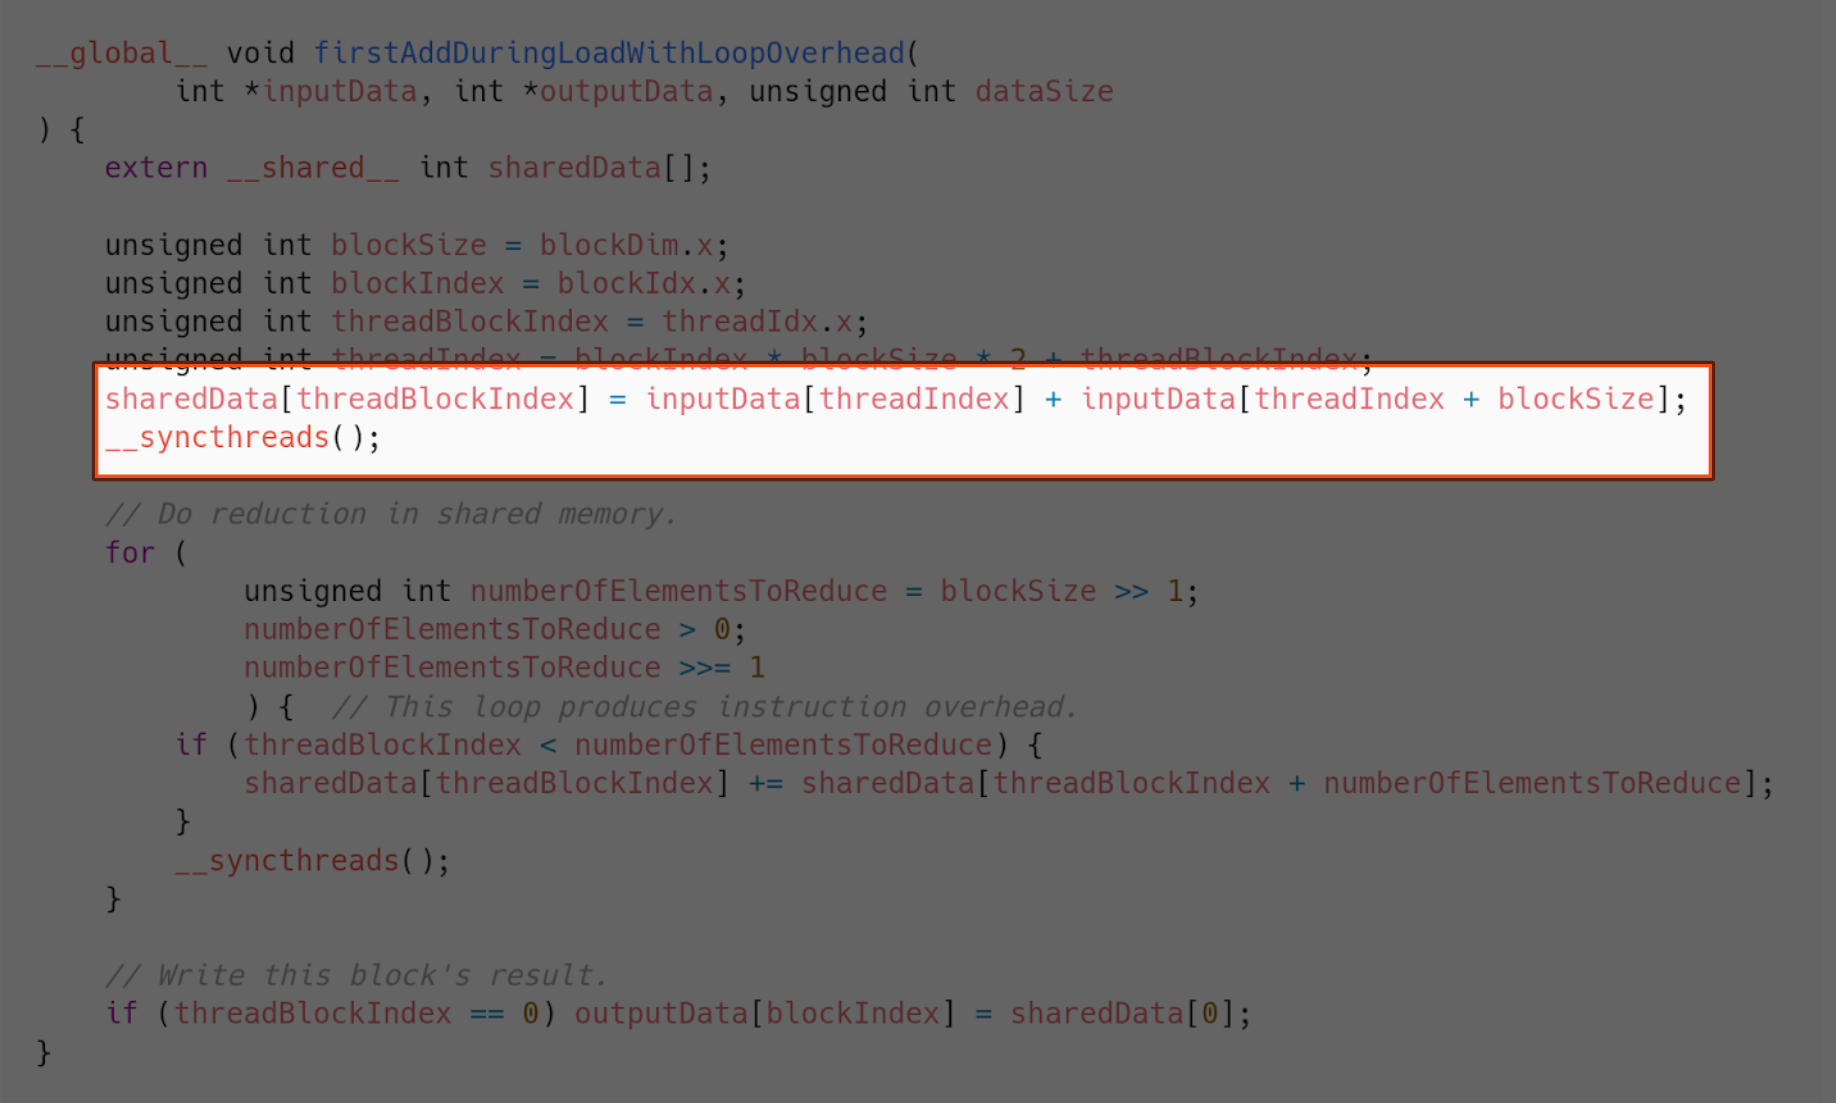
Instead of reserving half the shared memory, we just use each block to cover double the amount of elements. Then, the kernel is launched with half the amount of blocks, because that is now enough to cover the whole array.
Compared to previous implementations, this seventh one is faster.
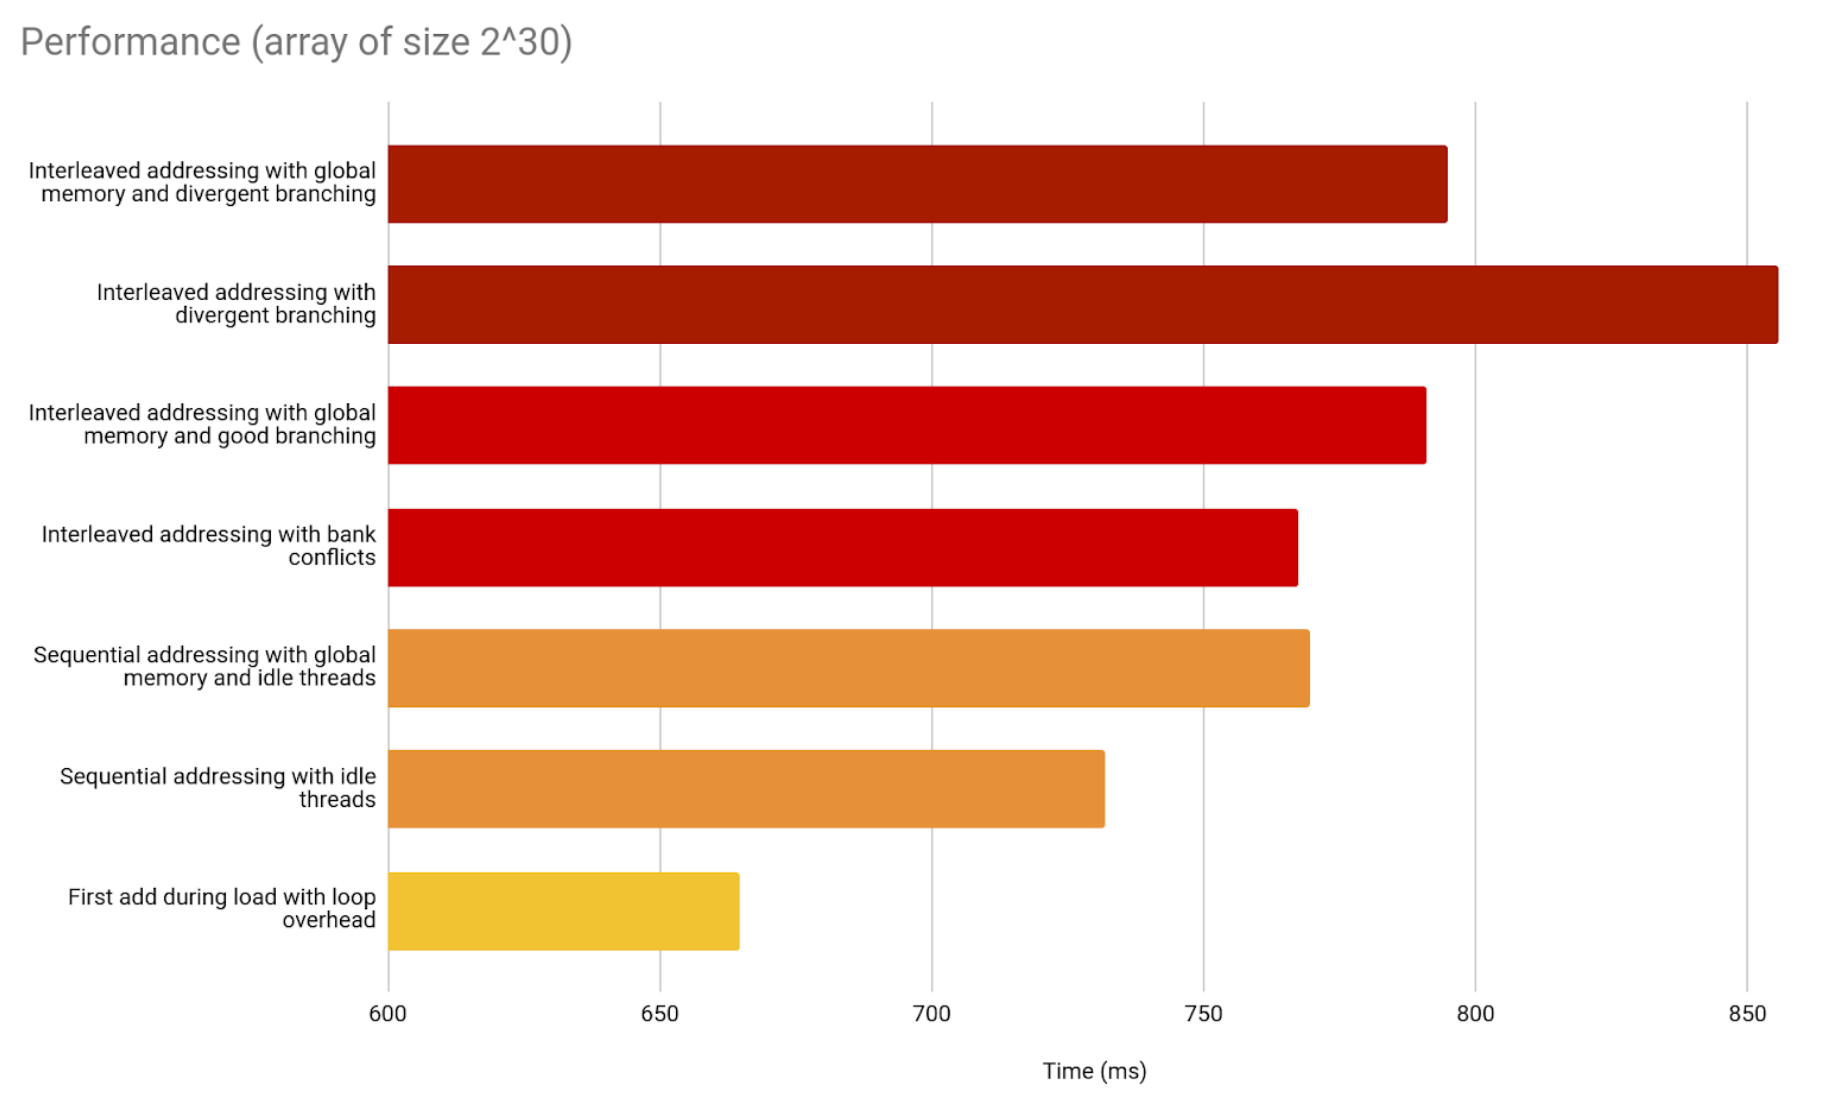
We managed to shave a lot of time.
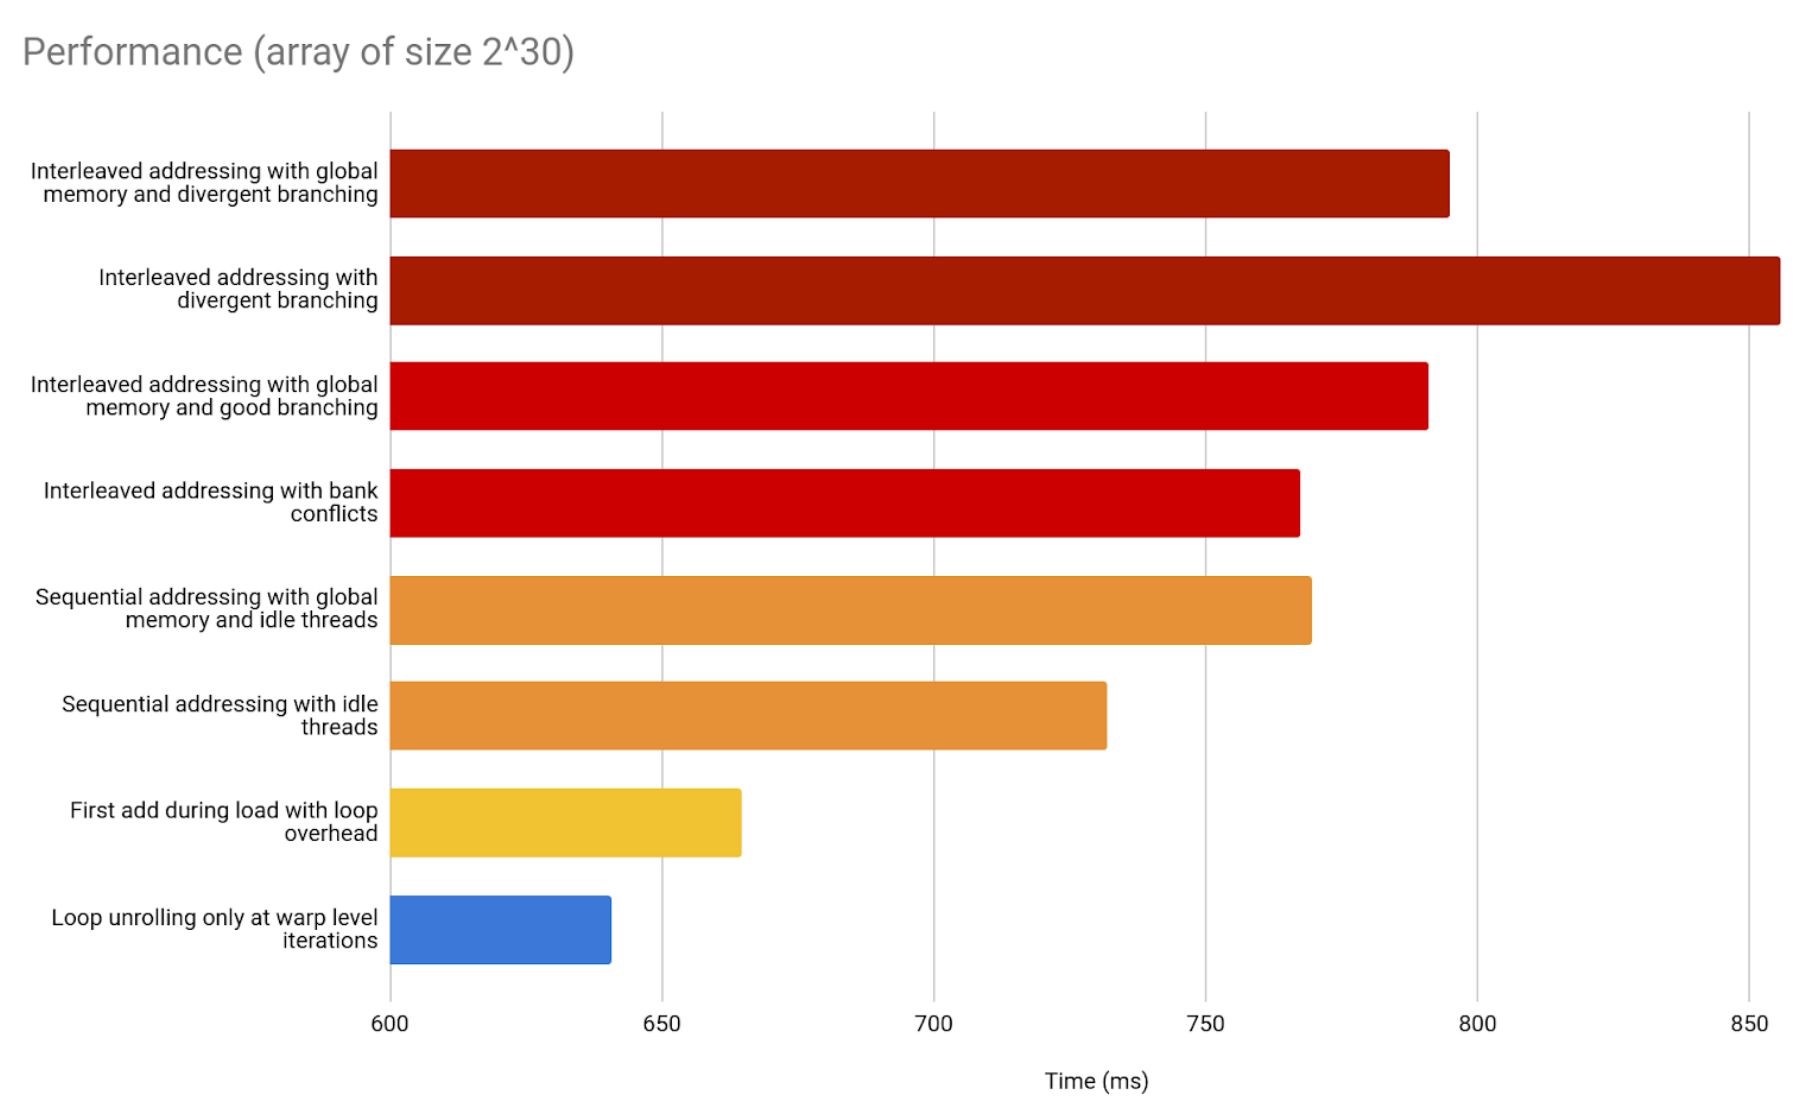
Implementation 8 - Warp-level loop unrolling
Loop unrolling is an old-school optimization in compilers. It has nothing to do with memory addressing or shared memory. The aim is to eliminate the overhead from the loop conditions, by explicitly writing each iteration of the loop. We know the version of the architecture we are working on has 32 threads in the same warp. So, when unrolling a loop for threads in the same warp, we know the amount of elements to reduce. Therefore, needing no condition checks.
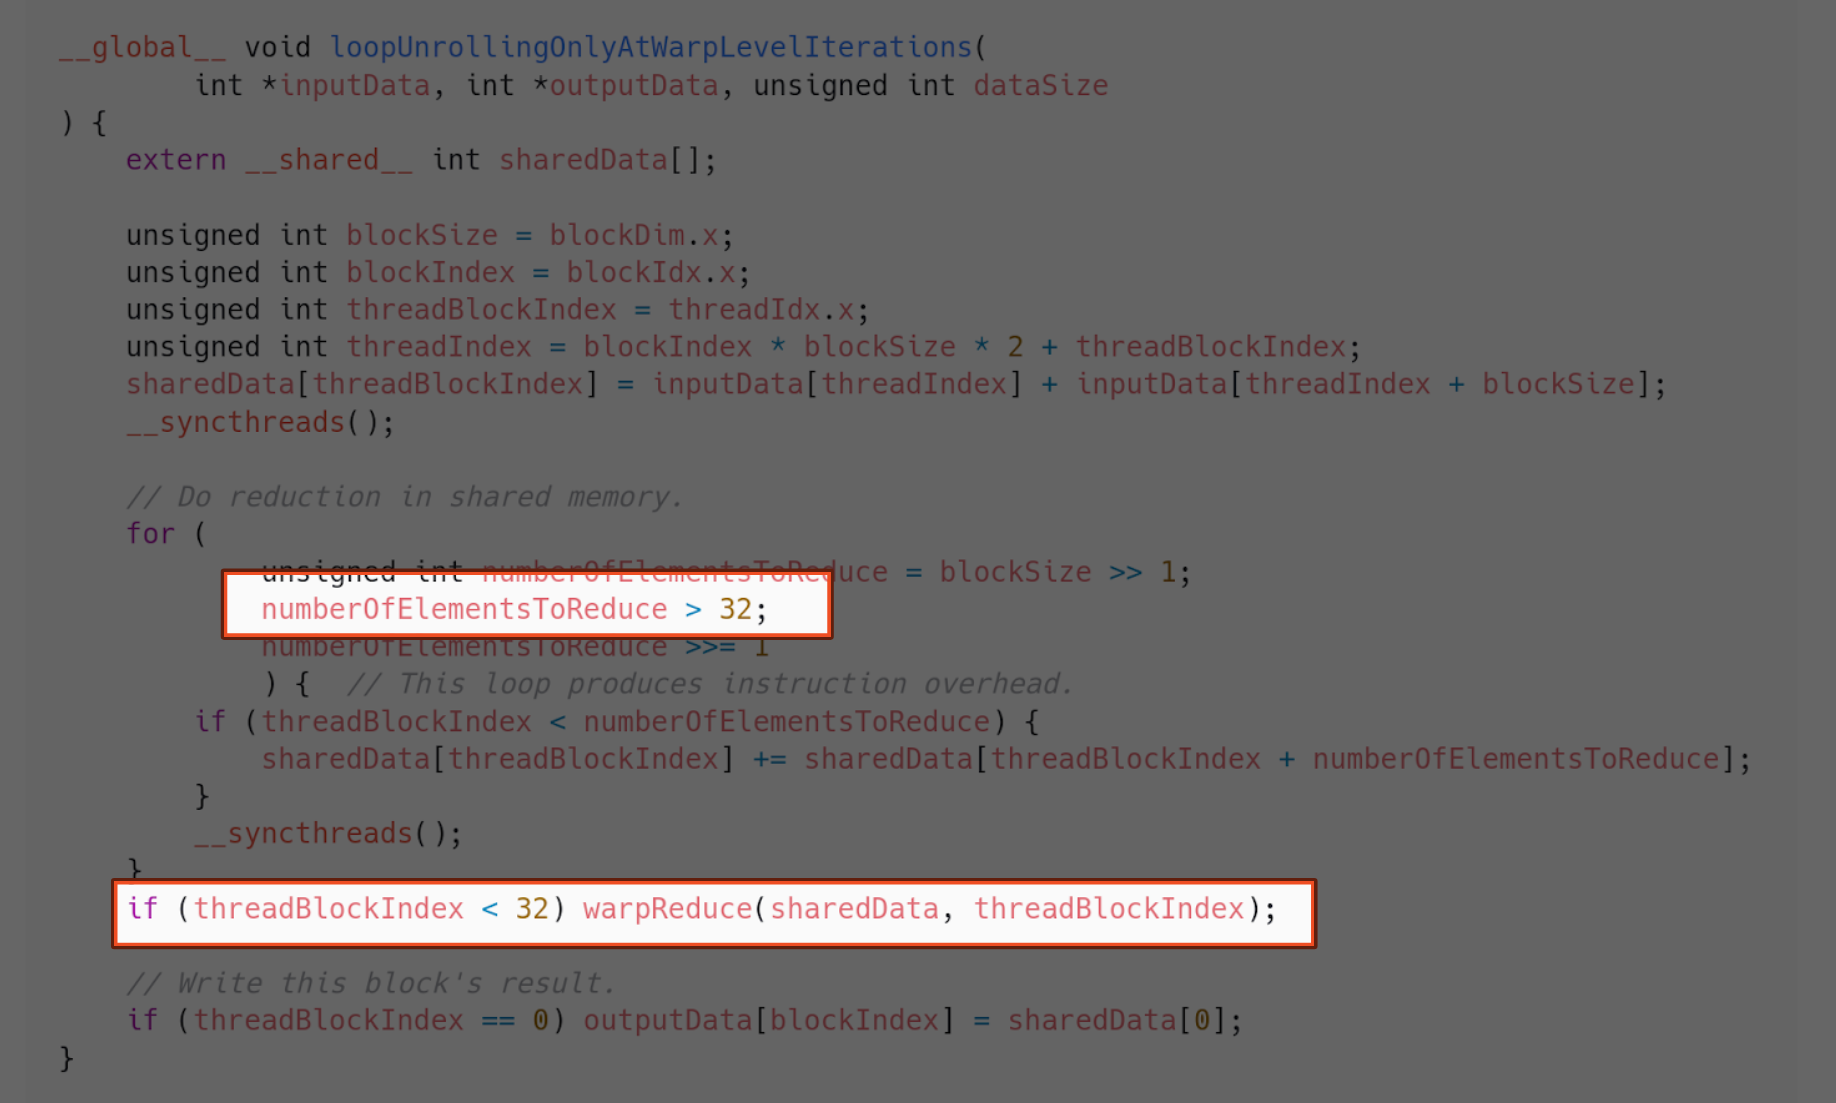

If we compare it against the previous implementations, we notice there is another improvement.
Implementation 9 - Complete loop unrolling
Given that we may know the block size in compile time, we can use that to avoid even more conditions, and therefore unroll the loop further, outside warps.
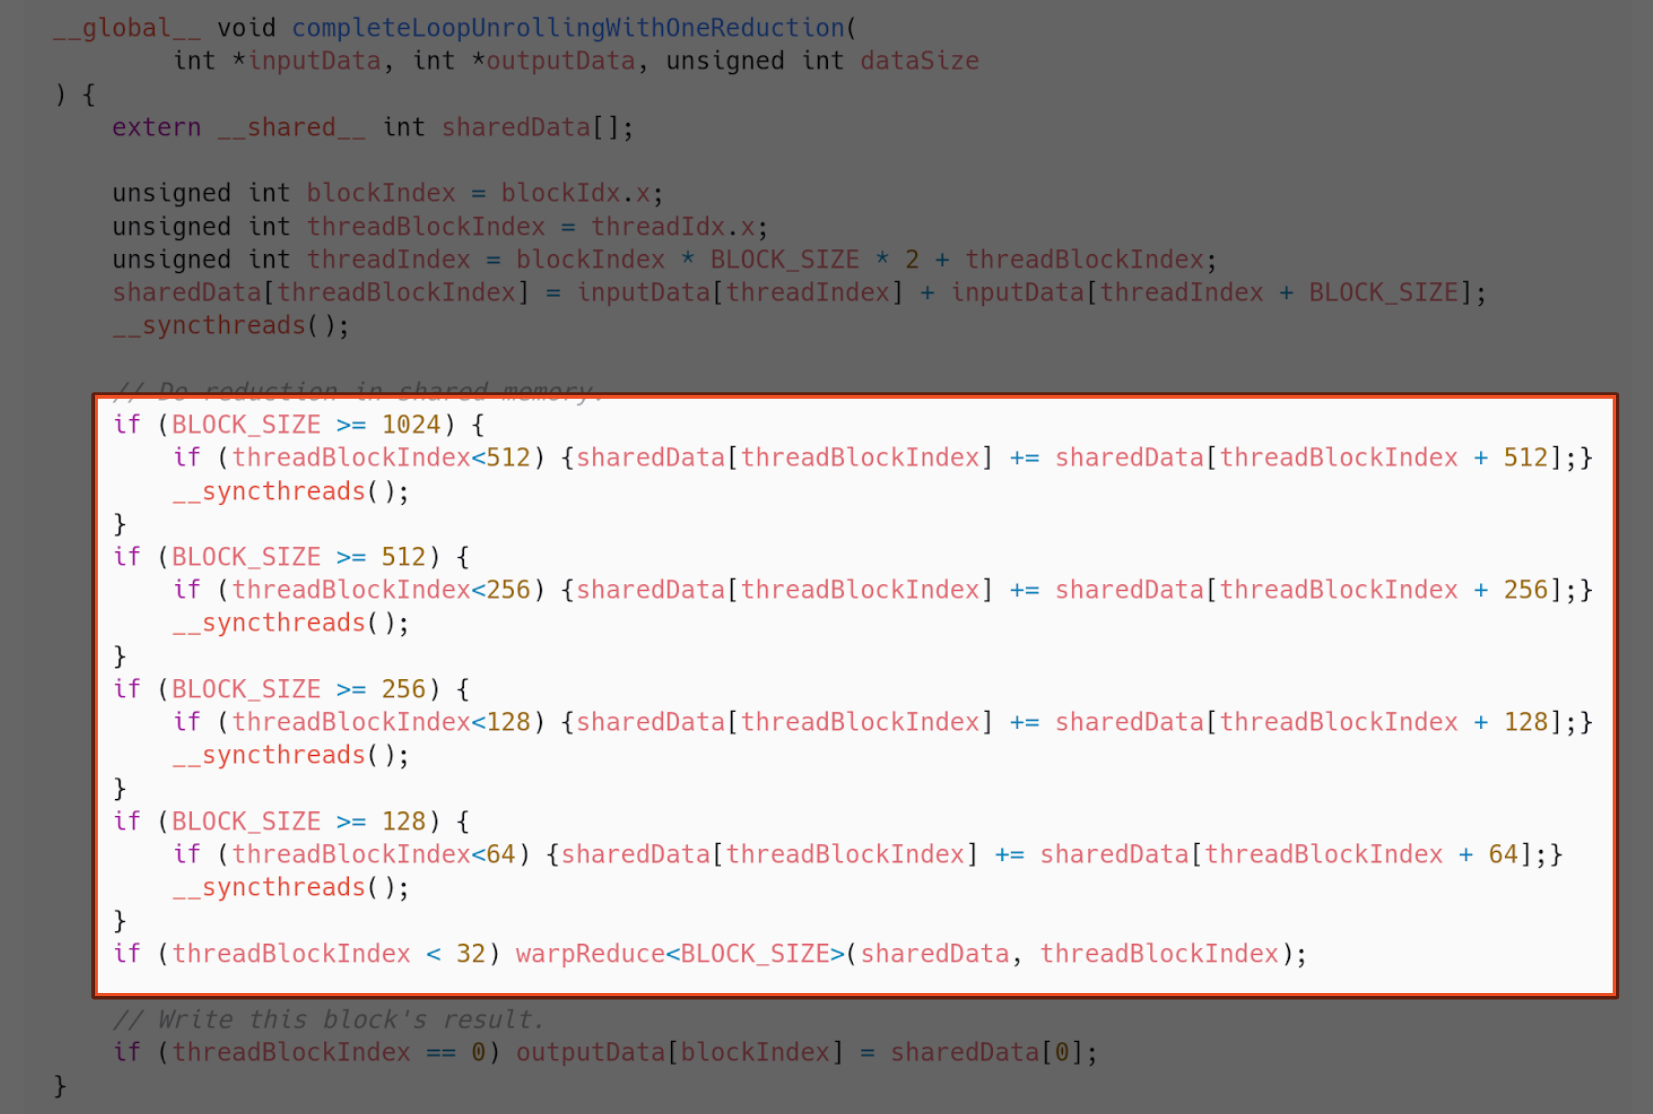
The comparison shows we managed to shave a little more time.
Implementation 10 - Reduce data to grid size
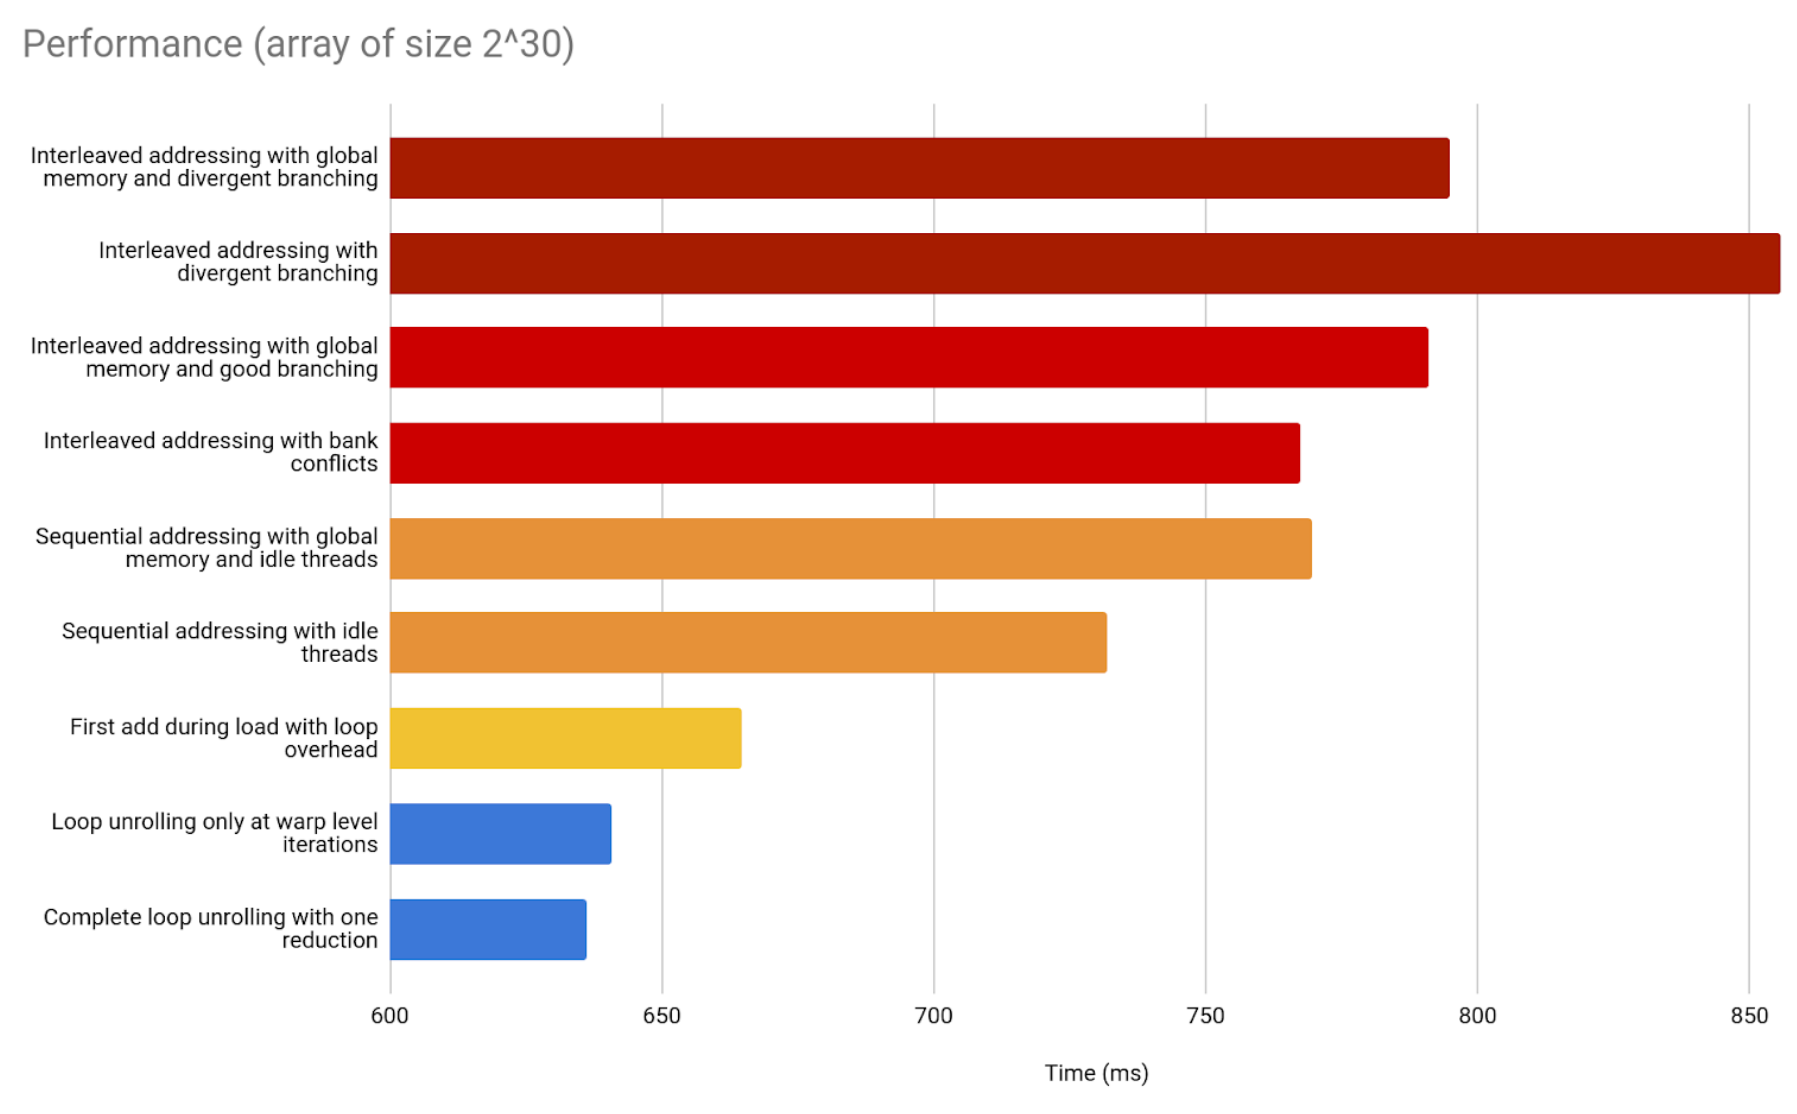
What if our problem size exceeds the amount of threads our CUDA device supports? What do we do about that? We can reduce our problem to be grid sized as soon as we begin parallelizing.
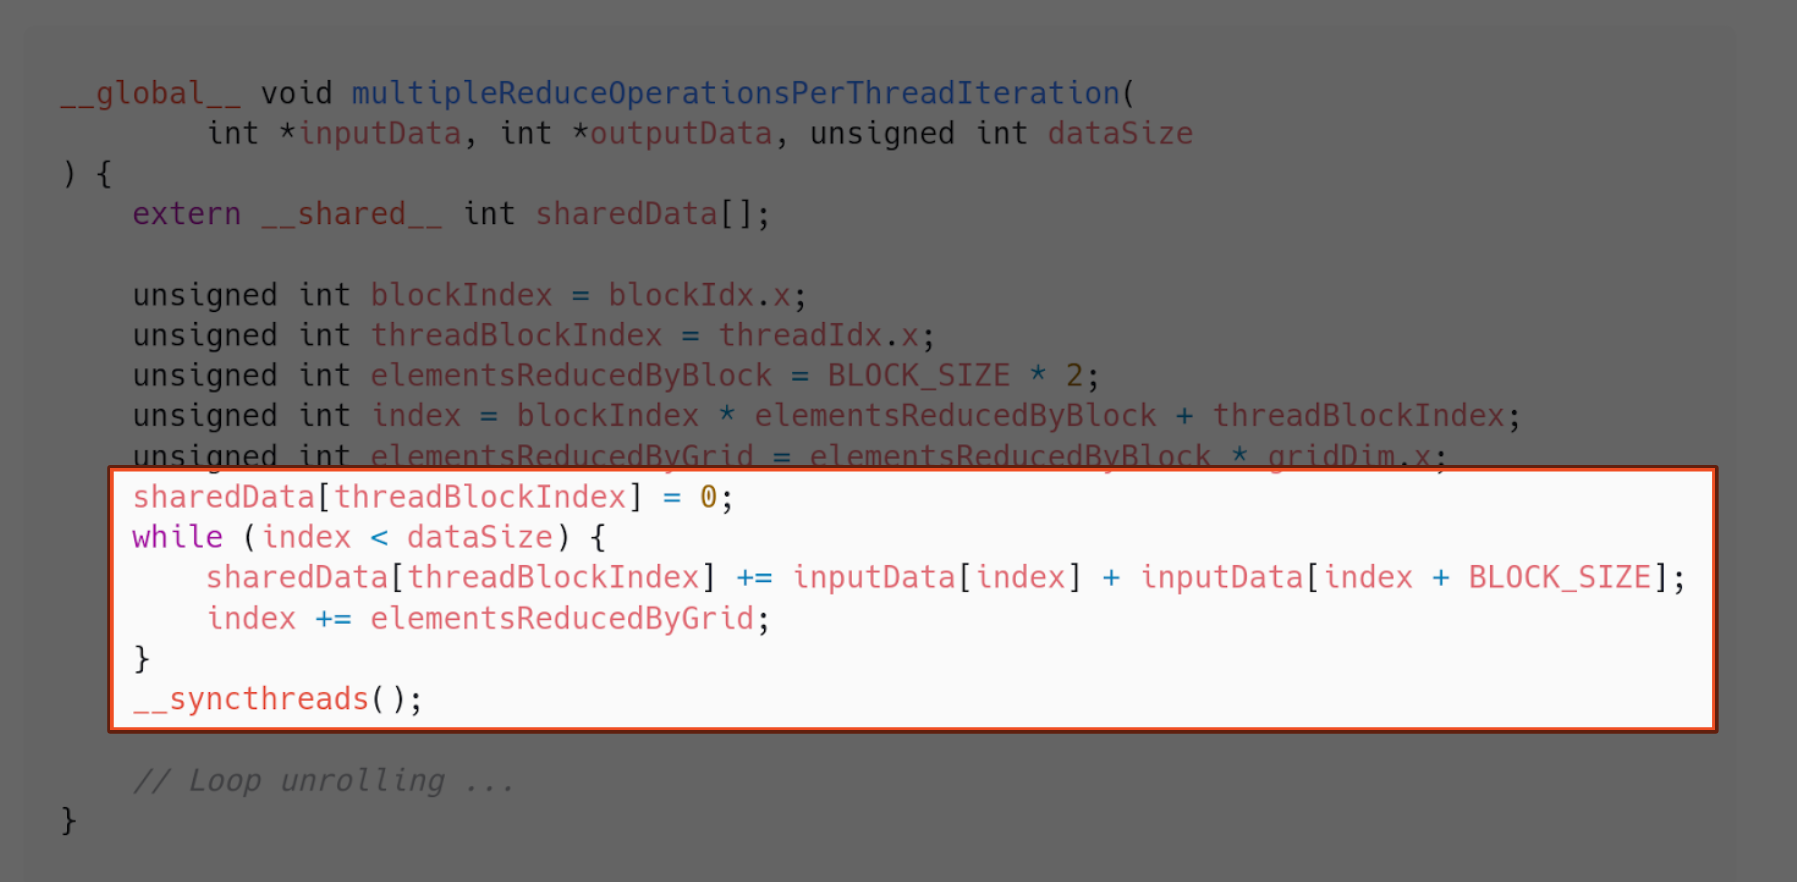
Say the grid size is $G$. As soon as we load our data to shared memory in the block, we can make threads add all the elements outside the first G elements of the array. That way, when the blocks start working, we know we have an array of size G.
This comes with three benefits:
- It can handle arrays bigger than the grid. The array is reduced to size G when loading the elements to shared memory.
- It provides maximum memory coalescing. We sum the array until it is reduced to size G by looping with a grid-stride. Therefore, memory access between warps is unit-stride every time. This means all accesses from threads in the same warp are going to be in consecutive addresses.
- It amortizes the of the creation and destruction of threads that comes from launching more than the grid size.
The following is an implementation of that approach:
And, when compared with the previous implementations, there is improvement!
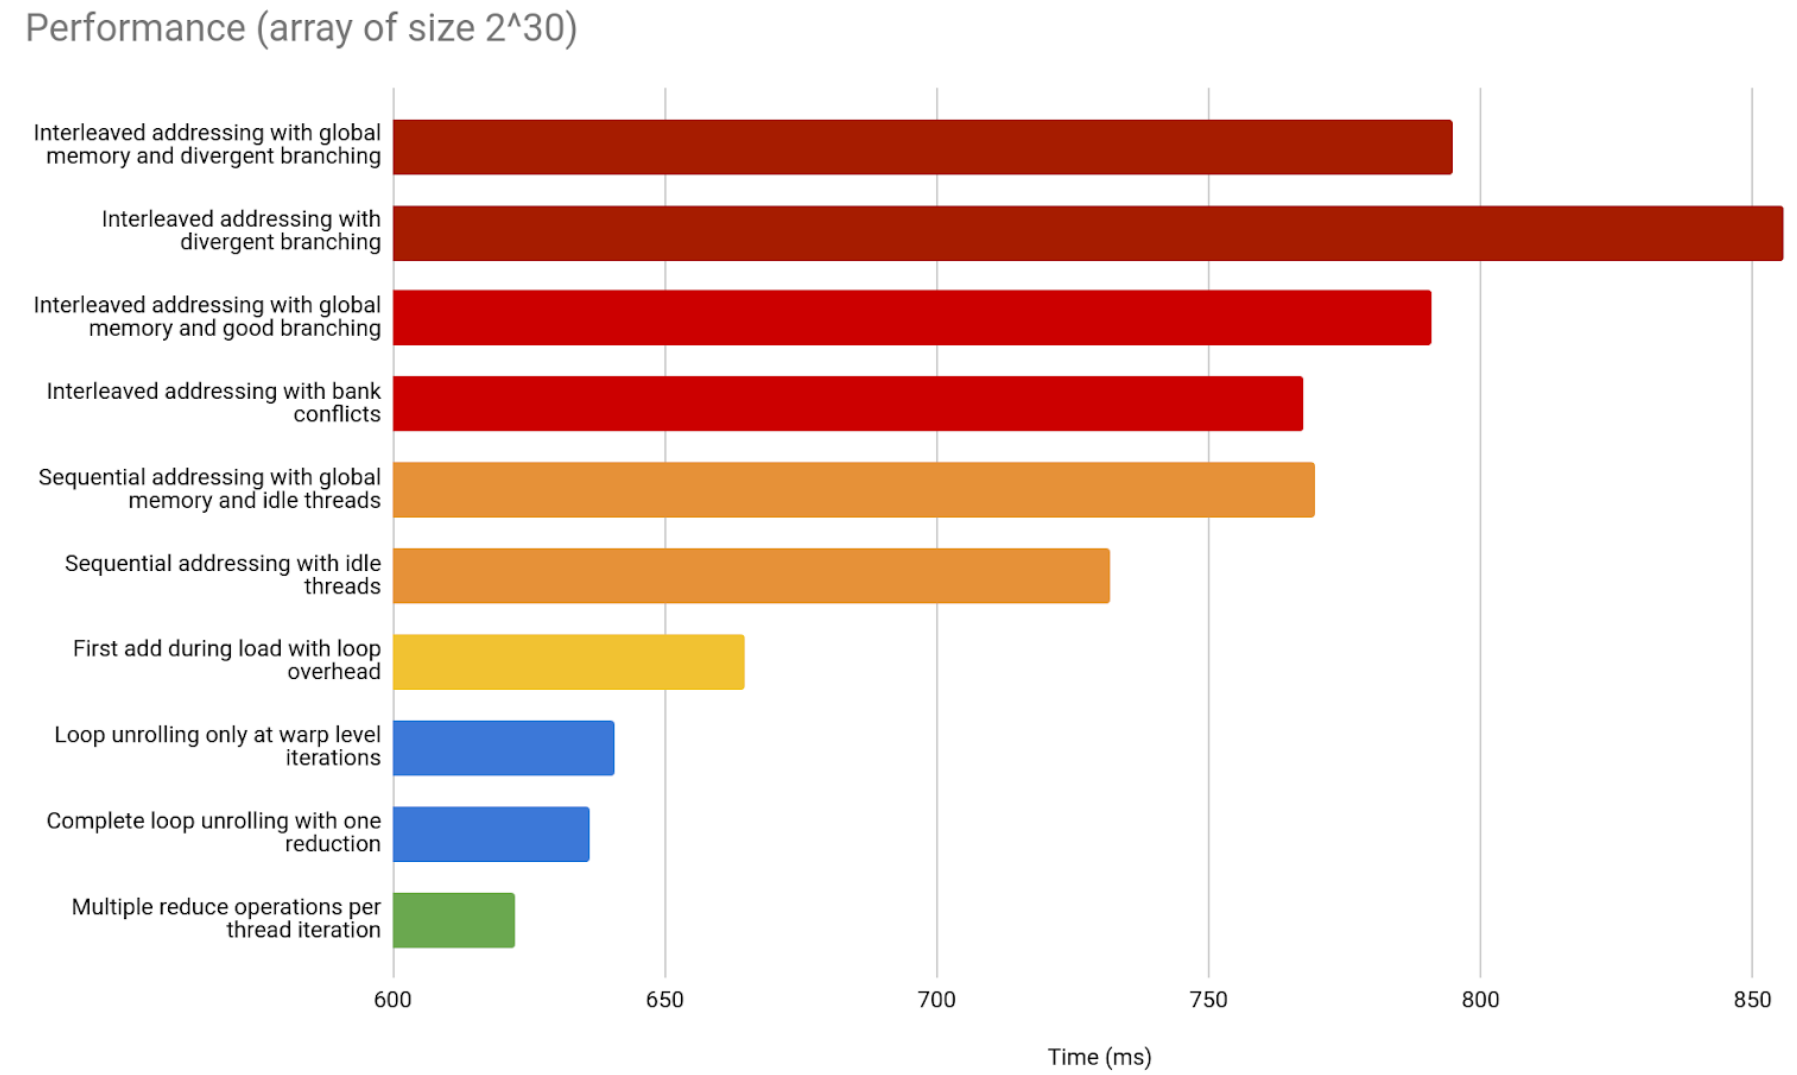
Remember that we only launch as many blocks as the grid size demands.
Note that this kind of implementation depends heavily on the architecture.
Implementation 11 - Operations with consecutive memory addressing
Interestingly, CUDA provides us with a way of speeding up basic arithmetic operations when the operands involved belong in consecutive memory addresses. They are called vector types. And this is how we can use them in our implementation:
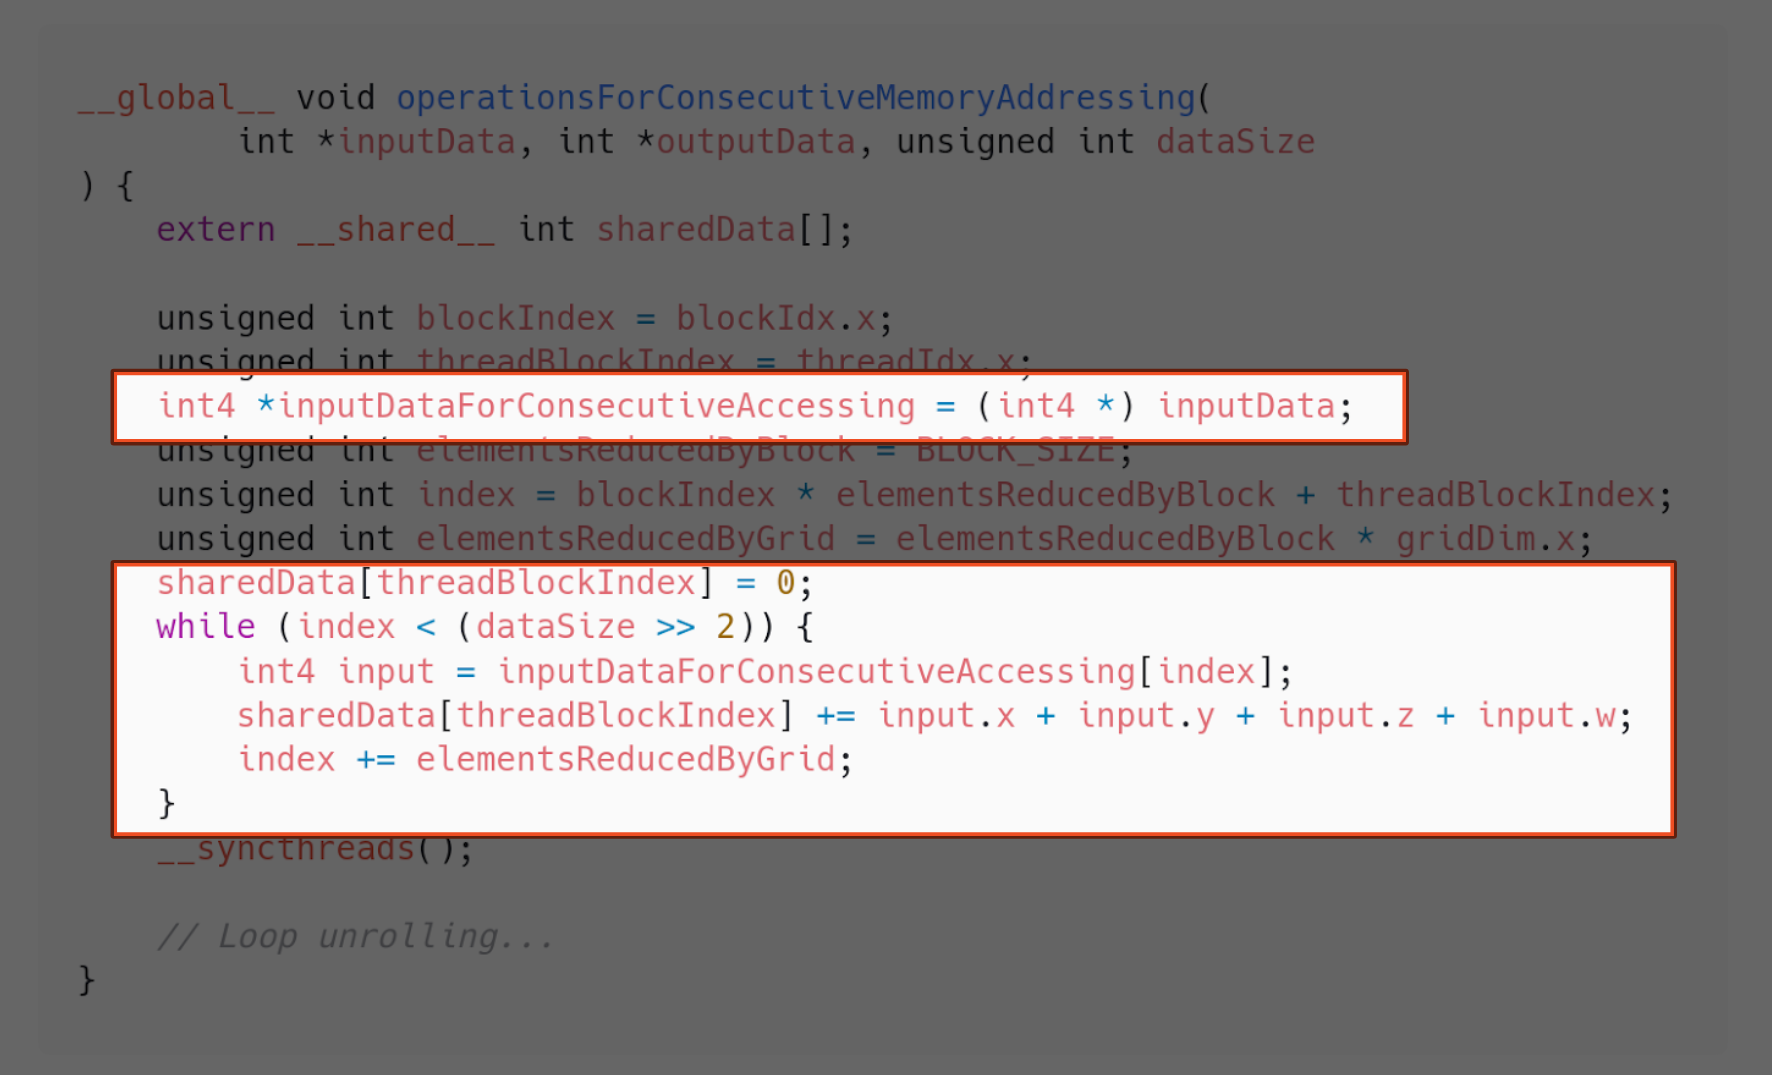
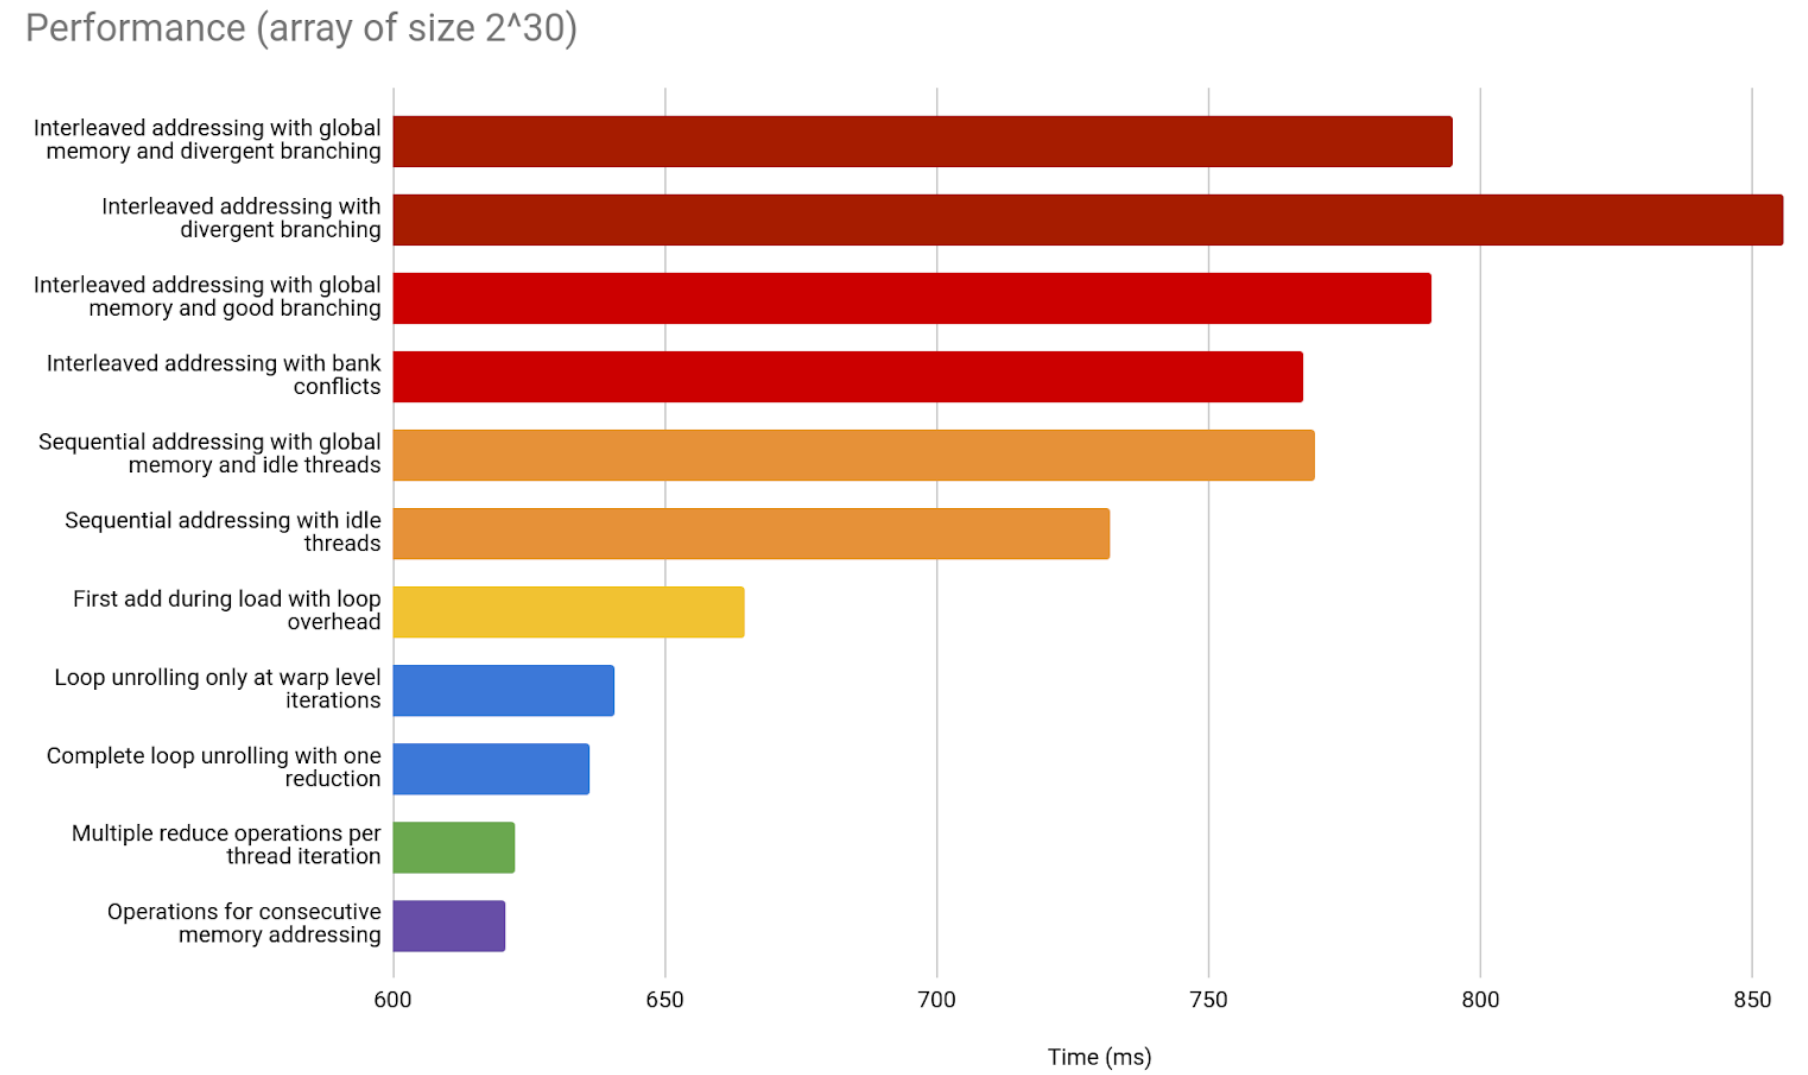
At this point and with this particular architecture, the difference this makes is not as significant as the ones that other steps have had. Once again, this varies between architecture versions.
Implementation 12 - Shuffle down inside warps
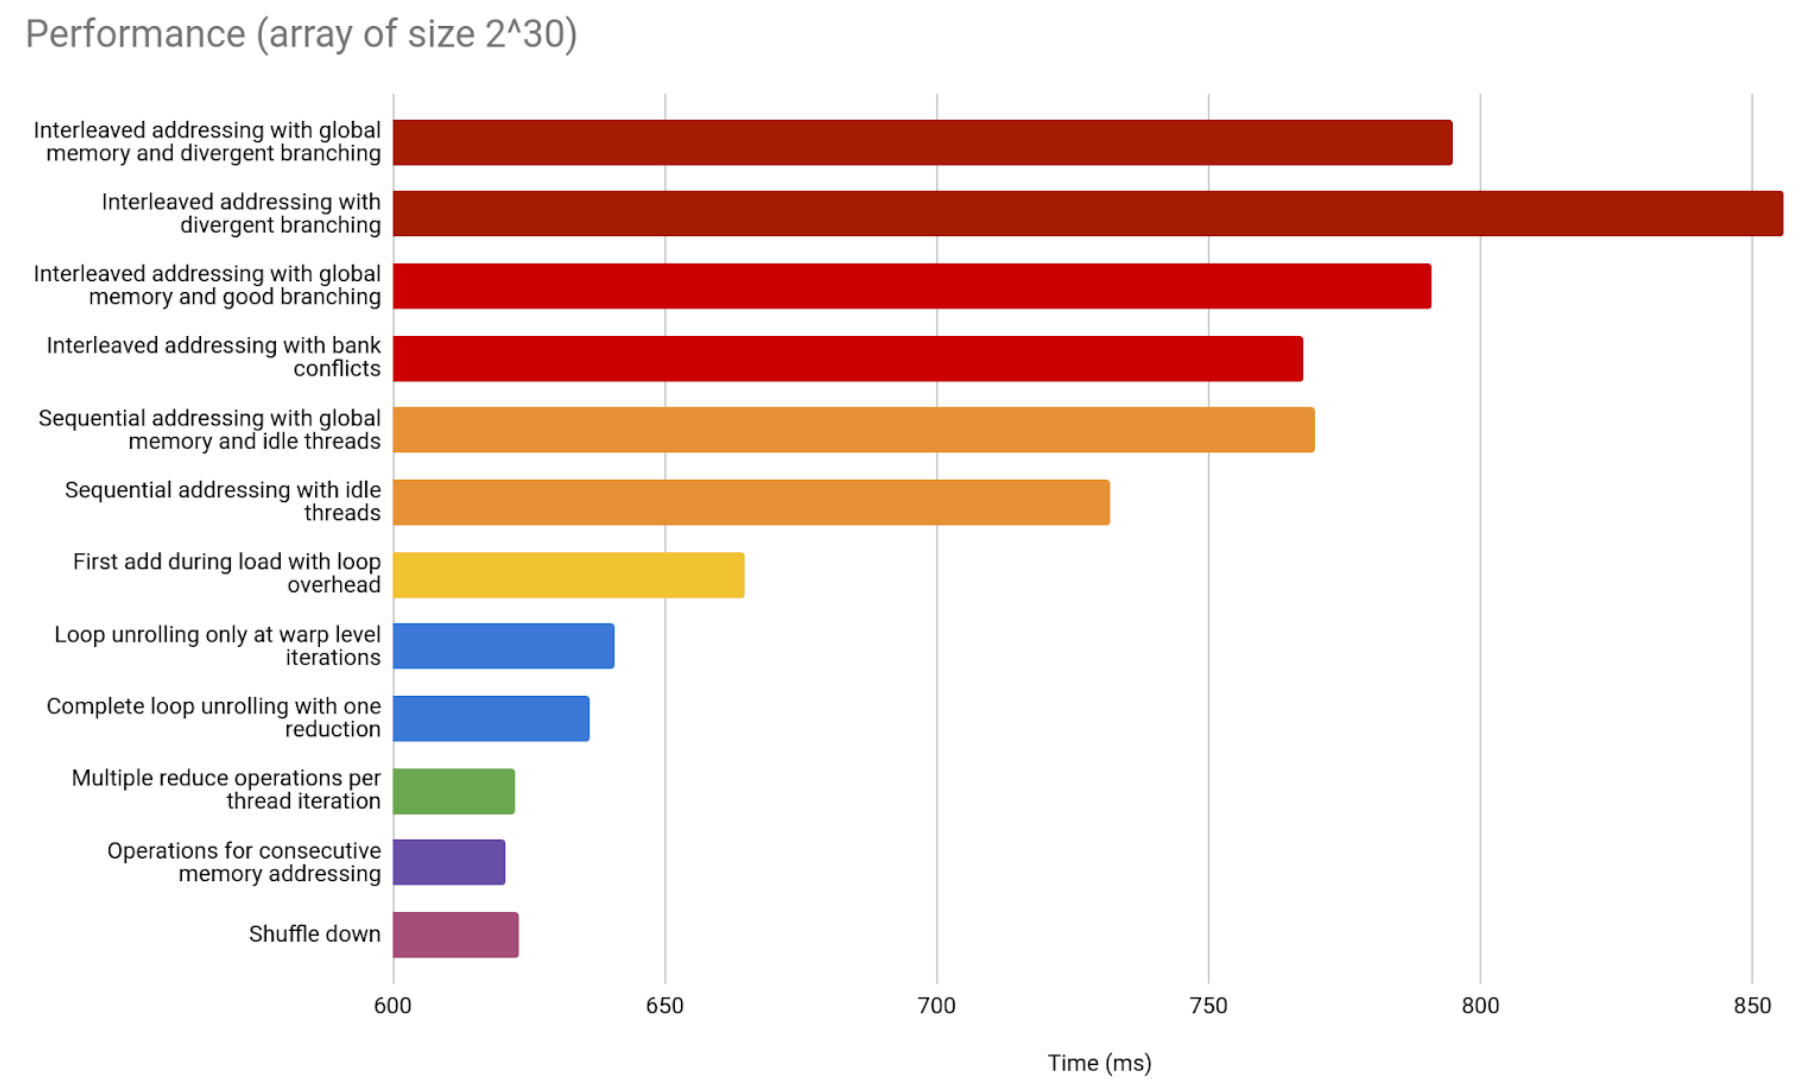
Threads in the same warp share register space. We are provided by CUDA with a way of using that to our advantage. Instead of loop unrolling, we loop through using this instruction.

Unfortunately, it looks like the loop unrolling is closer to optimality.
Implementation 13 - What if we used a library for this?
The age-old question. What if we used a library for this? Well, this is how you do that for a binary reduction in CUDA.

We will compare it against our implementations in the next section. In any case, we should note that the fact that there is a library available is only because the binary reduction is a common algorithm. It is widely used and probably used as one of the canonical examples of GPU parallelization. All examples given here are applicable to more specific algorithms which will most likely not have an implemented library ready for use.
Performance Comparisons
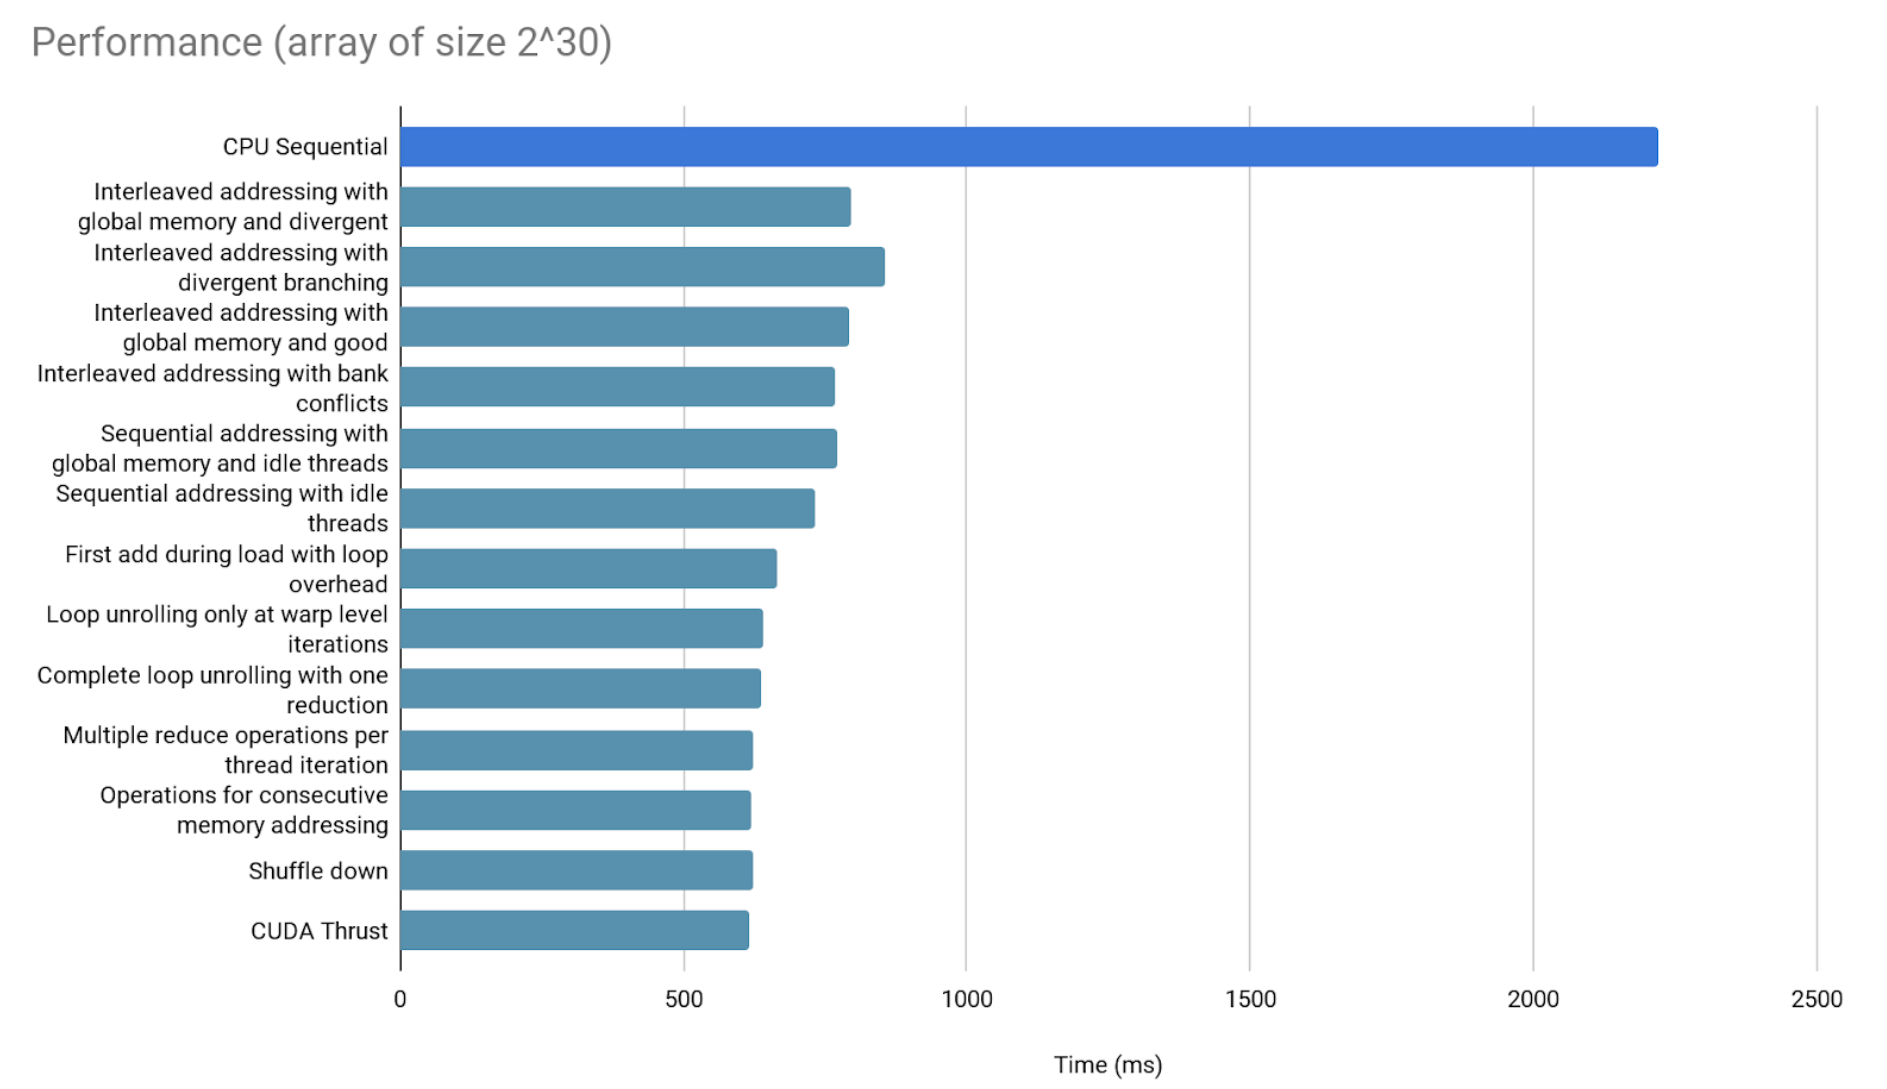
Including the sequential version, we managed to review 14 implementations of the binary reduction. How do they all fare against each other?
* All graph results were measured in a Dell Latitude 7490.
Comparisons For different thread sizes
The following are comparisons to showcase the parallelization in different thread sizes.
Starting with 2^10 elements.
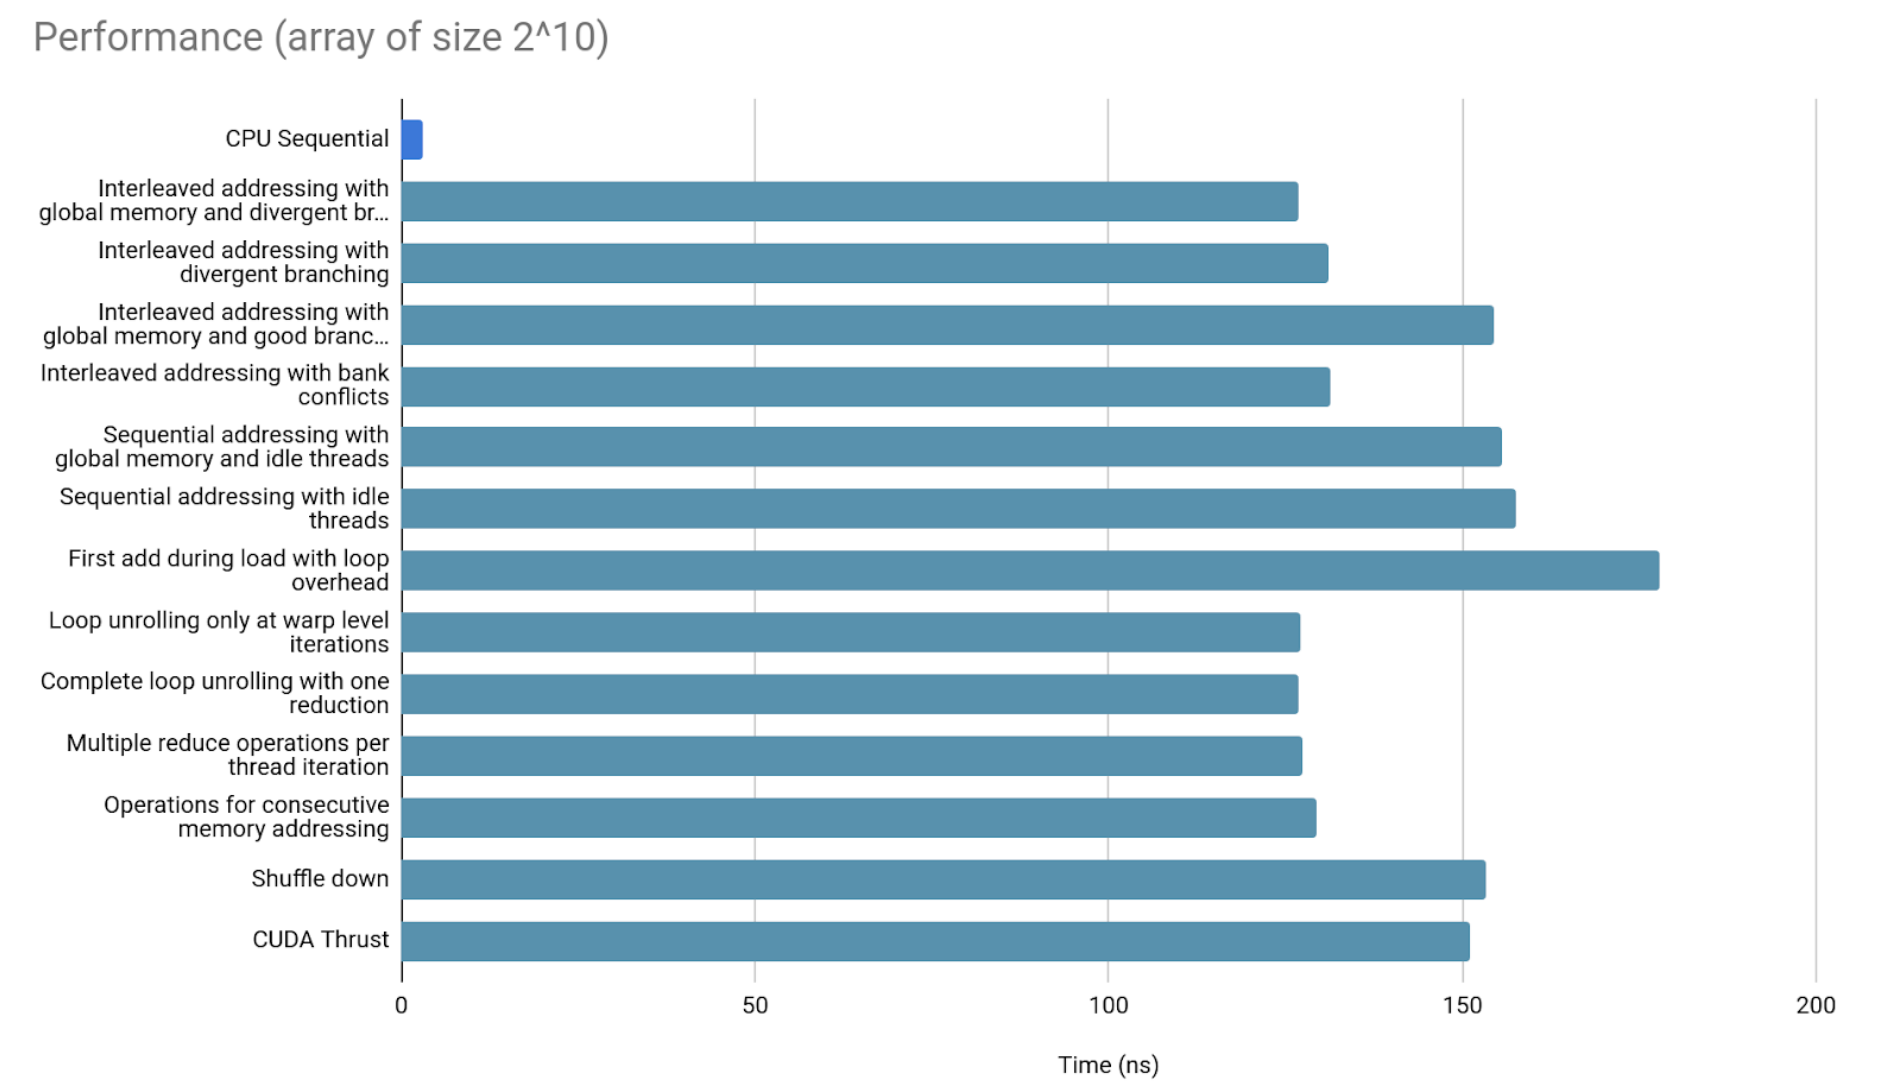
The overhead of copying data to and from GPU memory looks to be too large to warrant parallelization in such small arrays.
Now 2^20 elements.
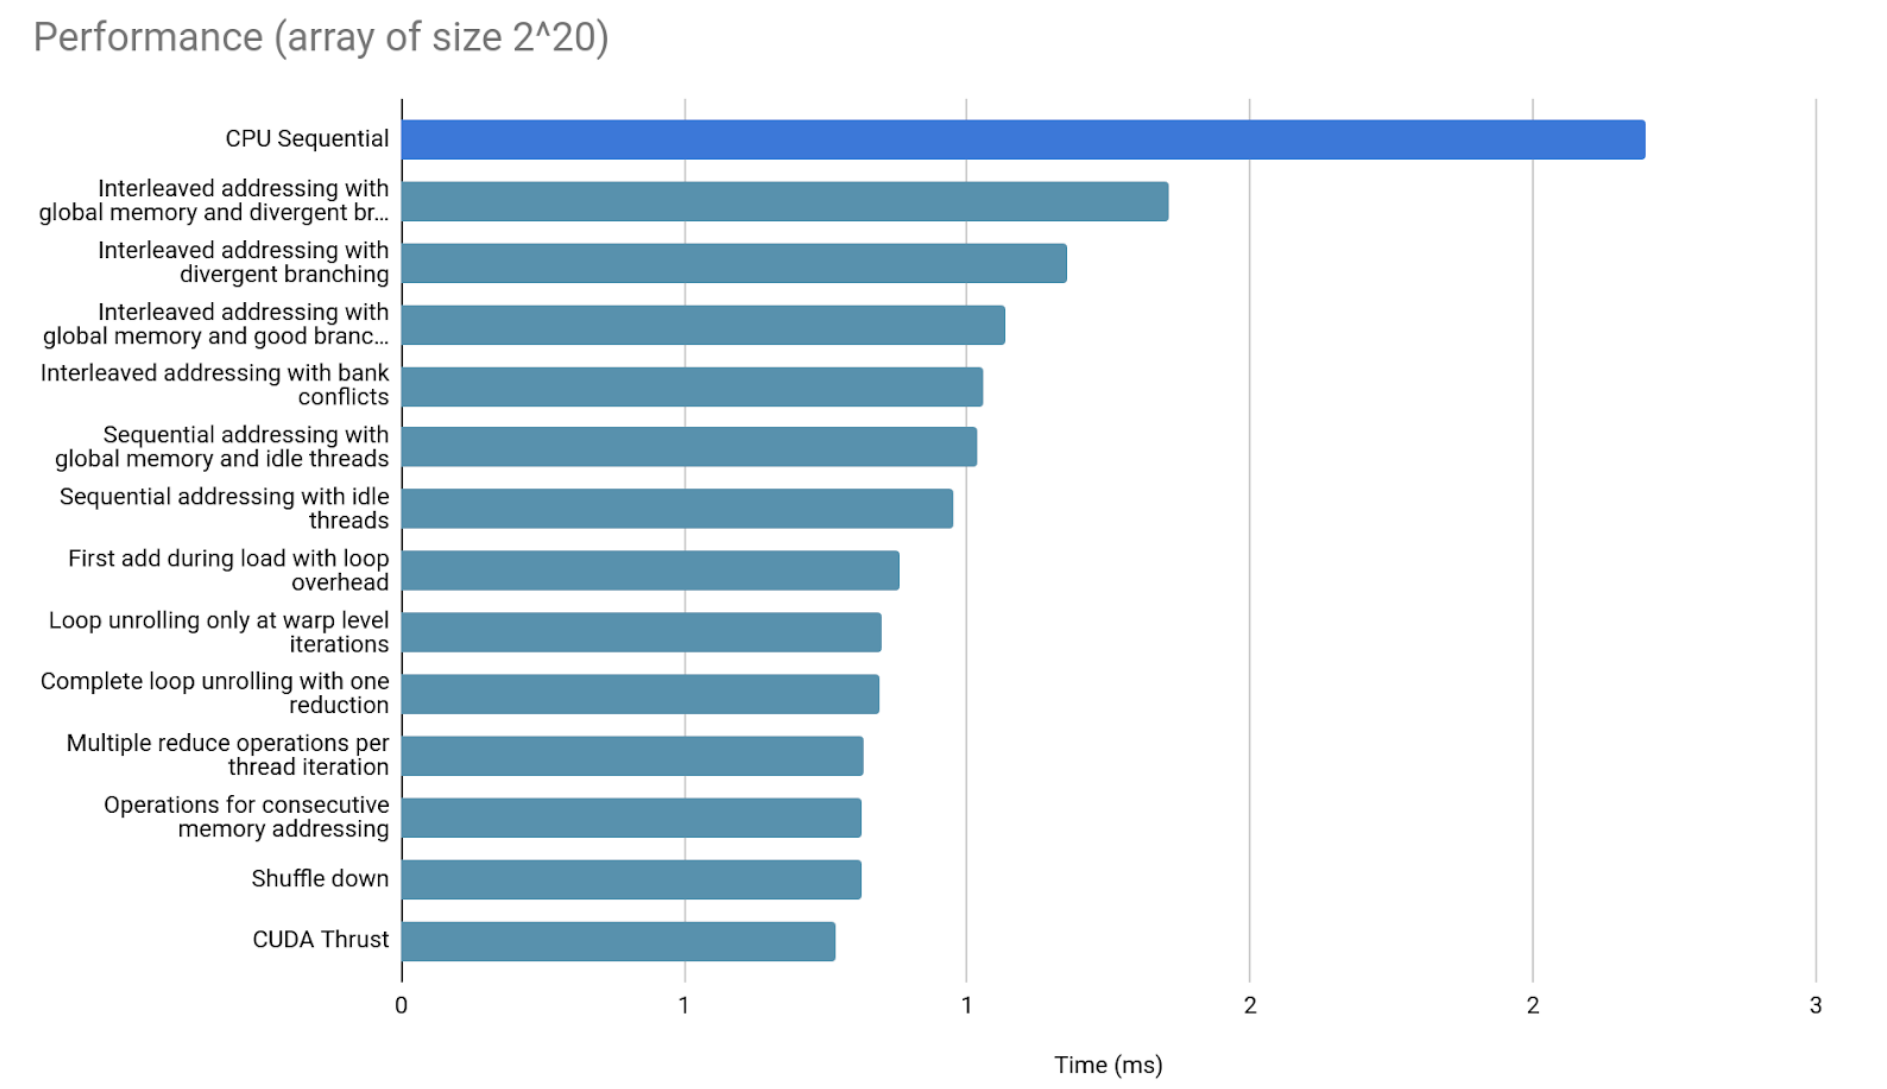
Significant differences are already showing up.
Finally, 2^30 elements.
A comment on GPU performance in the previous graphs
The previous bar graphs, just like every graph shown in this article, include the time it takes to copy data from CPU memory to GPU memory, and back after finishing the result.
This is important to clarify, since that overhead may not be in that proportion for all GPU optimizations. That overhead takes most of our measured time. However, some applications, that handle data over longer, multi-part workflows, can avoid it from overtaking every step of the process. Just by maintaining the data in the GPU memory, the performance will stop depending as much on it. It is recommended to copy data between CPU and GPU memory only at the start and at the end of the optimized workflow, to minimize this overhead’s impact.
Final comparison between all GPU implementations
Since the CPU implementation is taking over the previous bar graph, we now compare GPU implementations only.
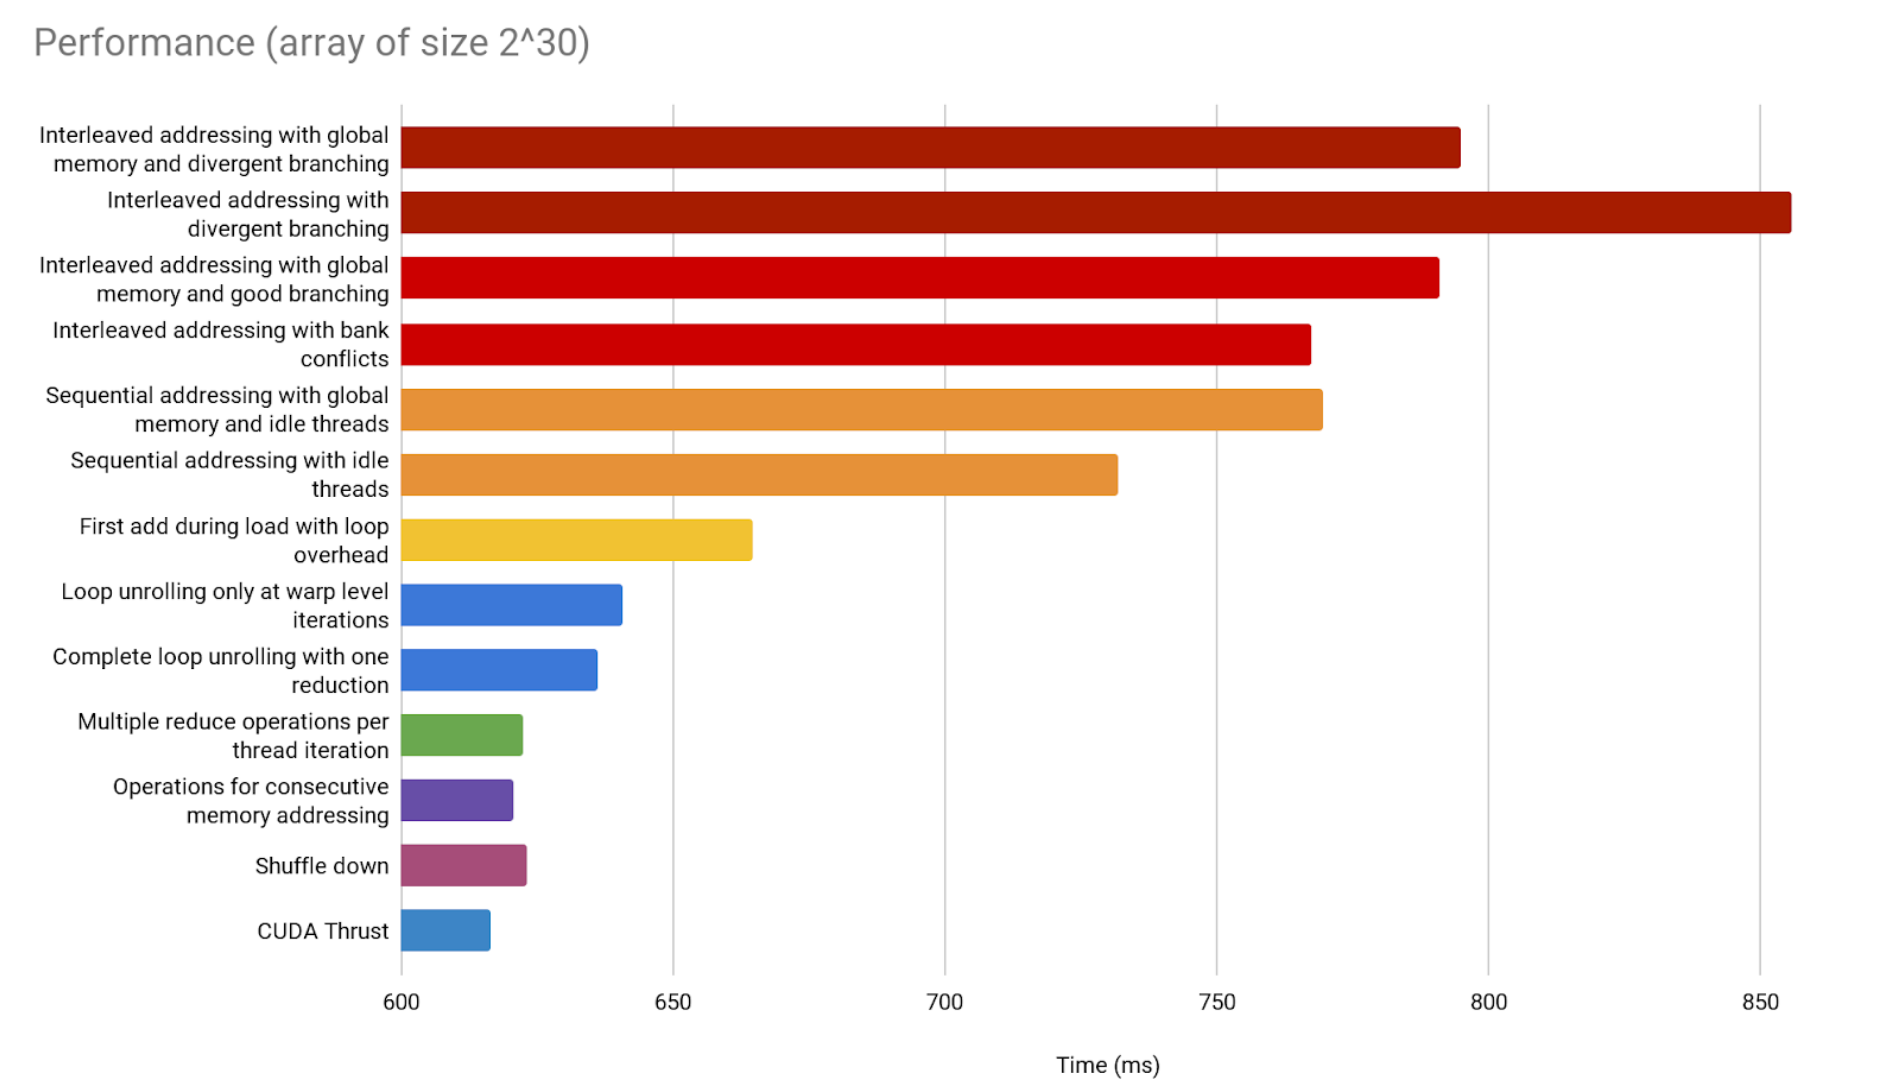
Thrust’s implementation seems to be the best, which is not surprising, coming from Nvidia. But notice the difference is not as big as it seems.
CUDA Thrust is an official library particularly optimized for stuff like binary reduction. The fact that we can get this close to its performance is a good sign. It proves the contents in this article are more than enough to help you understand and implement a GPU parallelization for your specific needs, without needing access to a library that solves it for you. What’s more, this parallelization won’t be far from optimality.
A comment on optimization and effort
It is worth noting that this kind of implementation is diving into diminishing returns territory. Moreover, the architecture may change with newer GPUs in a matter of two or three years at a time, and that may change the results of these optimizations as it has done with some of the cited sources. Even between concurrent GPU types, the results may heavily vary.
We are already orders of magnitude faster than the sequential implementation, and threading this delicately may need more maintenance to keep the performance and not be worth the effort. If it is, and every speck of speed must be squeezed, then benchmarking with GPUs of all types and budgets used to run the code is advised. This will be particularly important for code running in commodity hardware.
Conclusions
The main takeaways are:
- Some basic concepts and ideas behind CUDA and GPU parallelization.
- Each implementation’s performance will vary since GPU architectures differ and evolve.
- We got very similar results to an official library, so these contents should be more than enough to start parallelizing in GPU.
Sources and Resources
- GitHub: jarnesino/cuda-reduction-optimization
- CUDA by Example: An Introduction to General-Purpose GPU Programming
- Optimizing a Parallel Reduction (1) $\leftarrow$
- Optimizing a Parallel Reduction (2)
- Notas de Programación en CUDA
- Vector Types (1)
- Vector Types (2)
- Unified Memory
- Cooperative Groups
- Grid Stride Loops
- CUDA Accelerated Applications
- Stwo
- Stwo GPU
